Aurora Borealis Broomstick Lace Neckwarmer Free Pattern – Knitted Chunky Cowl
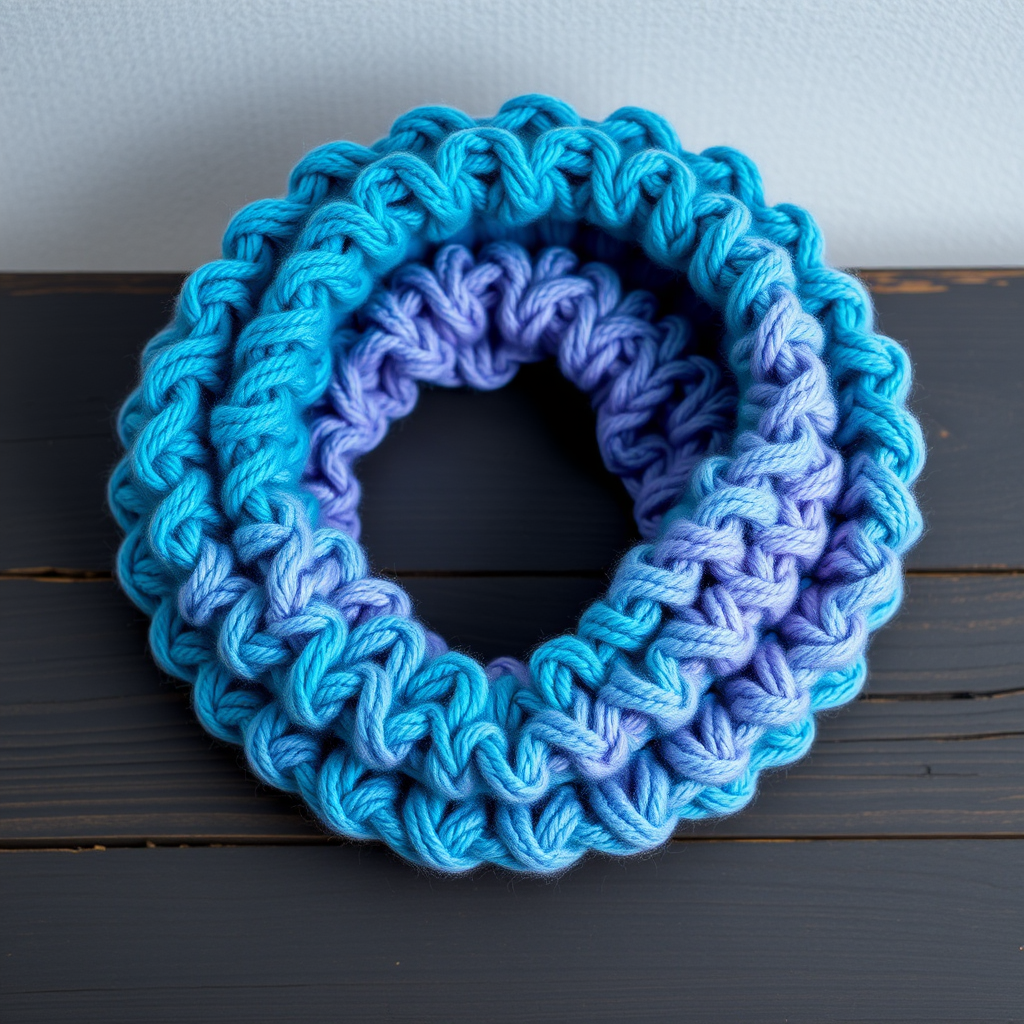
Aurora Borealis Broomstick Lace Neckwarmer: A Free Knitted Chunky Cowl Pattern
Wrap yourself in the swirling, ethereal beauty of the northern lights with this stunning, hand-knitted neckwarmer. The unique broomstick lace technique creates a dramatic, airy honeycomb texture that is both incredibly cozy and visually striking. This chunky cowl pattern is perfect for intermediate knitters looking to try something new, and the simplified flat construction makes it more approachable than traditional broomstick lace. Using a gorgeous gradient yarn that transitions from deep teal to lavender to soft pink, this piece becomes a wearable work of art. Let's dive into this free knitting pattern and create a winter accessory that will turn heads.
Materials Needed
Before you begin, gather the following supplies. This project comes together quickly with super bulky yarn, making it a satisfying weekend knit.
- Yarn: Super bulky weight yarn (size 6), approximately 180 yards. The sample shown uses a gradient yarn transitioning from deep teal to lavender to soft pink, but any super bulky yarn will work beautifully.
- Knitting Needles: US 15 (10 mm) knitting needles.
- Crochet Hook: US 15 (10 mm) crochet hook (for the bind-off and grouping rows).
- Broomstick or Large Needle: A large broomstick or a US 50 (25 mm) knitting needle for creating the broomstick loops. A smooth, cylindrical object works best.
- Other Tools: Tapestry needle for weaving in ends, scissors.
Gauge: 4 stitches and 5 rows = 4 inches in stockinette stitch (unblocked). Gauge is not critical for this project, but it will affect the final size of your cowl.
Step-by-Step Instructions
This pattern is worked flat and seamed at the end. The broomstick lace technique is simplified and worked in sections, making it easy to master. Follow these detailed instructions carefully, and you'll have a beautiful neckwarmer in no time.
Finished Size & Abbreviations
Finished Size: Approximately 24 inches in circumference and 10 inches tall (unstretched).
Abbreviations:
- CO: Cast on
- K: Knit
- P: Purl
- St(s): Stitch(es)
- BSL: Broomstick Lace (see special technique below)
- K2tog: Knit two stitches together
- BO: Bind off
Special Technique – Broomstick Lace (BSL)
This pattern uses a simplified broomstick lace technique worked flat. You will use a large knitting needle (or broomstick) to pull up loops, then crochet them together in groups. This creates the signature honeycomb-like openwork pattern.
Pattern Instructions
Step 1: Cast On and Base Row
CO 24 sts using the long-tail cast-on method.
- Row 1 (WS): Purl all sts.
- Row 2 (RS): Knit all sts.
- Repeat Rows 1-2 once more (so you have 4 rows total, ending with a WS row). This creates a solid base for your lace.
Step 2: Broomstick Lace Row (RS)
Row 5 (RS): This is where the magic happens.
- *K1, insert the right needle into the next st as if to knit.
- Wrap the yarn around the large broomstick needle (held in your left hand) instead of the knitting needle.
- Pull up a loop onto the broomstick. Slip the loop off the knitting needle onto the broomstick.*
- Repeat from * across all 24 sts. You will now have 24 loops on the broomstick. Do not turn your work.
Step 3: Crochet Grouping Row (WS)
With the WS facing you and the broomstick loops still on the large needle, it's time to group them.
- Insert the crochet hook into the first 4 loops on the broomstick (slide them off onto the hook).
- Yarn over with the working yarn and pull through all 4 loops on the hook. Chain 1 to secure.
- *Insert hook into the next 4 loops on the broomstick, yarn over, pull through all 4 loops, chain 1.*
- Repeat from * across until all loops are worked. You will have 6 groups of 4 loops. Turn your work.
Step 4: Knit Row (RS)
Row 6 (RS): Now we'll bring the stitch count back to 24.
- With the knitting needle, pick up and knit 1 st in each of the 6 chain spaces from the previous row. You should have 6 sts on your needle.
- Now, pick up and knit 3 additional sts evenly along the edge of the broomstick lace row (between the chain groups) to bring the total back to 24 sts.
- Alternative method: You can also pick up 4 sts in each chain space for a total of 24 sts – just ensure you have 24 sts on your needle.
Step 5: Repeat Broomstick Lace Rows
Repeat Steps 2-4 (Rows 5 and 6) until the piece measures approximately 24 inches from the cast-on edge, ending with a Broomstick Lace Row (Step 2). This will create the beautiful, repetitive lace pattern.
Step 6: Final Rows and Bind Off
To create a neat, finished edge that mirrors the bottom, work a few rows of stockinette.
- Work 4 rows of stockinette stitch (K on RS, P on WS).
- Bind off loosely on the RS using a crochet hook: Insert hook into first st, yarn over, pull through st and loop on hook (slip stitch bind off). Continue slip stitching across all sts.
- Fasten off and weave in ends.
Step 7: Finishing
The final steps will transform your flat piece into a wearable cowl.
- Block lightly by steaming or wet blocking to even out the lace and relax the yarn.
- Sew the short ends together using a mattress stitch or whip stitch to form a tube. This will be the back seam of your neckwarmer.
- Weave in all ends securely.
Your Aurora Borealis Broomstick Lace Neckwarmer is complete! The combination of the chunky yarn and the open lacework creates a piece that is both warm and breathable, perfect for chilly days. The gradient colors will mimic the dancing lights of the aurora, making this a truly special handmade gift or a luxurious treat for yourself.


