Argyle Diamond Row Log Gauge Swatch Free Pattern
Argyle Diamond Row Log Gauge Swatch — Free Beginner Crochet Pattern
Introduction
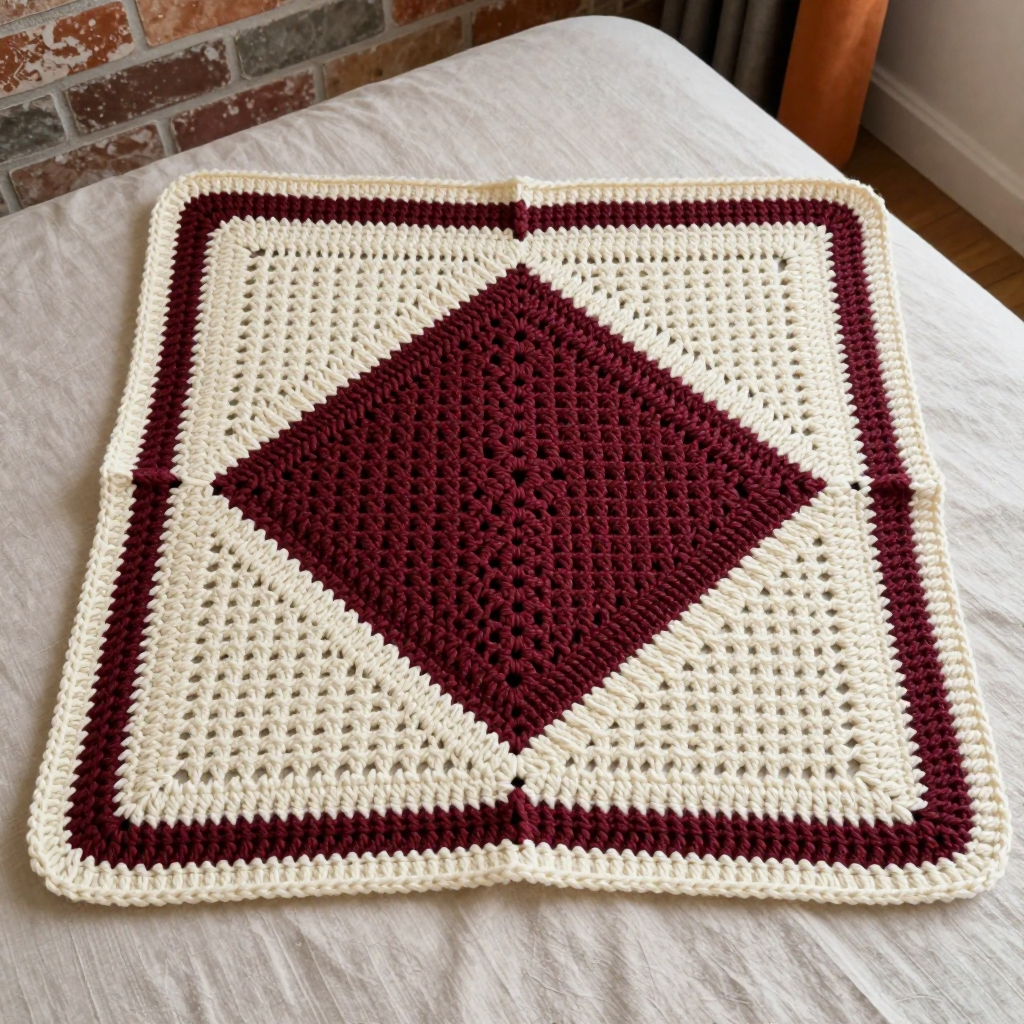
If you have ever wanted to try colorwork but felt nervous about it, this little swatch is the perfect first step. The Argyle Diamond Row Log Gauge Swatch is a preppy, 8-inch square worked flat in simple single crochet, featuring one big burgundy diamond on a cream background. What makes it special is the built-in "row log": cream border rows appear at Rows 1, 10, 20, 30, and 36, so you can count your rows at a glance without ever losing your place. It is ideal for complete beginners who want to practice holding two colors, changing colors neatly, and checking gauge — all in one small, satisfying project. When finished and blocked, it looks crisp and geometric, feels dense and sturdy, and doubles as a coaster, a washcloth, or the first square of a bigger blanket.
Materials Needed
- Yarn: Worsted weight (CYC #4) acrylic or cotton-blend yarn, approximately 60 yd (55 m) total — 35 yd (32 m) burgundy (Color A) and 25 yd (23 m) cream (Color B).
- Crochet hook: US H-8 (5.0 mm), or whatever size you need to match the gauge below.
- Stitch marker (optional, but helpful for marking border rows).
- Tapestry needle (a blunt, large-eyed needle) for weaving in ends.
- Scissors for cutting yarn.
- Finished size: 8 in (20 cm) wide x 8 in (20 cm) tall, including border rows. The swatch is 32 stitches wide and 36 rows tall.
Abbreviations and Beginner Glossary
- ch — chain. Make a loop of yarn on your hook, then pull the yarn through that loop. Each loop you pull through is one chain.
- sc — single crochet. Insert your hook into the stitch, pull up a loop (you now have 2 loops on the hook), yarn over (wrap yarn around the hook), and pull through both loops. One single crochet made.
- st / sts — stitch / stitches. A "stitch" is one completed unit of crochet in your fabric.
- sk — skip. Do not work into that stitch; move past it to the next one.
- A — Color A, the burgundy yarn.
- B — Color B, the cream yarn.
- Right side (RS) — the front, "pretty" side of your work that faces you.
- Wrong side (WS) — the back side of your work, where you carry the unused yarn.
- Turn — flip your work over so you can crochet back across the row you just finished.
- Fasten off — cut the yarn a few inches from your work, then pull the tail all the way through the last loop to lock it.
- Weave in ends — thread a yarn tail onto a tapestry needle and sew it back and forth through the fabric so it disappears and stays put.
- Block — dampen the finished piece and pin it to the correct measurements so it dries flat and even.
Gauge
16 sc x 18 rows = 4 in (10 cm) in single crochet after blocking.
Gauge means how many stitches and rows fit into a set measurement. It matters because it is how you know your finished swatch will actually be 8 inches square — if your stitches are too big, the square grows; too small, it shrinks. To check gauge, work a small practice square of about 20 stitches by 20 rows in single crochet, block it lightly, then lay a ruler across the middle and count how many stitches fit in 4 inches and how many rows fit in 4 inches. If you have more stitches than 16, your tension is tight — try a larger hook. If you have fewer, try a smaller hook. Always measure in the middle of the fabric, never at the edges.
Beginner Tips Before You Start
- Change colors on the last pull-through. When you finish the last stitch of the old color, pull the new color through to complete that stitch. This keeps the color change clean with no gap.
- Carry the unused color loosely. Let the resting yarn lie along the back of your work without pulling it tight, or the swatch will pucker and shrink.
- Use your cream border rows as landmarks. Every cream row (1, 10, 20, 30, 36) marks a tenth row — count from the nearest cream band instead of from the very beginning.
- Count your stitches at the end of every row. You should always have 32 stitches. Losing or adding one is the most common beginner mistake.
- Do not pull your yarn too tight. Keep an even, relaxed tension so the fabric stays soft and square.
- Keep both yarn balls on the same side of your work to avoid tangling, and untwist them every few rows.
Step-by-Step Instructions
Setup and Border Rows
Setup: With B (cream), ch 33.
Row 1 (border row, right side): Sc in the 2nd ch from hook and in each ch across, turn. (32 sc)
Row 2 (wrong side): Ch 1, sc in each st across, turn. (32 sc)
Diamond — Lower Half
Row 3: Ch 1, sc in first 8 sts with B, change to A, sc in next 16 sts with A, change to B, sc in last 8 sts with B, turn. (32 sc)
Row 4: Ch 1, sc in first 8 sts with B, sc in next 16 sts with A, sc in last 8 sts with B, turn. (32 sc)
Row 5: Ch 1, sc in first 9 sts with B, sc in next 14 sts with A, sc in last 9 sts with B, turn. (32 sc)
Row 6: Ch 1, sc in first 9 sts with B, sc in next 14 sts with A, sc in last 9 sts with B, turn. (32 sc)
Row 7: Ch 1, sc in first 10 sts with B, sc in next 12 sts with A, sc in last 10 sts with B, turn. (32 sc)
Row 8: Ch 1, sc in first 10 sts with B, sc in next 12 sts with A, sc in last 10 sts with B, turn. (32 sc)
Row 9: Ch 1, sc in first 11 sts with B, sc in next 10 sts with A, sc in last 11 sts with B, turn. (32 sc)
Row 10 (border row): Change to B for the entire row. Ch 1, sc in each st across, turn. (32 sc)
Row 11: Ch 1, sc in first 11 sts with B, sc in next 10 sts with A, sc in last 11 sts with B, turn. (32 sc)
Row 12: Ch 1, sc in first 12 sts with B, sc in next 8 sts with A, sc in last 12 sts with B, turn. (32 sc)
Row 13: Ch 1, sc in first 12 sts with B, sc in next 8 sts with A, sc in last 12 sts with B, turn. (32 sc)
Row 14: Ch 1, sc in first 13 sts with B, sc in next 6 sts with A, sc in last 13 sts with B, turn. (32 sc)
Row 15: Ch 1, sc in first 13 sts with B, sc in next 6 sts with A, sc in last 13 sts with B, turn. (32 sc)
Row 16: Ch 1, sc in first 14 sts with B, sc in next 4 sts with A, sc in last 14 sts with B, turn. (32 sc)
Row 17: Ch 1, sc in first 14 sts with B, sc in next 4 sts with A, sc in last 14 sts with B, turn. (32 sc)
Row 18: Ch 1, sc in first 15 sts with B, sc in next 2 sts with A, sc in last 15 sts with B, turn. (32 sc)
Row 19: Ch 1, sc in first 15 sts with B, sc in next 2 sts with A, sc in last 15 sts with B, turn. (32 sc)
Diamond — Center and Upper Half
Row 20 (border row): Change to B for the entire row. Ch 1, sc in each st across, turn. (32 sc)
Row 21: Ch 1, sc in first 15 sts with B, sc in next 2 sts with A, sc in last 15 sts with B, turn. (32 sc)
Row 22: Ch 1, sc in first 15 sts with B, sc in next 2 sts with A, sc in last 15 sts with B, turn. (32 sc)
Row 23: Ch 1, sc in first 14 sts with B, sc in next 4 sts with A, sc in last 14 sts with B, turn. (32 sc)
Row 24: Ch 1, sc in first 14 sts with B, sc in next 4 sts with A, sc in last 14 sts with B, turn. (32 sc)
Row 25: Ch 1, sc in first 13 sts with B, sc in next 6 sts with A, sc in last 13 sts with B, turn. (32 sc)
Row 26: Ch 1, sc in first 13 sts with B, sc in next 6 sts with A, sc in last 13 sts with B, turn. (32 sc)
Row 27: Ch 1, sc in first 12 sts with B, sc in next 8 sts with A, sc in last 12 sts with B, turn. (32 sc)
Row 28: Ch 1, sc in first 12 sts with B, sc in next 8 sts with A, sc in last 12 sts with B, turn. (32 sc)
Row 29: Ch 1, sc in first 11 sts with B, sc in next 10 sts with A, sc in last 11 sts with B, turn. (32 sc)
Row 30 (border row): Change to B for the entire row. Ch 1, sc in each st across, turn. (32 sc)
Row 31: Ch 1, sc in first 11 sts with B, sc in next 10 sts with A, sc in last 11 sts with B, turn. (32 sc)
Row 32: Ch 1, sc in first 10 sts with B, sc in next 12 sts with A, sc in last 10 sts with B, turn. (32 sc)
Row 33: Ch 1, sc in first 10 sts with B, sc in next 12 sts with A, sc in last 10 sts with B, turn. (32 sc)
Row 34: Ch 1, sc in first 9 sts with B, sc in next 14 sts with A, sc in last 9 sts with B, turn. (32 sc)
Row 35: Ch 1, sc in first 9 sts with B, sc in next 14 sts with A, sc in last 9 sts with B, turn. (32 sc)
Row 36 (border row): Change to B for the entire row. Ch 1, sc in each st across, turn. (32 sc) Do not fasten off yet — move to finishing.
Assembly and Finishing
Fasten off: Cut the yarn about 4 inches (10 cm) from your work, then pull the tail through the last loop and tug gently to lock it.
Weave in ends: Thread each tail onto your tapestry needle. Turn the swatch to the wrong side and sew the tail back and forth through the backs of several stitches in one direction, then reverse direction for a few more stitches. This "zigzag" hides the tail and stops it from working loose. Trim the excess close to the fabric. Do this for every tail, including the carried color ends.
Blocking: Lightly dampen the swatch with cool water (spray it or press it between damp towels — do not wring it). Lay it flat on a towel or blocking mat. Pin each corner and the middle of each edge so the piece measures exactly 8 in (20 cm) square, using a ruler to check. Let it dry completely, then remove the pins. Blocking squares up the corners, evens out the color changes, and lets you measure your true gauge.
Check your row log: Once dry, count your cream border rows — you should see five bands (Rows 1, 10, 20, 30, and 36). If you can see them clearly, your row counting worked perfectly.
Pro Tips and Variations
- Change the colors: Swap burgundy and cream for any two contrasting colors — navy and white, forest green and oatmeal, or pink and gray all look great. Just keep one light and one dark so the diamond stands out.
- Make it bigger or smaller: To resize, add or remove stitches in multiples of 2 and rows in multiples of 2, keeping the diamond centered. Keep the cream border rows every tenth row so your row log still works.
- Try a different yarn: Cotton makes a great washcloth; acrylic is soft and budget-friendly. If you change yarn weight, always re-check your gauge and adjust your hook size.
- Turn it into a project: Make several squares in different color combos and seam them together into a preppy patchwork blanket or a set of coasters.