Whispering Willow Wall Hanging Free Pattern – Textured Crochet Boho Decor
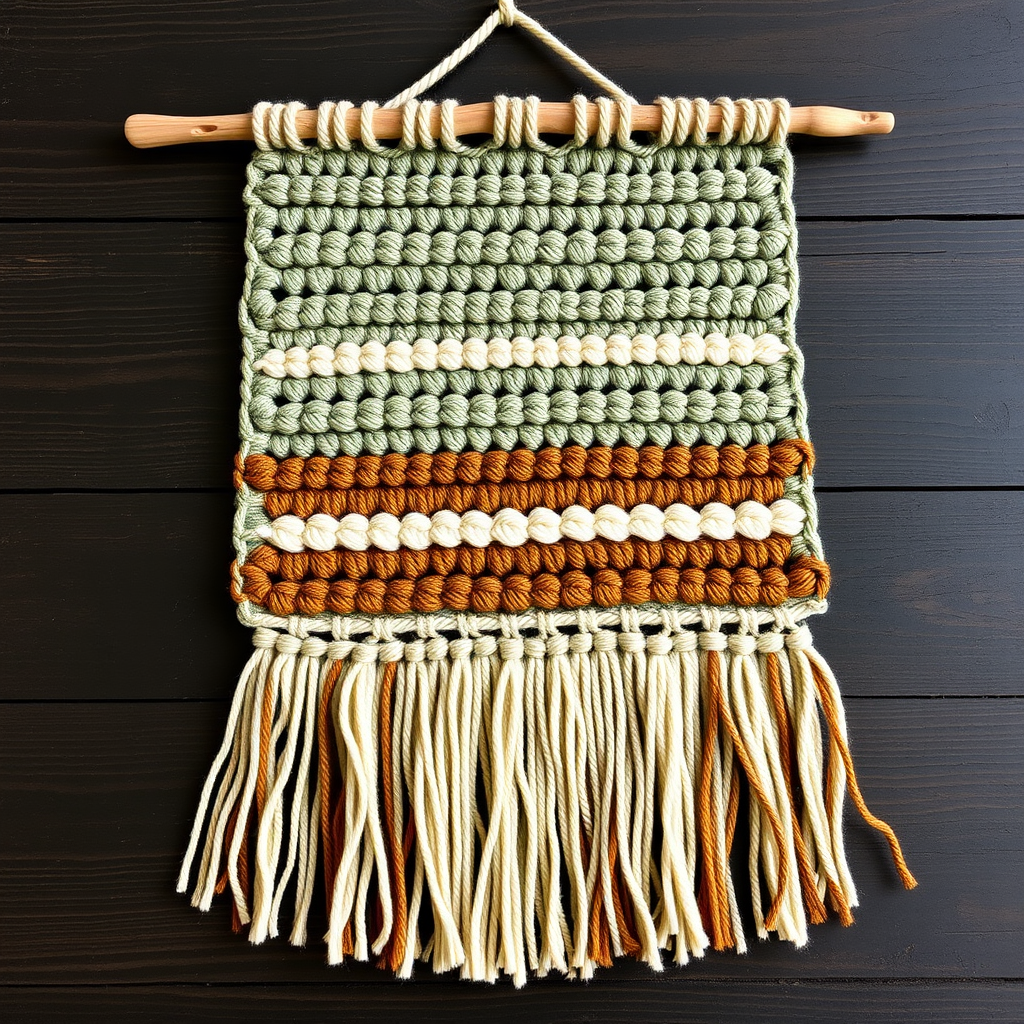
Whispering Willow Wall Hanging: A Beginner-Friendly Boho Crochet Pattern
Bring the serene beauty of a weeping willow into your home with this textured crochet wall hanging. Featuring cascading fringe, earthy tones, and a handcrafted bohemian aesthetic, this piece adds warmth and organic charm to any room. Whether you're a seasoned crocheter or just starting your yarn journey, this pattern is designed to be accessible, rewarding, and utterly beautiful. Let's create something magical together!
Why You'll Love This Pattern
This wall hanging is more than just decor—it's a statement. The combination of sage green, cream, and warm brown creates a calming, nature-inspired palette that complements any interior. The textured stitches and openwork spaces mimic the gentle movement of willow leaves, while the long fringe adds a touch of whimsy. Plus, it's a fantastic project for practicing your double crochet and color changes!
Materials Needed
Before we dive in, gather these supplies:
- Yarn: Worsted weight cotton yarn in three colors:
- Sage green (Yarn A) – approx. 100g
- Cream (Yarn B) – approx. 100g
- Warm brown (Yarn C) – approx. 100g
- Hook: 5.5mm crochet hook (US I-9)
- Wooden dowel or branch: Approximately 12 inches long
- Tapestry needle for weaving in ends
- Scissors
Gauge: 14 double crochet stitches x 8 rows = 4 inches. Don't stress about perfect gauge—this is a wall hanging, so slight variations add to the handmade charm!
Abbreviations
- ch: chain
- sc: single crochet
- dc: double crochet
- tr: treble crochet
- sl st: slip stitch
- st(s): stitch(es)
Step-by-Step Instructions
Getting Started: The Foundation
Row 1: With Yarn A (sage green), chain 26. Double crochet in the 4th chain from the hook and in each chain across. You should have 24 double crochet stitches. This forms your foundation row.
Row 2: Chain 3 (this counts as your first double crochet), turn your work. Double crochet in each stitch across. (24 dc)
Creating the First Textured Section
Row 3: Chain 3, turn. *Double crochet in the next 3 stitches, chain 2, skip 2 stitches, double crochet in the next 3 stitches; repeat from * across the row. You'll end with 18 double crochet stitches and 3 chain-2 spaces. These spaces will create beautiful openwork in your design.
Row 4: Chain 3, turn. *Double crochet in the next 3 stitches, work 2 double crochet into the chain-2 space, double crochet in the next 3 stitches; repeat from * across. This fills in the spaces, bringing you back to 24 double crochet stitches.
Row 5: Chain 3, turn. Double crochet in each stitch across. (24 dc) This solid row gives your piece stability.
Adding the Cream Stripe
Row 6: Switch to Yarn B (cream). Chain 3, turn. Double crochet in each stitch across. (24 dc) When changing colors, simply finish the last stitch of the previous row with the new color—pull the cream yarn through the last two loops of the final double crochet.
Row 7: Chain 3, turn. *Double crochet in the next 2 stitches, chain 3, skip 3 stitches, double crochet in the next 2 stitches; repeat from * across. You'll have 12 double crochet stitches and 3 chain-3 spaces. These larger spaces add variety to your texture.
Row 8: Chain 3, turn. *Double crochet in the next 2 stitches, work 3 double crochet into the chain-3 space, double crochet in the next 2 stitches; repeat from * across. (24 dc)
Row 9: Chain 3, turn. Double crochet in each stitch across. (24 dc)
Introducing the Warm Brown
Row 10: Switch to Yarn C (warm brown). Chain 3, turn. Double crochet in each stitch across. (24 dc)
Row 11: Chain 3, turn. *Double crochet in the next 4 stitches, chain 2, skip 2 stitches, double crochet in the next 4 stitches; repeat from * across. You'll have 16 double crochet stitches and 2 chain-2 spaces.
Row 12: Chain 3, turn. *Double crochet in the next 4 stitches, work 2 double crochet into the chain-2 space, double crochet in the next 4 stitches; repeat from * across. (24 dc)
Row 13: Chain 3, turn. Double crochet in each stitch across. (24 dc)
Returning to Sage Green
Row 14: Switch back to Yarn A (sage green). Chain 3, turn. Double crochet in each stitch across. (24 dc)
Row 15: Chain 3, turn. *Double crochet in the next 3 stitches, chain 3, skip 3 stitches, double crochet in the next 3 stitches; repeat from * across. (12 dc, 3 chain-3 spaces)
Row 16: Chain 3, turn. *Double crochet in the next 3 stitches, work 3 double crochet into the chain-3 space, double crochet in the next 3 stitches; repeat from * across. (24 dc)
Row 17: Chain 3, turn. Double crochet in each stitch across. (24 dc)
Final Cream Section
Row 18: Switch to Yarn B (cream). Chain 3, turn. Double crochet in each stitch across. (24 dc)
Row 19: Chain 3, turn. *Double crochet in the next 2 stitches, chain 2, skip 2 stitches, double crochet in the next 2 stitches; repeat from * across. (16 dc, 2 chain-2 spaces)
Row 20: Chain 3, turn. *Double crochet in the next 2 stitches, work 2 double crochet into the chain-2 space, double crochet in the next 2 stitches; repeat from * across. (24 dc)
Row 21: Chain 3, turn. Double crochet in each stitch across. (24 dc)
Warm Brown Finish
Row 22: Switch to Yarn C (warm brown). Chain 3, turn. Double crochet in each stitch across. (24 dc)
Row 23: Chain 3, turn. *Double crochet in the next 5 stitches, chain 2, skip 2 stitches, double crochet in the next 5 stitches; repeat from * across. (20 dc, 1 chain-2 space)
Row 24: Chain 3, turn. *Double crochet in the next 5 stitches, work 2 double crochet into the chain-2 space, double crochet in the next 5 stitches; repeat from * across. (24 dc)
Row 25: Chain 3, turn. Double crochet in each stitch across. (24 dc) Fasten off and weave in this end.
Adding the Cascading Fringe
Now for the fun part—the fringe that gives this wall hanging its signature willow-like flow!
- Cut strands of Yarn A, B, and C, each 12 inches long. You'll need about 24 fringe bundles total, so cut approximately 72 strands (24 bundles × 3 strands each).
- For each fringe bundle, take 3 strands (mix colors for a beautiful effect, or keep them uniform—it's your choice!).
- Fold the 3 strands in half to create a loop at the top.
- Insert your crochet hook through the bottom edge of the wall hanging, from front to back.
- Catch the folded loop with your hook and pull it through the fabric.
- Thread the loose ends of the strands through the loop and pull tight to secure.
- Space your fringe bundles evenly across the bottom edge, alternating colors for a dynamic, organic look.
Finishing Touches
- Weave in all remaining loose ends using your tapestry needle. Be sure to secure them well so they don't unravel over time.
- Slide the top edge of your crochet piece onto the wooden dowel or branch. The dowel should fit snugly—if it's a bit loose, you can fold the top edge over and stitch it in place.
- Create a hanging loop: Cut a 12-inch piece of yarn (any color), fold it in half, and tie the ends together to form a loop. Attach this loop to each end of the dowel by tying it securely.
- Give your wall hanging a gentle shake to let the fringe settle into its natural cascade.
Styling Your Whispering Willow
This piece looks stunning in a variety of settings:
- Hang it above a cozy reading nook
- Pair it with other boho decor in your living room
- Use it as a unique headboard accent in a bedroom
- Place it in an entryway to welcome guests with warmth
Tips for Success
- Count your stitches at the end of each row to ensure accuracy—it's much easier to fix a mistake early!
- Keep your tension consistent for a polished, professional look.
- Don't be afraid to customize—swap the colors to match your decor, or add more rows for a longer hanging.
- Block your work if desired: gently wet the piece, lay it flat, and pin it to size for perfectly straight edges.
Congratulations! You've just created a stunning, handcrafted piece of boho wall art. The Whispering Willow Wall Hanging is a testament to your creativity and skill. Hang it with pride, knowing you've brought a little bit of nature's serenity into your home—one stitch at a time.
Happy crocheting, and may your home be filled with handmade warmth and beauty!


