Whispering Willow Cocoon and Hat Set Free Pattern
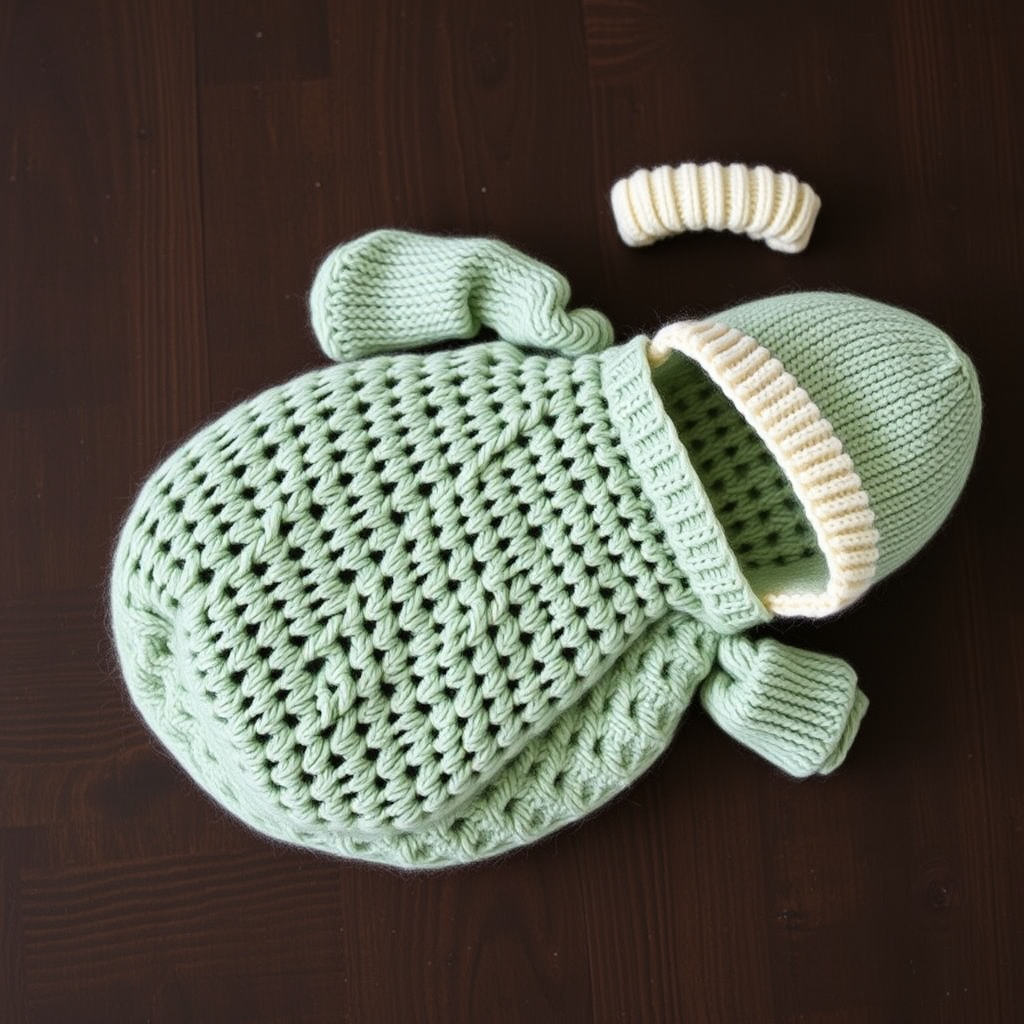
Whispering Willow Cocoon and Hat Set: A Beginner-Friendly Knitting Pattern
There is something truly magical about creating a handmade heirloom for a new arrival. The Whispering Willow Cocoon and Hat Set is designed to wrap your little one in the softest embrace, perfect for cozy autumn strolls or quiet afternoons at home. This pattern features a delicate lace stitch that creates a beautiful texture of eyelets and knit stitches, all in earthy sage green and cream tones. Despite its elegant appearance, this project is surprisingly approachable—even for beginners who have mastered the basics of knitting and are ready to try something new.
In this comprehensive guide, I'll walk you through every step, from gathering your materials to seaming the final stitch. By the end, you'll have a stunning, textured cocoon and matching hat that will be treasured for years to come.
Materials Needed
Before you begin, gather the following supplies. Having everything ready will make your knitting experience smooth and enjoyable.
Yarn
- Weight: Worsted weight (4) cotton or cotton-blend yarn
- Colors: Sage green and cream
- Total Yardage: Approximately 300g total (roughly 200g sage green for the cocoon and hat body, 100g cream for the hat brim and cocoon border)
Tip: Cotton or cotton-blend yarn is ideal for baby items because it's soft, breathable, and machine washable—a must for anything destined for a nursery.
Needles
- US 7 (4.5 mm) circular knitting needles (16-inch length) for the cocoon
- US 7 (4.5 mm) double-pointed needles (DPNs) for the hat
If you prefer, you can also use a 16-inch circular needle for the hat and switch to DPNs only when the stitches become too few for the circular needle.
Other Supplies
- Tapestry needle for weaving in ends and seaming
- Stitch markers (optional, but helpful for the hat decreases)
- Scissors
Gauge
20 stitches and 28 rows = 4 inches in stockinette stitch (knit on RS, purl on WS).
Always take time to knit a gauge swatch before starting. This ensures your finished cocoon and hat will be the correct size for a newborn. If your gauge is off, adjust your needle size accordingly—larger needles for fewer stitches per inch, smaller needles for more.
Step-by-Step Instructions
This pattern is worked in two parts: the cocoon (knitted flat and then seamed) and the hat (knitted in the round). Let's begin with the cocoon.
Part 1: The Cocoon
The cocoon is knitted flat in one piece, then seamed up the side. The lace pattern is simple and repetitive, making it easy to memorize.
Cast On and Garter Stitch Border
- With your sage green yarn and circular needles, cast on 80 stitches using the long-tail method.
- Row 1 (Right Side): Knit all stitches.
- Row 2 (Wrong Side): Purl all stitches.
- Repeat Rows 1 and 2 until the piece measures 2 inches from the cast-on edge. This creates a neat garter stitch border at the top of the cocoon. End with a wrong-side row.
Begin the Lace Pattern
Now we'll introduce the delicate lace stitch that gives this cocoon its name. The pattern is a 4-row repeat.
- Row 3 (RS): K4, *yo, k2tog, k4; repeat from * to the last 4 stitches, K4.
- Row 4 (WS): Purl all stitches.
- Row 5 (RS): Knit all stitches.
- Row 6 (WS): Purl all stitches.
Understanding the lace pattern: The "yo" (yarn over) creates a small eyelet hole, and the "k2tog" (knit two together) decreases one stitch to keep the stitch count even. This combination creates a beautiful, airy texture that's both elegant and breathable for baby.
Repeat Rows 3-6 until the piece measures 12 inches from the cast-on edge, ending with a wrong-side row (Row 4 or 6).
Shape the Bottom
Now we'll decrease to create the rounded bottom of the cocoon.
- Row 1 (RS): K2tog across the row. You will have 40 stitches remaining.
- Row 2 (WS): Purl all stitches.
- Row 3 (RS): K2tog across the row. You will have 20 stitches remaining.
Cut your yarn, leaving a long tail (at least 12 inches). Thread the tail through a tapestry needle, then pass the needle through all 20 remaining stitches on your knitting needle. Slide the stitches off the needle, pull the yarn tight to gather the bottom, and secure with a few small stitches.
Seam the Cocoon
- Fold the cocoon in half with the right sides together, matching the cast-on edges.
- Using the mattress stitch technique, seam the side edges together from the bottom gathered edge up to the top. Leave the top open—this is where baby goes in!
- Weave in all loose ends with your tapestry needle.
Mattress stitch quick guide: Working from the wrong side, insert the needle under the horizontal bar between the first and second stitches on one side, then under the corresponding bar on the other side. Alternate sides, pulling gently to close the seam. This creates an invisible, professional-looking seam.
Part 2: The Hat
The matching hat is knitted in the round, starting with a cream ribbed brim and finishing with a sage green crown.
Cast On and Ribbing
- With your cream yarn and double-pointed needles, cast on 60 stitches. Distribute them evenly across three or four needles (20 stitches per needle if using three).
- Join in the round, being very careful not to twist your stitches. Place a stitch marker to mark the beginning of the round.
- Work k1, p1 ribbing for 1 inch. This creates a stretchy, snug brim that will keep baby's ears warm.
Knit the Body
- Switch to your sage green yarn.
- Knit every round in stockinette stitch (knit all stitches) for 2 inches.
Shape the Crown
Now we'll decrease to shape the top of the hat. The decreases are worked in a specific pattern, with a plain knit round between each decrease round.
- Round 1 (Decrease): *K8, k2tog; repeat from * to end of round. You will have 54 stitches.
- Round 2: Knit all stitches.
- Round 3 (Decrease): *K7, k2tog; repeat from * to end. You will have 48 stitches.
- Round 4: Knit all stitches.
- Round 5 (Decrease): *K6, k2tog; repeat from * to end. You will have 42 stitches.
- Round 6: Knit all stitches.
- Round 7 (Decrease): *K5, k2tog; repeat from * to end. You will have 36 stitches.
- Round 8: Knit all stitches.
- Round 9 (Decrease): *K4, k2tog; repeat from * to end. You will have 30 stitches.
- Round 10: Knit all stitches.
- Round 11 (Decrease): *K3, k2tog; repeat from * to end. You will have 24 stitches.
- Round 12: Knit all stitches.
- Round 13 (Decrease): *K2, k2tog; repeat from * to end. You will have 18 stitches.
- Round 14: Knit all stitches.
- Round 15 (Decrease): *K1, k2tog; repeat from * to end. You will have 12 stitches.
Cut your yarn, leaving a long tail. Thread the tail through a tapestry needle and pass it through the remaining 12 stitches. Pull tight to close the top of the hat, and secure with a few stitches.
Finishing
- Weave in all loose ends on the inside of the hat using your tapestry needle.
- Gently block the hat and cocoon if desired, following the care instructions on your yarn label.
Final Thoughts
Your Whispering Willow Cocoon and Hat Set is now complete! The combination of the delicate lace pattern, the earthy sage green, and the crisp cream border creates a timeless piece that looks like it came from a boutique—but it's made with your own hands, which makes it infinitely more special.
This set makes a beautiful gift for a baby shower or a lovely addition to your own nursery. The lace stitch is simple enough for beginners to master, yet the finished result looks intricate and professional. As you knit, remember that every stitch is a wish for warmth, comfort, and love for the little one who will wear it.
Happy knitting, and enjoy watching your Whispering Willow set come to life!



