Whispering Pines Forest Floor Rug Free Pattern – Textured Knitted Oval Rug
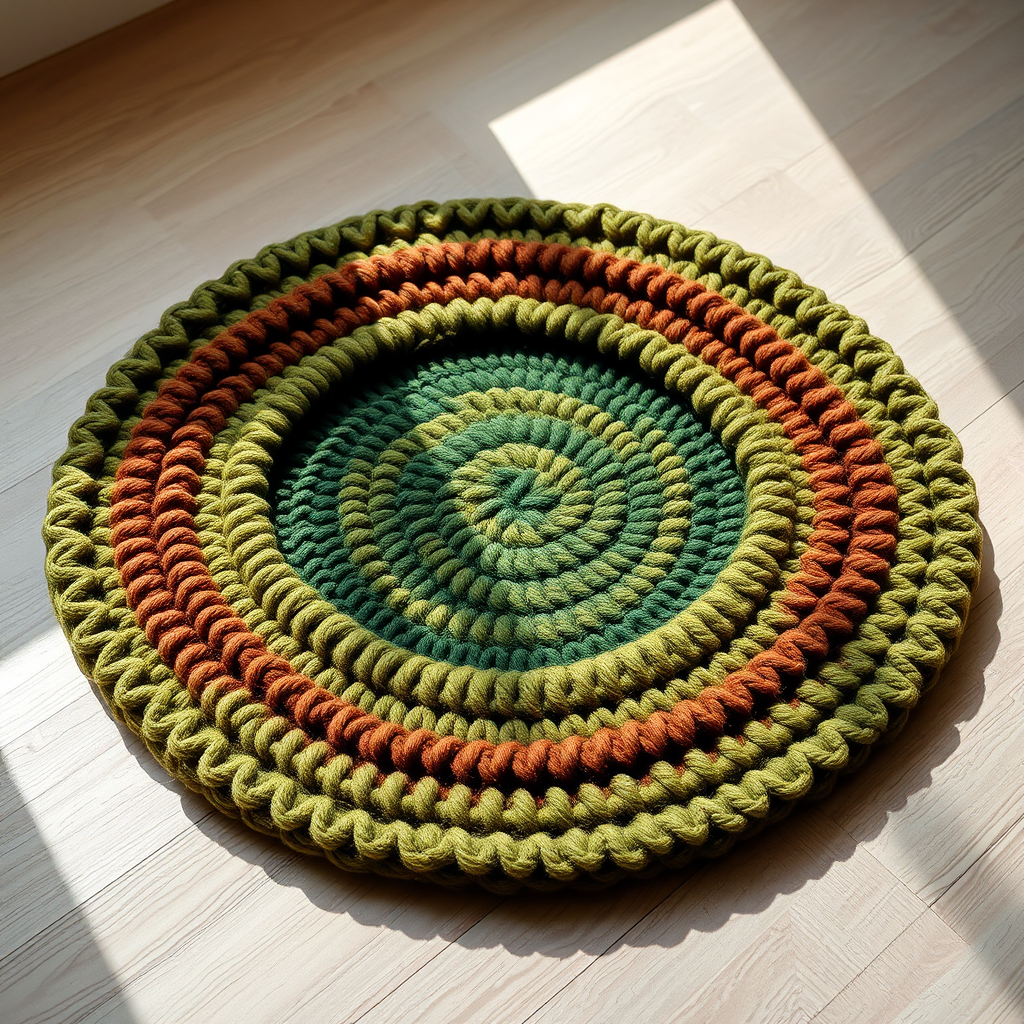
Bring the Serenity of the Forest Indoors: The Whispering Pines Forest Floor Rug
Imagine stepping out of bed onto a surface that feels like a carpet of moss and earth—soft, plush, and grounding. The Whispering Pines Forest Floor Rug is more than just a home decor piece; it's an experience. This textured oval rug, knitted in earthy greens and warm browns, brings the tranquil beauty of a woodland floor into your living space. Whether placed in a cozy reading nook, a rustic bedroom, or a serene entryway, this pattern is designed to add a touch of organic warmth to any room.
This free knitting pattern is perfect for intermediate knitters looking for a rewarding project. It combines simple stitches—garter, stockinette, and seed—to create a rich, tactile surface that is as delightful to make as it is to use. The strategic color changes mimic the natural patchwork of a forest floor, with bands of mossy green, deep forest green, and warm earth brown. Let's dive into this relaxing and rewarding project.
Materials Needed: Gathering Your Forest Palette
Before you begin, ensure you have all the necessary supplies. The beauty of this rug lies in its chunky, plush texture, so the materials are simple but specific.
Yarn
- Weight: Super Bulky (Weight 6)
- Colors: You will need three shades to create the forest floor effect:
- Color A (Forest Green): For the main body and decreases.
- Color B (Moss Green): For the textured seed stitch bands.
- Color C (Warm Brown): For the earthy garter stitch bands.
- Total Yardage: Approximately 1200 yards combined. (This is an estimate; you may need slightly more or less depending on your tension).
Needles & Notions
- Needle: US 15 (10 mm) circular knitting needle with a 36-inch cable. The long cable is essential to hold the large number of stitches as the rug grows.
- Other: Stitch markers (optional, but helpful for tracking sections), a tapestry needle for weaving in ends, and scissors.
Gauge
To ensure your rug turns out the correct size, it's crucial to check your gauge.
- Gauge: 8 stitches and 12 rows = 4 inches in stockinette stitch (knit on RS, purl on WS).
Tip: If your gauge is off, switch to a larger or smaller needle size until you achieve the correct tension. This is a large project, so taking the time to swatch will save you from disappointment later.
Step-by-Step Instructions: Knitting Your Forest Floor
This rug is knitted flat in an oval shape. The construction is intuitive: you'll start with a foundation, increase to widen the oval, work the body in a beautiful color and stitch sequence, and then decrease to close the other end. Follow these detailed instructions carefully, and you'll have a stunning rug in no time.
Part 1: The Foundation & Increases
We begin with Color A (Forest Green) to create the base of the oval.
- Cast On: With Color A, cast on 40 stitches.
- Row 1 (Right Side): Knit all stitches.
- Row 2 (Wrong Side): Purl all stitches.
Now, we will increase stitches at both ends of the needle to create the rounded shape of the oval. This is done on Right Side rows only.
- Row 3 (Increase Row): K1, M1L (Make 1 Left), knit until 1 stitch remains, M1R (Make 1 Right), K1. (You now have 42 stitches).
- Row 4: Purl all stitches.
- Row 5 (Increase Row): K1, M1L, knit until 1 stitch remains, M1R, K1. (You now have 44 stitches).
- Row 6: Purl all stitches.
Repeat Rows 3-6 two more times. This means you will complete two more increase rounds (adding 2 stitches each time). After these repeats, you should have a total of 48 stitches on your needle.
Part 2: The Body of the Rug – A Symphony of Texture
Now that the base is formed, we will work even (without increasing) to create the long, textured body of the rug. This is where the magic happens! We will alternate colors and stitch patterns in a specific sequence to create the forest floor effect.
Your sequence is: B (Seed Stitch) → A (Stockinette) → C (Garter Stitch). You will repeat this sequence until the rug reaches the desired length.
- Rows 7-10 (Color B - Moss Green): Work in Seed Stitch.
- Row 7 (RS): *K1, P1; repeat from * across.
- Row 8 (WS): *P1, K1; repeat from * across. (This creates the classic seed stitch texture).
- Rows 9 & 10: Repeat Rows 7 and 8.
- Rows 11-14 (Color A - Forest Green): Work in Stockinette Stitch.
- Row 11 (RS): Knit all stitches.
- Row 12 (WS): Purl all stitches.
- Rows 13 & 14: Repeat Rows 11 and 12.
- Rows 15-18 (Color C - Warm Brown): Work in Garter Stitch.
- Rows 15, 16, 17, 18: Knit all stitches on both the Right Side and the Wrong Side.
Continue this sequence: Keep repeating the 12-row pattern (4 rows of B seed stitch, 4 rows of A stockinette, 4 rows of C garter stitch) until the rug measures approximately 36 inches in length from the cast-on edge. Important: Ensure you end this section after completing a Color C garter stitch section.
Part 3: The Decreases – Shaping the Final Curve
To mirror the rounded start of the rug, we will now decrease stitches to shape the other end. Switch back to Color A (Forest Green).
- Row 1 (RS - Decrease Row): K1, K2tog (Knit Two Together), knit until 3 stitches remain, SSK (Slip, Slip, Knit), K1. (You now have 46 stitches).
- Row 2 (WS): Purl all stitches.
- Row 3 (RS - Decrease Row): K1, K2tog, knit until 3 stitches remain, SSK, K1. (You now have 44 stitches).
- Row 4 (WS): Purl all stitches.
Repeat Rows 1-4 until you have decreased back down to 40 stitches on your needle.
Part 4: Finishing Touches
- Bind Off: On the next Right Side row, bind off all stitches loosely in knit. A loose bind-off is crucial to prevent the edge from pulling in and ruining the oval shape.
- Weave in Ends: Using your tapestry needle, carefully weave in all loose yarn ends on the wrong side of the rug. Make sure to secure them well so they don't come undone with use.
- Blocking: Gently block the rug to shape. Since it's super bulky, you can simply lay it flat and gently pat it into an oval shape. You can use a spray bottle to lightly mist it and let it dry flat. This will help even out the stitches.
- Non-Slip Pad (Optional): For safety and to keep your beautiful rug in place, consider adding a non-slip rug pad underneath. This is especially helpful on hardwood or tile floors.
And there you have it—your very own Whispering Pines Forest Floor Rug. This project is a labor of love that results in a stunning, functional piece of art for your home. The combination of textures and earthy tones will bring a sense of calm and natural beauty to your space for years to come. Happy knitting!


