Whispering Pines Cozy Cuff Free Pattern
Wrap Your Hands in Woodland Warmth: The Whispering Pines Cozy Cuff
There's something magical about a handmade accessory that feels like a gentle hug on a crisp morning. The Whispering Pines Cozy Cuff is exactly that—a textured, forest-inspired wrist warmer that brings a touch of woodland charm to your everyday wardrobe. Whether you're typing at your desk, sipping coffee on a chilly porch, or simply want to add a cozy layer to your outfit, this cuff is the perfect project.
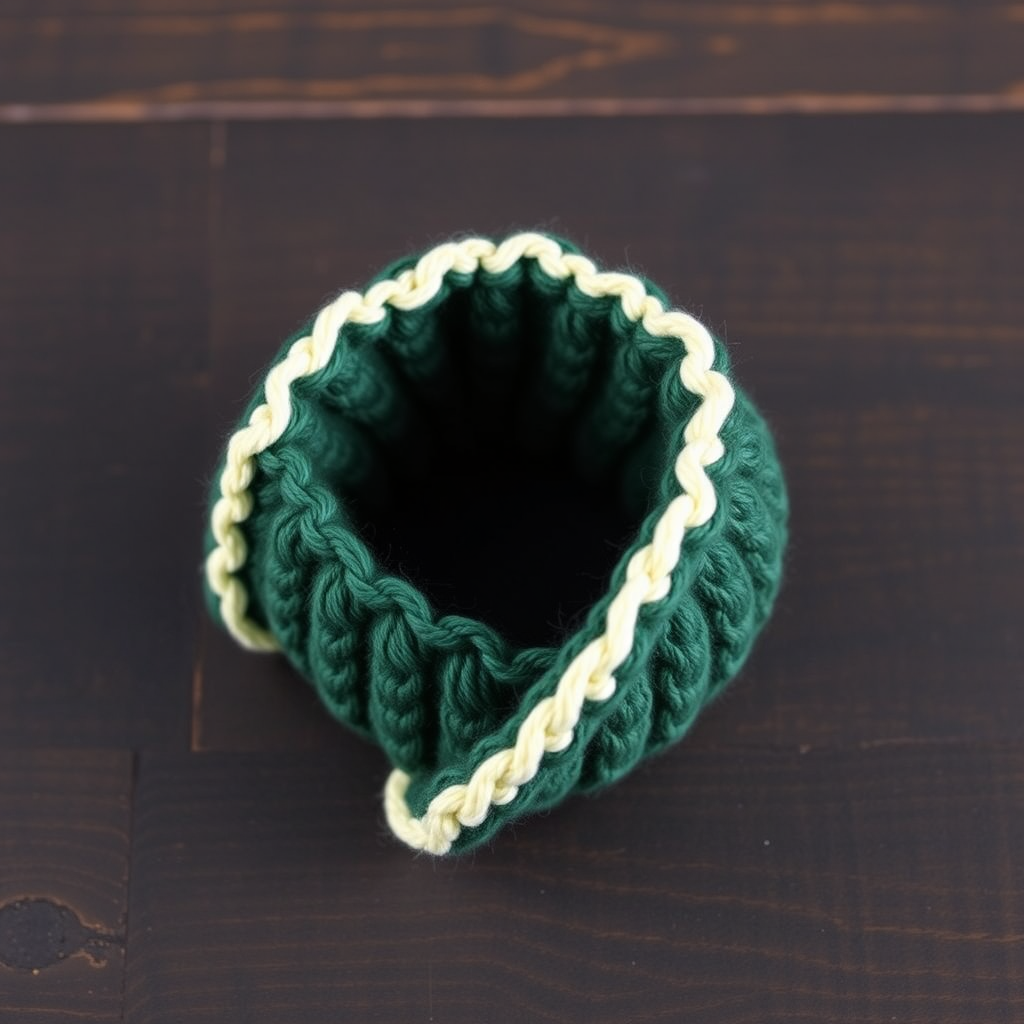
Designed with beginners in mind, this pattern uses basic crochet techniques with a beautiful twist: front post and back post double crochet stitches create a stunning ribbed, braided texture that mimics the bark of pine trees. The gentle leaf-shaped curves at each end add a delicate, nature-inspired silhouette that sets this cuff apart from ordinary wrist warmers.
Best of all, this pattern is worked flat in simple rows, then seamed—no tricky in-the-round techniques required. With just two colors of worsted weight yarn and a single hook, you'll create a pair of cuffs that are as functional as they are beautiful. Let's get started!
Materials Needed
Before you begin, gather these simple supplies:
- Yarn: Worsted weight yarn in two colors—Forest Green (MC) and Cream (CC), approximately 100g of each. A soft acrylic or wool blend works beautifully.
- Hook: 5.0 mm (H/8) crochet hook
- Gauge: 16 sc x 18 rows = 4 inches (10 cm) in pattern stitch. (Don't stress about perfect gauge—this is a forgiving, stretchy project!)
- Extras: Yarn needle for seaming and weaving in ends, scissors
Special Stitches You'll Need
This pattern uses a few special stitches that are easier than they sound. Here's a quick breakdown:
Front Post Double Crochet (Fpdc)
Yarn over, insert your hook from front to back around the post (the vertical part) of the next stitch, yarn over and pull up a loop, then complete it just like a regular double crochet (yarn over, pull through two loops, yarn over, pull through two loops).
Back Post Double Crochet (Bpdc)
Yarn over, insert your hook from back to front around the post of the next stitch, yarn over and pull up a loop, then complete as a regular double crochet.
Single Crochet Decrease (sc2tog)
Insert your hook into the next stitch, yarn over and pull up a loop (two loops on hook). Insert your hook into the next stitch, yarn over and pull up a loop (three loops on hook). Yarn over and pull through all three loops on your hook. You've decreased by one stitch!
Step-by-Step Instructions
This cuff is worked flat in rows, then seamed to create a tube. It fits an average adult wrist (approximately 7 inches in circumference) with a stretchy ribbed edge. You'll make two identical cuffs—one for each wrist.
Cuff (Make 2)
Row 1: With Forest Green (MC), chain 10. Single crochet in the 2nd chain from your hook and in each chain across. Turn. (9 single crochets)
Row 2: Chain 1, single crochet in each stitch across. Turn. (9 stitches)
Row 3: Chain 1, sc2tog (decrease), single crochet in the next 5 stitches, sc2tog. Turn. (7 stitches)
Row 4: Chain 1, single crochet in each stitch across. Turn. (7 stitches)
Row 5: Chain 1, sc2tog, single crochet in the next 3 stitches, sc2tog. Turn. (5 stitches)
Row 6: Chain 1, single crochet in each stitch across. Turn. (5 stitches)
Row 7: Chain 1, sc2tog, single crochet in the next 1 stitch, sc2tog. Turn. (3 stitches)
Row 8: Chain 1, single crochet in each stitch across. Turn. (3 stitches)
Row 9: Chain 1, work 2 single crochets in the first stitch (increase), single crochet in the next stitch, work 2 single crochets in the last stitch. Turn. (5 stitches)
Row 10: Chain 1, work 2 single crochets in the first stitch, single crochet in the next 3 stitches, work 2 single crochets in the last stitch. Turn. (7 stitches)
Row 11: Chain 1, work 2 single crochets in the first stitch, single crochet in the next 5 stitches, work 2 single crochets in the last stitch. Turn. (9 stitches)
Row 12: Chain 1, single crochet in each stitch across. Turn. (9 stitches)
You've now completed the first leaf-shaped point of your cuff. The increases and decreases create a gentle, organic curve that will become the decorative end of your wrist warmer.
Creating the Ribbed Texture
Now comes the fun part—the beautiful ribbed section that gives this cuff its cozy, textured look!
Row 13: Chain 1, single crochet in the first stitch, *front post double crochet (Fpdc) around the next stitch, single crochet in the next stitch*—repeat from * to * across the row. Turn.
Row 14: Chain 1, single crochet in the first stitch, *back post double crochet (Bpdc) around the next stitch, single crochet in the next stitch*—repeat from * to * across the row. Turn.
Rows 15-24: Repeat Rows 13 and 14 five more times. (You will have a ribbed section of 10 rows total.)
This alternating front post and back post pattern creates a gorgeous braided, ribbed effect that's both stretchy and visually striking. The texture resembles the bark of a pine tree, perfectly matching the "Whispering Pines" theme.
Shaping the Second Point
Now you'll mirror the decreases from the beginning to create the second leaf-shaped point.
Row 25: Chain 1, single crochet in each stitch across. Turn. (9 stitches)
Row 26: Chain 1, sc2tog, single crochet in the next 5 stitches, sc2tog. Turn. (7 stitches)
Row 27: Chain 1, single crochet in each stitch across. Turn. (7 stitches)
Row 28: Chain 1, sc2tog, single crochet in the next 3 stitches, sc2tog. Turn. (5 stitches)
Row 29: Chain 1, single crochet in each stitch across. Turn. (5 stitches)
Row 30: Chain 1, sc2tog, single crochet in the next 1 stitch, sc2tog. Turn. (3 stitches)
Row 31: Chain 1, single crochet in each stitch across. Turn. (3 stitches)
Row 32: Chain 1, work 2 single crochets in the first stitch, single crochet in the next stitch, work 2 single crochets in the last stitch. Turn. (5 stitches)
Row 33: Chain 1, work 2 single crochets in the first stitch, single crochet in the next 3 stitches, work 2 single crochets in the last stitch. Turn. (7 stitches)
Row 34: Chain 1, work 2 single crochets in the first stitch, single crochet in the next 5 stitches, work 2 single crochets in the last stitch. Turn. (9 stitches)
Row 35: Chain 1, single crochet in each stitch across. Turn. (9 stitches)
Row 36: Chain 1, single crochet in each stitch across. Do not turn. Fasten off Forest Green, leaving a long tail (about 12 inches) for seaming.
Finishing Your Cuff
Now it's time to transform your flat piece into a cozy tube:
- Fold the cuff in half lengthwise so the two short ends meet. The leaf-shaped points should align perfectly.
- Thread your yarn needle with the long tail you left.
- Using a whip stitch, carefully seam the two short ends together to form a tube. Take small, even stitches through the edges of both layers.
- Once seamed, weave in all loose ends securely with your yarn needle.
- Repeat the entire process to create your second cuff.
Optional Decorative Edge
For an extra touch of woodland elegance, add a contrasting cream border:
- With Cream (CC) yarn, join to the bottom edge of the cuff (the wider ribbed edge) with a slip stitch.
- Chain 1, then single crochet evenly around the entire edge. Work one single crochet in each row end or stitch, keeping your tension even.
- Join with a slip stitch to your first single crochet.
- Fasten off and weave in the ends.
- Repeat for the top edge if you'd like a matching border on both sides.
Wear and Enjoy!
Slip your finished Whispering Pines Cozy Cuffs on and feel the gentle warmth wrap around your wrists. The textured ribbing provides a comfortable, stretchy fit, while the leaf-shaped points add a whimsical, nature-inspired detail that's sure to spark conversations.
These cuffs make wonderful gifts for nature lovers, cozy-season enthusiasts, or anyone who appreciates handmade warmth. Experiment with different color combinations—think dusty blue and cream, burgundy and gold, or even a soft lavender for a dreamy vibe.
Remember, crochet is a journey, not a race. Take your time, enjoy the rhythm of the stitches, and don't be afraid to unravel and try again if something doesn't look quite right. Every stitch you make is a step toward mastering this beautiful craft.
Happy crocheting, and may your hands always be wrapped in whispering pines!