Wanderlust Woven Tote Free Crochet Pattern
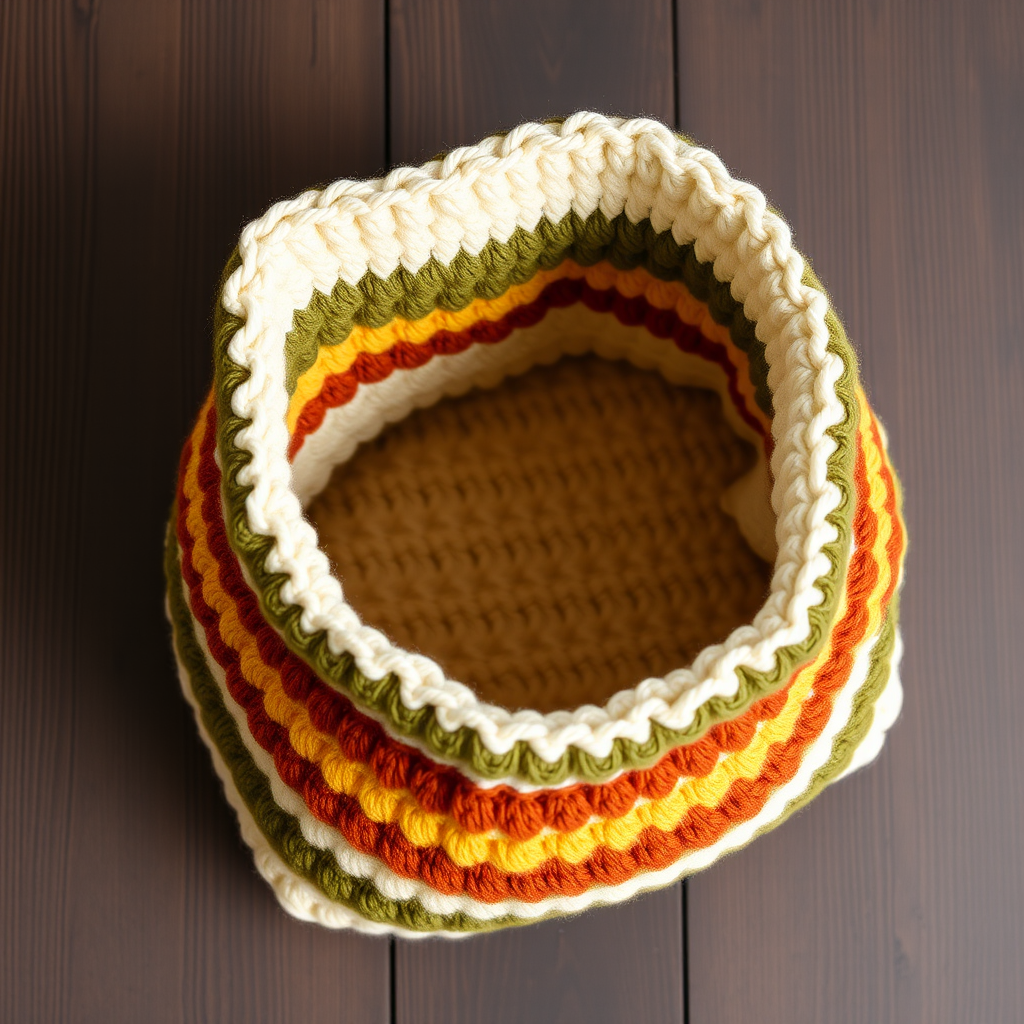
Wanderlust Woven Tote: A Free Boho Crochet Bag Pattern
Carry your world in style with this boho-chic woven tote! Featuring a rich tapestry of earthy stripes—cream, terracotta, olive, and mustard—this sturdy, textured bag is as functional as it is beautiful. Whether you're heading to the farmer's market, the beach, or a cozy café, this handmade accessory adds a warm, handcrafted touch to any outfit. Best of all, this free crochet pattern is beginner-friendly, worked in simple half-double crochet stitches with bulky yarn for a quick and satisfying project.
Materials Needed
Before you begin, gather the following supplies. This pattern uses bulky weight yarn, which makes the bag work up fast and gives it that lovely, dense woven texture.
- Yarn: Bulky weight yarn (Category 5) in 4 colors:
- Color A (Cream) – approximately 200g
- Color B (Terracotta) – approximately 100g
- Color C (Olive) – approximately 100g
- Color D (Mustard) – approximately 100g
- Crochet Hook: 8 mm (L/11) crochet hook
- Tapestry Needle: For seaming and weaving in ends
- Scissors
Gauge
9 half double crochet (hdc) stitches and 8 rows = 10 cm / 4 inches. Be sure to check your gauge to ensure your bag turns out the correct size. If your gauge is off, adjust your hook size accordingly.
Step-by-Step Instructions
This bag is worked in one piece from the bottom up, then folded and seamed at the sides. The handles are crocheted separately and attached at the end. Follow along carefully, and you'll have a beautiful tote in no time!
Part 1: The Bag Body
Foundation:
With Color A (Cream), chain 41 stitches.
Row 1:
Half double crochet (hdc) in the 2nd chain from the hook and in each chain across. You should have 40 hdc total. Turn your work.
Rows 2-8 (Color A):
Chain 1 (this does not count as a stitch), hdc in each stitch across. (40 hdc) Turn.
Repeat this row for a total of 8 rows in Color A (including Row 1). At the end of Row 8, switch to Color B.
Rows 9-16 (Color B - Terracotta):
With Color B, repeat the same row: Chain 1, hdc in each stitch across. (40 hdc) Turn.
Work a total of 8 rows in Color B. At the end of Row 16, switch to Color C.
Rows 17-24 (Color C - Olive):
With Color C, repeat the same row: Chain 1, hdc in each stitch across. (40 hdc) Turn.
Work a total of 8 rows in Color C. At the end of Row 24, switch to Color D.
Rows 25-32 (Color D - Mustard):
With Color D, repeat the same row: Chain 1, hdc in each stitch across. (40 hdc) Turn.
Work a total of 8 rows in Color D. At the end of Row 32, switch back to Color A.
Rows 33-40 (Color A - Cream):
With Color A, repeat the same row: Chain 1, hdc in each stitch across. (40 hdc) Turn.
Work a total of 8 rows in Color A. At the end of Row 40, switch to Color B.
Rows 41-48 (Color B - Terracotta):
With Color B, repeat the same row: Chain 1, hdc in each stitch across. (40 hdc) Turn.
Work a total of 8 rows in Color B. At the end of Row 48, switch to Color C.
Rows 49-56 (Color C - Olive):
With Color C, repeat the same row: Chain 1, hdc in each stitch across. (40 hdc) Turn.
Work a total of 8 rows in Color C. At the end of Row 56, switch to Color D.
Rows 57-64 (Color D - Mustard):
With Color D, repeat the same row: Chain 1, hdc in each stitch across. (40 hdc) Turn.
Work a total of 8 rows in Color D. At the end of Row 64, switch to Color A.
Rows 65-72 (Color A - Cream):
With Color A, repeat the same row: Chain 1, hdc in each stitch across. (40 hdc) Turn.
Work a total of 8 rows in Color A. Fasten off and weave in the yarn end.
Part 2: Seaming the Sides
Now it's time to shape your flat rectangle into a bag.
- Fold the rectangle in half with the right sides (the outside of the bag) facing each other. Match the short ends together so the foundation chain and the last row meet.
- Whip stitch the side seams: Thread a tapestry needle with a long piece of Color A yarn. Starting at the bottom corner, whip stitch the two side edges together, working from the bottom up toward the top opening. Leave the top edge completely open.
- Repeat on the other side: Whip stitch the remaining side seam the same way.
- Turn the bag right side out. Gently push out the corners to give the bag a nice, flat bottom shape.
Part 3: Crocheting the Handles (Make 2)
The handles are simple, sturdy strips that will give your tote a professional finish.
Foundation:
With Color A (Cream), chain 8.
Row 1:
Hdc in the 2nd chain from the hook and in each chain across. You should have 7 hdc total. Turn.
Rows 2-40:
Chain 1, hdc in each stitch across. (7 hdc) Turn.
Repeat this row until you have a total of 40 rows. Fasten off, leaving a long tail (at least 30 cm / 12 inches) for sewing the handle to the bag.
Repeat to make a second handle.
Part 4: Attaching the Handles
Proper placement of the handles ensures your bag hangs beautifully and is comfortable to carry.
- Find the center: Fold each handle in half to find its center point. Mark this with a stitch marker or a scrap of yarn.
- Position the handles: Place the handles on the inside of the bag. Position each handle so that its center point aligns with the center of the bag's top edge. The ends of the handle should be approximately 5 cm / 2 inches down from the top edge and 7 cm / 2.75 inches from the side seams.
- Sew securely: Using the long tail left on the handle, thread your tapestry needle and sew the handle ends firmly to the inside of the bag. Use a whip stitch or a figure-eight stitch, going through both the handle and the bag fabric multiple times to ensure it's very secure. Repeat for the other handle.
- Weave in all ends: Use your tapestry needle to weave in any remaining yarn tails on the inside of the bag.
Your Tote is Complete!
Congratulations! You've just created a beautiful, boho-chic Wanderlust Woven Tote. The dense half-double crochet stitch and bulky yarn make this bag sturdy enough for everyday use, while the earthy color palette adds a touch of handcrafted warmth to any look. The top edge will naturally fold over slightly where the handles are attached, giving it that relaxed, lived-in bohemian vibe.
Show off your new favorite accessory, and don't forget to share your creation with fellow crafters. Happy crocheting!


