The Sun-Kissed Topknot Hat Free Pattern
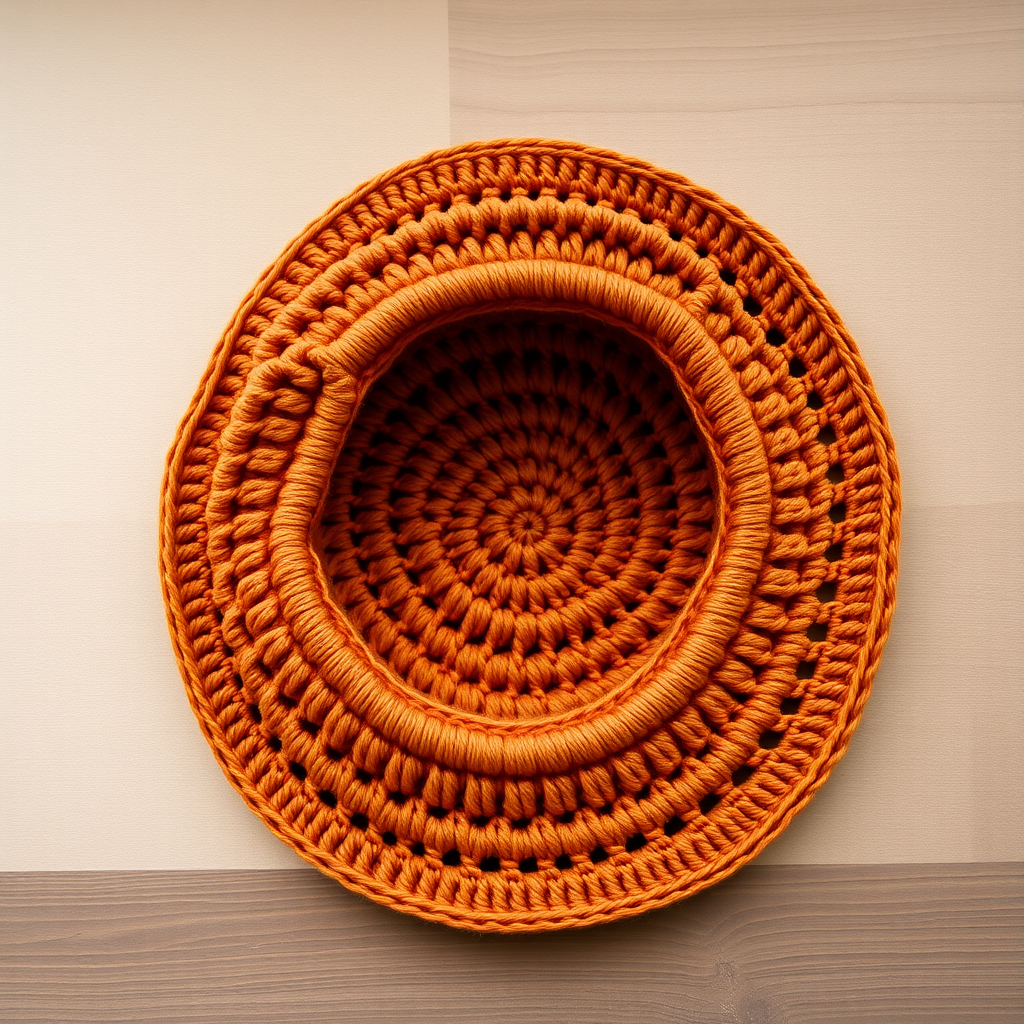
The Sun-Kissed Topknot Hat: A Free Boho Crochet Pattern for Messy Bun Days
Are you ready to elevate your warm-weather style with a hat that's as functional as it is fashionable? Meet the Sun-Kissed Topknot Hat—a breezy, boho-inspired accessory designed to cradle your bun or ponytail while shielding your face from the sun. With its airy mesh stitch and wide, floppy brim, this hat is the perfect companion for beach days, garden parties, or simply lounging in the backyard with a cold drink in hand.
This free crochet pattern is beginner-friendly yet yields a professional-looking result. The hat is worked from the top down in joined rounds, starting with a solid crown, transitioning into a lacy mesh body, and finishing with a beautifully flared brim. The distinct opening at the top of the crown is what makes this hat so special—it's designed to comfortably accommodate a messy bun or high ponytail, so you can keep your hair up and your face shaded all at once.
Grab your hook and your favorite worsted-weight cotton yarn, and let's dive into this delightful project that's sure to become a staple in your summer wardrobe.
Materials Needed
Before we begin, let's gather everything you'll need for this project. The beauty of this pattern is that it requires minimal supplies—just yarn, a hook, and a bit of patience!
Yarn
- Worsted weight cotton or cotton-blend yarn (approximately 200-250 yards)
- Suggested colors: warm terracotta, sun-bleached sand, or any earthy tone that speaks to your boho soul
Why cotton? Cotton yarn is breathable, absorbent, and holds its shape beautifully—making it the ideal choice for a summer sun hat. It also provides excellent stitch definition, so your hard work will be beautifully visible.
Hook
- I/9 (5.5 mm) crochet hook
Additional Supplies
- Yarn needle for weaving in ends
- Scissors
- Blocking mats and pins (optional, for finishing)
Gauge
- 14 dc x 8 rows = 4 inches (10 cm) in mesh pattern (ch 1, skip 1, dc) after blocking
Be sure to check your gauge before starting! If your gauge is off, your hat may end up too large or too small. Adjust your hook size as needed to match the specified gauge.
Step-by-Step Instructions
Now that you have all your materials ready, let's get crocheting! This pattern is worked in joined rounds from the top down. Follow along carefully, and you'll have a gorgeous hat in no time.
Abbreviations
- ch = chain
- sl st = slip stitch
- sc = single crochet
- dc = double crochet
- sp = space
- rnd = round
- st(s) = stitch(es)
The Crown
The crown of the hat is a solid circle of double crochet stitches. This provides a sturdy base and creates the opening that will eventually accommodate your bun or ponytail.
Rnd 1: Make a magic ring, ch 3 (counts as dc), 11 dc into ring, sl st to top of ch-3 to join. (12 dc)
Rnd 2: Ch 3, dc in same st, 2 dc in each st around, sl st to join. (24 dc)
Rnd 3: Ch 3, dc in same st, dc in next st, *2 dc in next st, dc in next st* repeat from * to * around, sl st to join. (36 dc)
Rnd 4: Ch 3, dc in same st, dc in next 2 sts, *2 dc in next st, dc in next 2 sts* repeat from * to * around, sl st to join. (48 dc)
Rnd 5: Ch 3, dc in same st, dc in next 3 sts, *2 dc in next st, dc in next 3 sts* repeat from * to * around, sl st to join. (60 dc)
Rnd 6: Ch 3, dc in same st, dc in next 4 sts, *2 dc in next st, dc in next 4 sts* repeat from * to * around, sl st to join. (72 dc)
Rnd 7: Ch 3, dc in same st, dc in next 5 sts, *2 dc in next st, dc in next 5 sts* repeat from * to * around, sl st to join. (84 dc)
Pro tip: The magic ring creates a tight, seamless center that's perfect for the top of your hat. If you're not comfortable with magic rings, you can chain 4 and join with a sl st to form a ring, then work your first round into that ring.
The Body (Mesh Pattern)
Now we transition into the beautiful mesh pattern that gives this hat its airy, boho feel. The mesh is created by alternating chains and double crochets, with each round working into the chain spaces of the previous round.
Rnd 8: Ch 4 (counts as dc + ch 1), skip next st, dc in next st, *ch 1, skip next st, dc in next st* repeat from * to * around, ending with ch 1, sl st to 3rd ch of starting ch-4. (42 dc, 42 ch-1 sps)
Rnd 9: Sl st into the first ch-1 sp, ch 4, dc in next ch-1 sp, *ch 1, dc in next ch-1 sp* repeat from * to * around, ending with ch 1, sl st to 3rd ch of starting ch-4.
Rnds 10-16: Repeat Rnd 9. (7 mesh rounds total)
Important note: When you sl st into the first ch-1 sp at the beginning of each round, you're positioning your hook to work into the spaces rather than the stitches themselves. This creates the lovely open mesh effect. Take your time with these rounds—the rhythm becomes soothing once you get the hang of it!
The Brim
After the mesh body, we'll create a solid, slightly flared brim. This is what gives the hat its wide, floppy character and provides excellent sun protection.
Rnd 17: Ch 3 (counts as dc), dc in same sp, 2 dc in each ch-1 sp and 1 dc in each dc around, sl st to join. (126 dc)
Note: In this round, you're working 2 dc into each chain space from the mesh pattern, and 1 dc into each dc from the previous round. This effectively doubles your stitch count in the spaces, creating the flare needed for the brim.
Rnd 18: Ch 3, dc in same st, dc in next 2 sts, *2 dc in next st, dc in next 2 sts* repeat from * to * around, sl st to join. (168 dc)
Rnd 19: Ch 3, dc in same st, dc in next 3 sts, *2 dc in next st, dc in next 3 sts* repeat from * to * around, sl st to join. (210 dc)
Rnd 20: Ch 1, sc in each st around, sl st to join. Fasten off and weave in ends.
The single crochet edging on the final round gives the brim a clean, finished look and helps it hold its shape beautifully.
Finishing Touches
Your hat is almost complete! Here's how to finish it off for a professional, polished result:
- Weave in all loose ends using your yarn needle. Be sure to weave them in securely so they don't come undone with wear.
- Block the hat lightly to shape the brim. Wet blocking is ideal for cotton yarn—simply soak the hat in cool water, gently squeeze out excess moisture (don't wring!), and shape it on a blocking mat or towel. Pay special attention to the brim, smoothing it out to your desired shape. Allow it to dry completely.
- Shape the crown opening: While the hat is drying, you can gently stretch the opening at the top of the crown to ensure it's large enough to comfortably accommodate your bun or ponytail.
How to Wear Your Sun-Kissed Topknot Hat
This hat is designed with functionality in mind. To wear it:
- Pull your hair into a bun or ponytail—messy buns work perfectly!
- Place the hat over your head so that your bun comes through the opening in the crown.
- Adjust the brim as desired—flip it up, let it flop down, or shape it however suits your style.
The mesh body allows for airflow around your bun, keeping you cool even on the hottest days. The wide brim provides excellent sun protection for your face, neck, and shoulders.
Tips for Success
- Count your stitches after each round, especially during the crown increases. A missed increase can throw off the entire pattern.
- Use stitch markers to mark the beginning of each round if you find yourself losing your place.
- Keep your tension consistent throughout the project. If your tension varies, your hat may end up lopsided.
- Don't be afraid to block—blocking transforms your work and gives it that polished, professional look.
- Experiment with colors: While terracotta and sand are suggested, this pattern looks gorgeous in any color. Try a soft sage green, a dusty blue, or even a vibrant coral for a pop of color!
Final Thoughts
Congratulations! You've just created a beautiful, functional sun hat that's perfect for all your warm-weather adventures. The Sun-Kissed Topknot Hat is more than just an accessory—it's a statement piece that showcases your crochet skills and your unique sense of style.
Whether you're gifting it to a friend, keeping it for yourself, or making one in every color, this pattern is sure to become a favorite in your crochet repertoire. The combination of the solid crown, airy mesh body, and floppy brim creates a hat that's both practical and undeniably chic.
We'd love to see your finished creations! Share your Sun-Kissed Topknot Hat photos on social media and tag us—we can't wait to see how you make this pattern your own.
Happy crocheting, and enjoy your sun-kissed days in your beautiful new hat!


