Summit Ridge Alpine Throw Free Knitting Pattern – Textured Mountain Peak Blanket
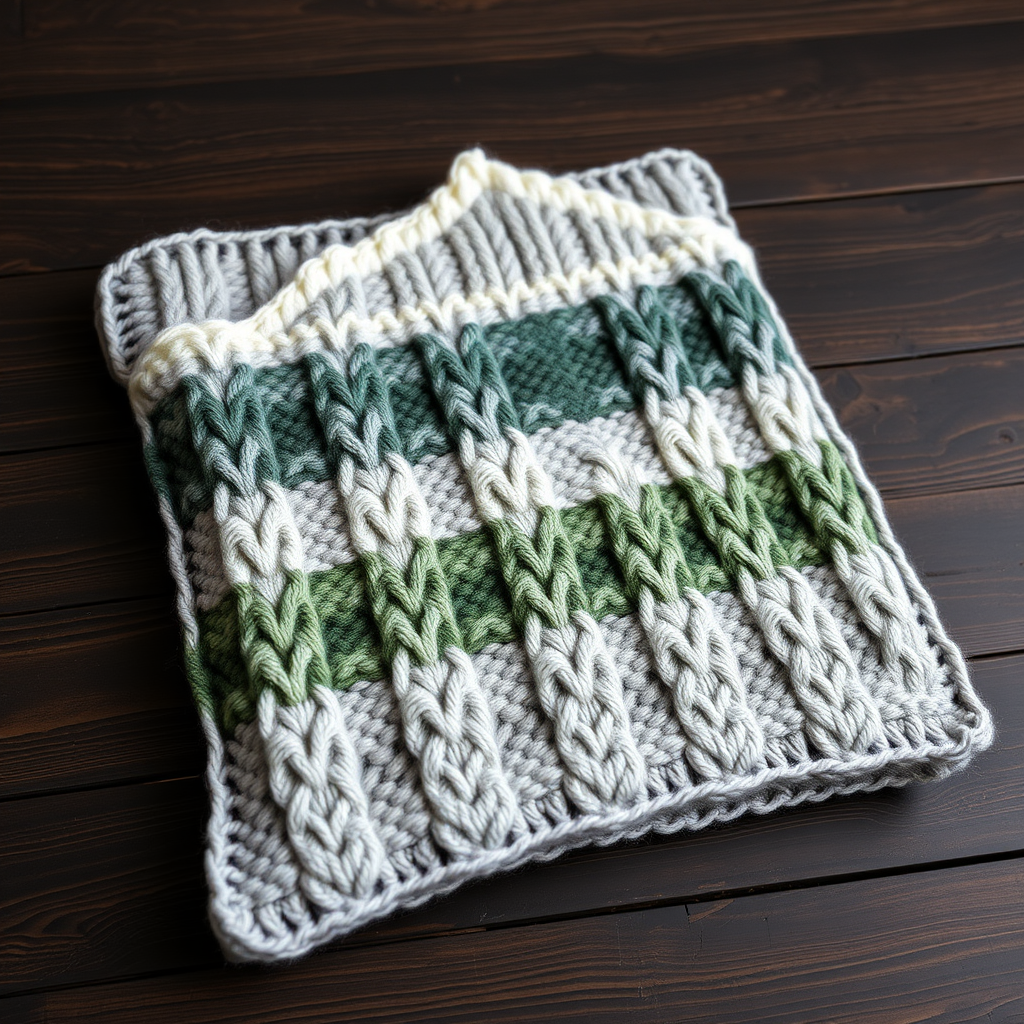
Summit Ridge Alpine Throw: A Beginner-Friendly Knitted Mountain Landscape
Imagine wrapping yourself in the serene beauty of a mountain sunrise—the soft gray of morning mist, the deep green of pine forests, and the crisp white of snow-capped peaks. That's exactly the experience this Summit Ridge Alpine Throw brings to your living space. This textured masterpiece combines classic cable motifs with delicate seed stitch borders to create a dynamic, dimensional landscape that's as cozy as it is stunning.
Despite its intricate appearance, this pattern is surprisingly accessible. With just a few basic techniques—knit, purl, and simple cables—you'll create a modern heirloom piece that looks like it came straight from a boutique. Whether you're a confident beginner ready to tackle your first cable project or an experienced knitter seeking a meditative, rewarding make, this throw delivers. Let's dive into everything you need to create this alpine-inspired treasure.
Why You'll Love This Pattern
This isn't just a blanket—it's a story told in yarn. The textured mountain ridge pattern uses alternating cable twists (C4F and C4B) to mimic the rugged contours of a mountain range, while the seed stitch border frames the piece like a rustic cabin window. The color transitions are thoughtfully placed: misty gray forms the foundation, forest pine stripes represent the tree line, and a snowcap white section with gentle decreases evokes the summit's peak. The result is a throw that's both visually striking and deeply comforting.
Materials Needed
Before you begin, gather these supplies. All materials are readily available at your local yarn shop or online.
Yarn
- Worsted weight yarn in three shades:
- Misty Gray (MC) – approximately 1200 yards
- Forest Pine (CC1) – approximately 400 yards
- Snowcap White (CC2) – approximately 200 yards
- Total yarn needed: approximately 1800 yards
Tip: Choose a soft, machine-washable wool blend for easy care, or a plush acrylic for a budget-friendly option. The yarn weight should be worsted (medium weight, #4 on the yarn weight system).
Needles & Notions
- US 8 (5.0 mm) circular knitting needle, 32 inches or longer (to accommodate the wide stitch count)
- Cable needle (or a double-pointed needle as a substitute)
- Stitch markers (optional, but helpful for tracking repeats)
- Tapestry needle for weaving in ends
- Blocking mats and pins (for finishing)
Gauge
18 stitches and 24 rows = 4 inches in stockinette stitch (blocked). Always knit a gauge swatch before starting—this ensures your finished throw matches the intended dimensions of approximately 50 inches wide by 60 inches long. If your gauge is off, adjust your needle size accordingly.
Step-by-Step Instructions
This throw is worked in one piece from the bottom up. The pattern combines a seed stitch border, a repeating cable panel, and strategic color changes. Don't be intimidated—we'll walk through every step in detail.
Abbreviations
Familiarize yourself with these standard knitting abbreviations:
- K = knit
- P = purl
- C4F = slip 2 stitches to cable needle, hold to front, knit next 2 stitches, then knit 2 from cable needle
- C4B = slip 2 stitches to cable needle, hold to back, knit next 2 stitches, then knit 2 from cable needle
- K2tog = knit two together (right-leaning decrease)
- SSK = slip, slip, knit (left-leaning decrease)
- Rep = repeat
Cast On and Border
Step 1: With Misty Gray (MC), cast on 160 stitches loosely. A long-tail cast-on works beautifully here. Ensure your cast-on is not too tight—this edge will form the bottom border of your throw.
Step 2: Work the seed stitch border:
- Rows 1-6: *K1, P1* across, ending with K1. Repeat this row for a total of 6 rows.
Seed stitch creates a lovely, bumpy texture that prevents curling and frames the main pattern beautifully.
Main Body – Misty Gray Section
Now we begin the main pattern. The center 144 stitches are worked in a 24-stitch repeating cable pattern, with 8 seed stitch stitches on each side as a border.
Row 7 (Right Side): With MC, work seed stitch over the first 8 stitches (K1, P1, K1, P1, K1, P1, K1, P1). Then work the pattern across the next 144 stitches as follows:
- *K6, P2, C4F, P2, K6, P2, C4B, P2* – this is a 24-stitch repeat. Work this sequence 6 times total.
Finally, work seed stitch over the last 8 stitches.
Row 8 (Wrong Side): With MC, work seed stitch over the first 8 stitches, then purl across the next 144 stitches, then seed stitch over the last 8 stitches.
Repeat Rows 7-8 for 20 more rows (for a total of 22 rows of the cable pattern in the Misty Gray section). This gives you 11 full cable twists in the first color block.
Pro tip: Place a stitch marker after the first 8 stitches and before the last 8 stitches to help you keep track of the border sections. The cable pattern itself is easy to read once you see the twists forming.
Forest Pine Stripe
Step 1: Switch to Forest Pine (CC1).
Step 2: Work Rows 7-8 for 6 rows (3 repeats of the cable pattern). This creates a beautiful deep green band representing the tree line.
When changing colors, simply drop the old color and pick up the new one at the beginning of a right-side row. Leave a 6-inch tail to weave in later.
Return to Misty Gray
Step 1: Switch back to Misty Gray (MC).
Step 2: Work Rows 7-8 for 30 rows (15 repeats of the cable pattern). This is the longest section of the throw, creating a substantial gray body.
Snowcap Peak Section
Step 1: Switch to Snowcap White (CC2).
Step 2: Work Rows 7-8 for 8 rows (4 repeats of the cable pattern). This crisp white section evokes the snow-covered summit.
Decrease for Peak Shaping
Now we shape the top of the throw to mimic a mountain peak. This is done by working decreases within each cable repeat.
Step 1: Continue with CC2. On the next right-side row, work seed stitch over the first 8 stitches, then work across the 144 stitches as follows:
- *K6, P2, C4F, P2, K2tog, K4, P2, C4B, P2* – this decreases 1 stitch per repeat (you now have 23 stitches per repeat instead of 24).
Work the wrong-side row as established (seed stitch border, purl across center, seed stitch border).
Step 2: Continue decreasing in this manner every 4th row (on the right-side rows where you work the cable pattern). Each decrease round removes 6 stitches total (1 per repeat × 6 repeats).
Step 3: Repeat this decrease sequence until you have decreased 6 stitches per repeat (total 36 stitches decreased). You will now have 108 stitches in the center section (18 stitches per repeat).
Important: As you decrease, the cable pattern will naturally narrow. The K2tog decrease should be worked in the knit section between the purl bumps, keeping the cable motifs intact. The pattern will look like the mountain is tapering to a point—exactly what we want!
Final Border
Step 1: Switch back to Misty Gray (MC).
Step 2: Work seed stitch across all stitches for 6 rows. This creates a matching border to the bottom, framing the entire piece.
Bind Off
Bind off loosely in pattern—knit the knit stitches and purl the purl stitches. This maintains the seed stitch rhythm and prevents a tight, puckered edge. A stretchy bind-off like the "Jeny's Surprisingly Stretchy Bind-Off" works wonderfully here.
Finishing Touches
Step 1: Weave in all ends using a tapestry needle. Take care to weave ends into matching color sections so they disappear completely.
Step 2: Block the throw to dimensions of approximately 50 inches wide by 60 inches long. Pin out the cable sections to open them up and flatten the texture. Wet blocking is ideal for wool blends—soak the throw in lukewarm water with a gentle wool wash, gently squeeze out excess water (never wring), roll in towels to remove moisture, then pin to shape on blocking mats. Allow to dry completely.
Blocking is crucial for this pattern—it transforms the cables from tight, bunched twists into beautiful, open, dimensional ridges that showcase the mountain motif.
Tips for Success
- Read your knitting: Once you've worked a few repeats, you'll be able to "read" the pattern—the cables will look like twisted columns, and the purl stitches will form valleys between them. This makes it easy to catch mistakes early.
- Use a lifeline: If you're new to cables, thread a lifeline (a piece of contrasting scrap yarn) through the stitches after every few rows. If you make a mistake, you can easily rip back to the lifeline and start again.
- Keep your tension even: Cable work can pull in more than stockinette. Blocking will help even everything out, but try to keep your tension relaxed and consistent.
- Count your stitches: After each decrease row, count your stitches to ensure you haven't dropped any. The pattern should stay at 160 stitches total until the decrease section begins.
Customization Ideas
Once you've mastered this pattern, feel free to make it your own:
- Change the color palette: Swap the alpine colors for ocean blues, desert terracottas, or your favorite team colors.
- Adjust the size: Add or remove repeats to make a smaller lap blanket or a larger bedspread. Each 24-stitch repeat adds approximately 5 inches of width.
- Skip the decreases: For a classic rectangular throw, simply omit the peak shaping and bind off after the Snowcap section.
Your Alpine Masterpiece Awaits
The Summit Ridge Alpine Throw is more than just a knitting project—it's a journey through the mountains, one stitch at a time. As you work the cables, you'll feel the rhythm of the pattern, and as the colors shift from gray to green to white, you'll watch your landscape come to life. This throw makes a thoughtful handmade gift for a mountain lover, a stunning addition to your own home, or a cherished heirloom to pass down.
So grab your needles, choose your yarn, and let's climb to new knitting heights. The summit is waiting—and it's beautifully cozy up there.
Happy knitting, and may your stitches always be even and your cables always twist true!


