Plum Bow Ponytail Tie Free Crochet Pattern
Introduction
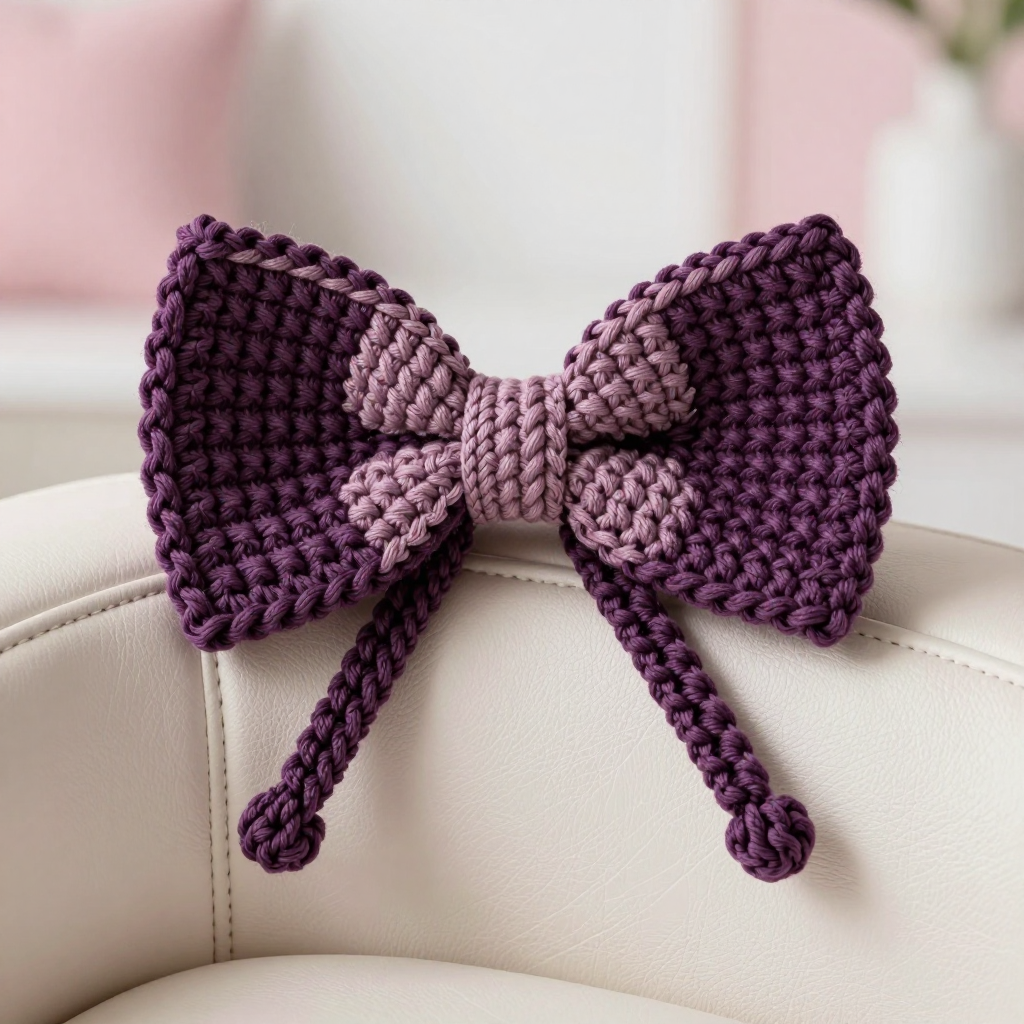
If you have never held a crochet hook before, this Plum Bow Ponytail Tie is the perfect very first project for you. It is a small, flat rectangle worked in the simplest stitch there is, cinched in the middle to make a sweet preppy bow, and finished with a tidy corded edge. Because it is only about 5 inches (12.5 cm) across, you can finish it in one cozy sitting and practice your stitches without committing to a big project. The finished bow feels soft but structured, with a deep plum body, a mauve center wrap that hides the cinch, and two short tie ends that dangle below. Clip it into a ponytail, a half-up style, or a tote bag strap and enjoy the compliments!
Materials Needed
- Yarn: Worsted weight (category 4) acrylic or cotton blend yarn — approximately 30 yards plum and 8 yards mauve. Scrap amounts work beautifully here.
- Crochet hook: Size H/8 (5 mm).
- Stitch markers: At least 2 (or use small safety pins or scrap yarn loops).
- Tapestry needle: A blunt-tipped needle with a large eye for sewing pieces together and weaving in ends.
- Scissors: Any small sharp pair.
- Optional: A hair elastic or small alligator clip for attaching the finished bow.
Finished measurements: Bow body about 4 inches (10 cm) wide x 2.5 inches (6.5 cm) tall before cinching. Center wrap about 1 inch (2.5 cm) wide. Each tie end about 3 inches (7.5 cm) long x 0.75 inch (2 cm) wide. Finished bow with tails about 5 inches (12.5 cm) across.
Abbreviations and Beginner Glossary
- ch — chain: yarn over the hook (wrap the yarn from back to front over the hook), pull the hook through the loop on your hook. That makes one chain.
- sc — single crochet: insert your hook into the stitch, yarn over, pull up a loop (2 loops on hook), yarn over again, pull through both loops. One single crochet made.
- rsc — reverse single crochet: exactly like a single crochet, but you work it from left to right instead of right to left. Insert hook into the stitch to the right of your hook, yarn over, pull up a loop, yarn over, pull through both loops. It makes a neat rolled cord edge.
- sl st — slip stitch: insert hook into the stitch, yarn over, pull the yarn through both the stitch and the loop on your hook in one motion. It joins without adding height.
- st / sts — stitch / stitches: the little V-shaped loops you work into.
- Rnd — round: a row that goes all the way around an edge and is joined into a circle.
- turn — flip your work over so you can work back along the row you just made.
- fasten off — cut the yarn a few inches from your work, pull the tail all the way through the last loop, and tug gently to lock it.
- 2nd ch from hook — skip the loop on your hook and the first chain; the next chain is where your first stitch goes.
Gauge
14 single crochet stitches x 16 rows = 4 inches (10 cm).
Gauge means how many stitches and rows fit into a square of fabric. It matters because it decides the finished size of your bow — if your stitches are looser than the gauge, the bow will be bigger; tighter, and it will be smaller. To check, crochet a small practice square about 5 inches wide in single crochet, lay it flat, and measure 4 inches across the middle. Count the stitches in that 4 inches. If you have more than 14, try a larger hook; if fewer, try a smaller hook. For a small accessory like this, being one or two stitches off is fine — just aim to be close.
Beginner Tips Before You Start
- Count every row. Single crochet rows all look alike, so place a stitch marker in the first stitch of each row as you begin it. It stops you from accidentally adding or losing stitches at the edges.
- Keep your tension relaxed. Do not pull the yarn tight after each stitch. The hook should glide; if it fights you, loosen your grip on the yarn.
- Work into both loops. Unless told otherwise, insert your hook under both the front and back loops of the V-shaped stitch. This keeps the fabric even.
- Chain 1 at the start of every row, then turn. That chain is just a little lifter — it does not count as a stitch, so your first single crochet goes into the very first stitch.
- Practice the reverse single crochet on a scrap first. Working left to right feels backwards at first; two minutes of practice makes it click.
- Do not cinch too tightly. When you gather the bow body, pinch it firmly but leave the center soft enough that the wrap can cover it neatly.
Step-by-Step Instructions
Bow Body (make 1, plum)
Row 1: Ch 15. Sc in the 2nd ch from hook and in each ch across. (14 sc)
Rows 2–10: Ch 1, turn. Sc in each st across. (14 sc)
Do not fasten off. You will now work the edging directly onto this piece.
Reverse Single Crochet Edging (plum)
Note: rsc is worked from left to right. Do not turn your work.
Rnd 1: Ch 1. Working along the top edge from left to right, rsc in each st across the top edge (14 rsc). Continue working rsc evenly down the side edge (10 rsc), across the bottom edge (14 rsc), and up the remaining side edge (10 rsc). Join with a sl st to the first rsc. Fasten off, leaving a 10-inch tail for cinching. (48 rsc total)
Center Wrap (make 1, mauve)
Row 1: Ch 7. Sc in the 2nd ch from hook and in each ch across. (6 sc)
Rows 2–8: Ch 1, turn. Sc in each st across. (6 sc)
Fasten off, leaving a 6-inch tail. The wrap should measure about 1 inch wide x 2 inches long.
Tie Ends (make 2, plum)
Row 1: Ch 6. Sc in the 2nd ch from hook and in each ch across. (5 sc)
Rows 2–8: Ch 1, turn. Sc in each st across. (5 sc)
Fasten off, leaving a 6-inch tail. Each tie end measures about 3 inches long x 0.75 inch wide. Repeat for the second tie end.
Assembly and Finishing
- Shape the bow: Lay the bow body flat and pinch it in the center with your fingers so the two sides fan out like a bow. Hold the pinch firmly.
- Wrap the center: Wrap the mauve center wrap around the cinched middle, covering the pinch completely. Thread the 6-inch tail onto your tapestry needle and sew the short ends of the wrap together at the back with a few small stitches. Secure with a knot but do not cut yet.
- Add the tie ends: Position the two plum tie ends behind the center wrap, angled slightly outward like little tails. Using the tapestry needle, sew each tie end securely to the back of the wrap with several stitches, then knot.
- Weave in ends: Thread each remaining tail onto the tapestry needle and run it back and forth through the back of the work for about an inch, changing direction once so it cannot pull loose. Trim close to the fabric.
- Block (optional but lovely): Lightly mist the bow with water, pin the bow body and tails flat on a towel or blocking mat, and let it dry completely. This relaxes the edges and makes the bow sit beautifully.
- Attach: Sew a hair elastic or small alligator clip to the back of the center wrap if desired.
Pro Tips and Variations
- Change colors: Make the bow body mauve and the center wrap plum for a reversed look, or use a scrap of cream for the wrap to make the plum pop.
- Adjust the size: For a bigger bow, start with a longer chain (every 2 extra chains adds about half an inch) and add rows to match; for a smaller bow, shorten the starting chain by 2–4 chains. Keep the center wrap and tie ends the same.
- Substitute yarn: Cotton yarn gives a crisp, preppy finish; acrylic is soft and squishy. Just check your gauge again, since different fibers behave differently.
- Add sparkle: Work the reverse single crochet edging in a metallic or contrast color for a fun, gift-worthy detail.