Meadow Whisper Cardigan Free Pattern
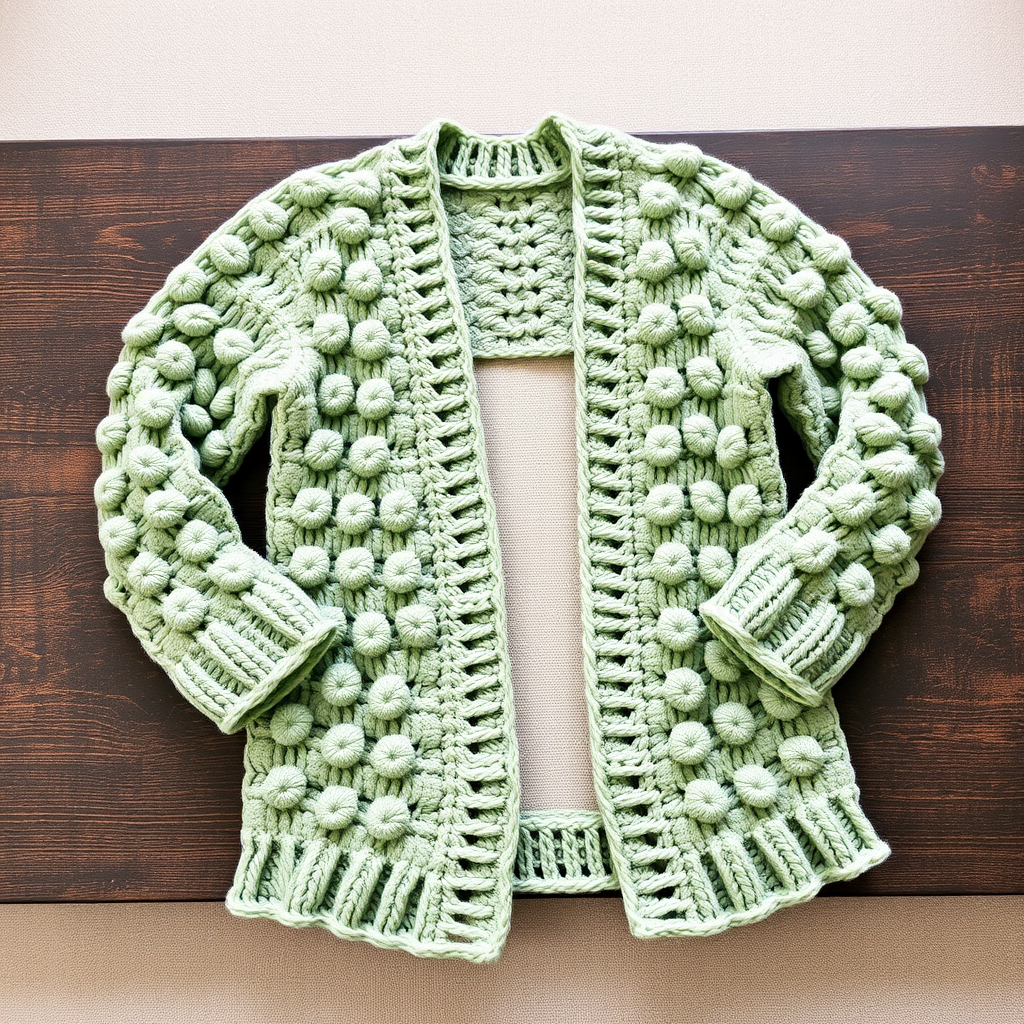
Meadow Whisper Cardigan Free Pattern: A Beginner's Guide to the Floret Stitch
Wrap yourself in the soft, textured embrace of the Meadow Whisper Cardigan, a modern take on the classic floret stitch. This cozy, open-front design features delicate floral clusters that cascade down the bodice, perfect for layering over your favorite dresses or tees. The dimensional, almost quilted appearance of the floret stitch creates a stunning visual effect that evokes a meadow of wildflowers, while the relaxed, drapey fit ensures all-day comfort. Whether you're a seasoned crocheter or a confident beginner looking for a rewarding project, this free pattern will guide you through creating a beautiful, nature-inspired garment that you'll treasure for years to come.
Materials Needed
Before you begin your crafting journey, gather the following materials to ensure a smooth and enjoyable crocheting experience:
- Yarn: Worsted weight (4) yarn in a soft sage green (approximately 1200-1600 yards depending on size). The soft, organic color perfectly complements the floral stitch pattern, but feel free to choose any color that speaks to you.
- Crochet Hooks: You'll need two sizes:
- 5.0 mm (H/8) crochet hook for the ribbing and edging
- 5.5 mm (I/9) crochet hook for the main body
- Other Supplies: Yarn needle for weaving in ends, scissors, and stitch markers (optional but helpful for keeping track of sections).
Gauge
14 sts x 11 rows = 4" in floret stitch with 5.5 mm hook. Always make a gauge swatch before starting to ensure your finished cardigan matches the intended measurements. Adjust your hook size if necessary to achieve the correct gauge.
Step-by-Step Instructions
Sizes and Measurements
This pattern is available in sizes S (M, L, XL, 2XL, 3XL, 4XL) with finished bust measurements of 36 (40, 44, 48, 52, 56, 60) inches. Choose the size that best fits your measurements, keeping in mind that this cardigan has a relaxed, drapey fit.
Stitches & Abbreviations (US terms)
- ch = chain
- sc = single crochet
- dc = double crochet
- tr = treble crochet
- sl st = slip stitch
- sk = skip
- sp = space
- st(s) = stitch(es)
- RS = right side
- WS = wrong side
Special Stitches
Floret Stitch (worked over 4 sts): *In same st, work (dc, tr, dc) all in same st, then sk 3 sts, sc in next st.* Repeat from * across. (Each floret uses 4 sts: 1 for the cluster, 3 skipped, 1 for sc)
Half Floret: At beginning of row, ch 3 (counts as dc), tr in same st, dc in same st, then continue with regular florets. This creates a neat edge that mirrors the full florets.
Pattern Notes
- The cardigan is worked in one piece from the bottom up, then split for armholes and worked in sections.
- Use 5.5 mm hook for main body, 5.0 mm hook for ribbing and edging.
- Always work with RS facing unless otherwise stated.
- Take your time with the floret stitch – it's easier than it looks and creates a beautiful, textured fabric.
Body (Worked in One Piece to Armholes)
With 5.5 mm hook, ch 126 (140, 154, 168, 182, 196, 210) loosely. The foundation chain should be relaxed to prevent the bottom edge from pulling.
Row 1 (RS): Sc in 2nd ch from hook, *sk 3 ch, in next ch work (dc, tr, dc), sk 3 ch, sc in next ch*; repeat from * across. Turn. (You will have 31 (35, 38, 42, 45, 49, 52) florets)
Row 2 (WS): Ch 1, sc in first st, *ch 3, sk next 3 sts (the cluster), sc in next sc*; repeat from * across. Turn. This row creates the chain spaces that will hold the next row's florets.
Row 3 (RS): Ch 3 (counts as dc), tr in same st, dc in same st (this forms a half floret at edge), *sc in next ch-3 sp, in next sc work (dc, tr, dc)*; repeat from * across, ending with sc in last ch-3 sp, then work (dc, tr, dc) in last sc. Turn. This creates a symmetrical edge with half florets on both sides.
Row 4: Repeat Row 2.
Repeat Rows 3-4 until piece measures 12 (12, 13, 13, 14, 14, 15) inches from beginning, ending with a WS row. This forms the main body of the cardigan before dividing for the armholes.
Divide for Armholes
Next Row (RS): Work in pattern across first 30 (34, 37, 41, 44, 48, 51) sts (approximately 7-8 florets), ch 4 (for underarm), skip next 30 (34, 37, 41, 44, 48, 51) sts (armhole), work in pattern across remaining sts. Turn. You now have two separate sections: the front and back, connected by the chain underarm. You'll work each section separately from here.
Left Front
Work on the first set of sts (from RS). Continue in pattern (Rows 2-3 repeat) until armhole measures 7 (7, 8, 8, 9, 9, 10) inches, ending with a WS row.
Shape Neck:
Next Row (RS): Work in pattern across first 15 (17, 19, 21, 22, 24, 26) sts, then turn, leaving remaining sts unworked. Continue in pattern on these sts for shoulder, decreasing 1 st at neck edge every row for 3 rows (by working sc2tog or skipping a st). This creates a gentle curve for the neckline. Then work even until total armhole length is 9 (9, 10, 10, 11, 11, 12) inches. Fasten off.
Right Front
Attach yarn to the other side of the armhole (RS). Work in pattern across the corresponding sts, mirroring left front shaping. This means you'll work the same number of stitches and decreases, but in reverse order. Fasten off.
Back
Attach yarn to the center section (back). Work in pattern across all back sts until armhole measures same as fronts. Then shape shoulders by working each side separately, decreasing at neck edge as for fronts. This creates a slight scoop at the back neckline. Fasten off.
Sleeves (Make 2)
With 5.5 mm hook, ch 46 (50, 54, 58, 62, 66, 70). Work in floret stitch pattern (as for body) until sleeve measures 2 inches less than desired length (e.g., if you want an 18-inch sleeve, work 16 inches). Then switch to 5.0 mm hook and work ribbing: *sc in each st across, ch 1, turn* for 2 inches (or desired cuff length). This creates a snug, comfortable cuff that contrasts beautifully with the textured body. Fasten off.
Finishing
- Sew shoulder seams using a yarn needle and mattress stitch or whip stitch for a seamless finish.
- Set in sleeves, sewing underarm and side seams. Take care to align the sleeve seams with the underarm chains for a professional look.
- Edging: With 5.0 mm hook, attach yarn at bottom corner. Work sc evenly around entire front opening and neckline, working 2 sc in each row end and 1 sc in each st. At corners, work 3 sc to create a smooth turn. Continue around bottom edge. Join with sl st. Fasten off. This clean edging frames the cardigan beautifully and prevents stretching.
- Weave in all ends carefully to ensure your cardigan looks polished from every angle.
- Block lightly to shape – this helps the floret stitch open up and drape beautifully. Use a spray bottle or steam iron (with care) to gently shape the cardigan to its final dimensions.
Congratulations! You've created your very own Meadow Whisper Cardigan. The textured floret stitch creates a stunning, dimensional fabric that's both cozy and elegant. This cardigan is perfect for layering over dresses, tees, or blouses, and the open-front design makes it easy to throw on for any occasion. The soft sage green color evokes a peaceful meadow, but don't be afraid to experiment with other shades – dusty rose, warm cream, or deep terracotta would all look gorgeous in this pattern.
As you wear your handmade creation, remember that every stitch was made with love and intention. This cardigan isn't just a garment – it's a piece of art that reflects your creativity and skill. Happy crocheting, and may your Meadow Whisper Cardigan bring you warmth and joy for many seasons to come!



