Lodge Bear Mug Hugger Free Crochet Pattern
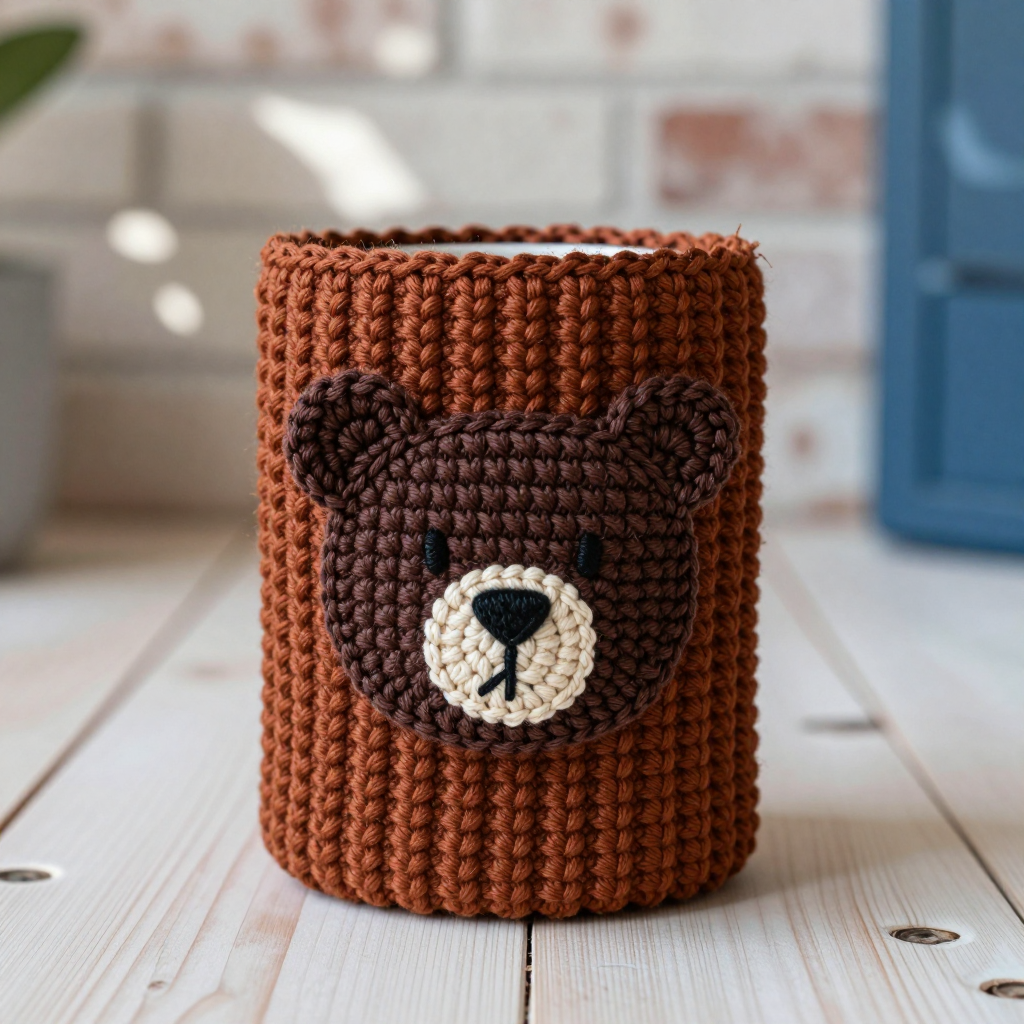
Lodge Bear Mug Hugger: A Cozy First Crochet Project
If you have never held a crochet hook before, this is the perfect place to begin. The Lodge Bear Mug Hugger is a small, satisfying project that wraps your favorite camp mug in warm, ribbed texture and finishes with an adorable bear face on the front. It works up quickly in worsted-weight yarn, uses only the most beginner-friendly stitches, and gives you a finished gift you can actually use. The ribbed body feels stretchy and snug in your hands, while the little bear head adds a rustic mountain-cabin charm. By the end, you will have learned chain, single crochet, half double crochet, and simple seaming — all in one cozy afternoon.
Materials Needed
- Yarn (worsted weight, category 4): approximately 60 yds Rust/Chocolate Brown (Color A) for the cozy body, 15 yds Dark Brown (Color B) for the bear head and ears, 5 yds Cream (Color C) for the muzzle, and 2 yds Black (Color D) for the nose and eyes. Acrylic or a wool blend both work well.
- Main hook: US I/9 (5.5 mm) crochet hook for the cozy body.
- Small hook: US E/4 (3.5 mm) crochet hook for the bear appliqué.
- Yarn needle (also called a tapestry needle) — a large, blunt-tipped needle with an eye big enough for yarn.
- Stitch marker — a small clip or safety pin used to mark a stitch.
- Scissors
- Small amount of fiberfill or yarn scraps for lightly stuffing the bear head.
- Finished size: Cozy body flat before seaming is 9 inches wide x 3.5 inches tall (23 cm x 9 cm). Seamed tube circumference is about 9 inches (23 cm), fitting mugs 3 to 3.5 inches in diameter. Bear head is about 2.25 inches wide x 2 inches tall (5.7 cm x 5 cm), with ears about 0.75 inch (2 cm) across.
Abbreviations and Beginner Glossary
- ch — chain: yarn over the hook, pull the yarn through the loop on your hook. This makes a small V-shaped link.
- sc — single crochet: insert hook into stitch, yarn over, pull up a loop (2 loops on hook), yarn over, pull through both loops. One loop remains.
- hdc — half double crochet: yarn over first, insert hook into stitch, yarn over, pull up a loop (3 loops on hook), yarn over, pull through all 3 loops at once.
- sl st — slip stitch: insert hook into stitch, yarn over, pull through both the stitch and the loop on your hook at the same time. Creates almost no height.
- sc2tog — single crochet 2 stitches together (a decrease): insert hook into first stitch, yarn over, pull up a loop; insert hook into next stitch, yarn over, pull up a loop (3 loops on hook); yarn over, pull through all 3 loops. Turns two stitches into one.
- BLO — back loop only: each stitch has two top loops (front and back). Work only into the loop farthest from you.
- st(s) — stitch(es)
- beg — beginning
- rnd — round: one complete circle of stitches worked around.
- magic ring — an adjustable loop of yarn you crochet into, then pull tight to close the center hole.
- yarn over — wrap the working yarn over your hook from back to front.
Gauge
Cozy body (hdc back-loop ribbing): 12 sts x 10 rows = 4 inches (10 cm). Bear head (single crochet): 5 sts x 5 rounds = 1 inch (2.5 cm).
Gauge means how many stitches and rows fit into a set measurement. It matters because it decides whether your cozy actually fits a mug — too loose and it slides off, too tight and it will not stretch over the cup. To check gauge, crochet a small square (about 4 inches) in the same stitch and hook, then lay a ruler across the middle and count the stitches and rows in 4 inches. If you have more stitches than listed, try a larger hook; if fewer, try a smaller hook.
Beginner Tips Before You Start
- Count your chains carefully. Row 1 sets the width of the whole cozy. Count the 27 hdc stitches once you finish the row.
- Use a stitch marker in the first stitch of each row so you never lose your place.
- Do not pull the yarn too tight. Keep an even, relaxed tension so the ribbing stays stretchy enough to hug the mug.
- Work the back loop only for the body. Look at the top of each stitch: skip the loop nearest you and go into the one behind it. This is what creates the ridges.
- Keep the bear small and flat. Use the 3.5 mm hook and stuff the head only lightly so the appliqué lies smoothly against the cozy.
Step-by-Step Instructions
Cozy Body (worked flat in rows with Color A and the 5.5 mm hook)
Row 1: Ch 28. Hdc in the 2nd ch from hook and in each ch across. (27 hdc)
Row 2: Ch 1, turn. Working in BLO, hdc in each st across. (27 hdc)
Rows 3–10: Repeat Row 2 seven more times. (27 hdc per row; 10 rows total)
Do not fasten off yet. The piece should measure about 9 inches wide x 3.5 inches tall and feel slightly stretchy.
Seaming the Tube
Fold the rectangle in half with right sides together, matching the first row to the last row. Using Color A and the yarn needle, whipstitch or mattress-stitch the short ends together to form a tube. Fasten off and weave in ends. Turn the tube right side out so the ribbed texture faces outward.
Bear Head Appliqué (worked in joined rounds with Color B and the 3.5 mm hook)
Rnd 1: Make a magic ring. Ch 1, work 6 sc into the ring. Join with a sl st to the first sc. (6 sc)
Rnd 2: Ch 1, 2 sc in each st around. Join with a sl st. (12 sc)
Rnd 3: Ch 1, [2 sc in next st, sc in next st] around. Join with a sl st. (18 sc)
Rnd 4: Ch 1, [2 sc in next st, sc in each of the next 2 sts] around. Join with a sl st. (24 sc)
Rnd 5: Ch 1, sc in each st around. Join with a sl st. (24 sc)
Rnd 6: Ch 1, [sc2tog, sc in each of the next 2 sts] around. Join with a sl st. (18 sc)
Rnd 7: Ch 1, [sc2tog, sc in next st] around. Join with a sl st. (12 sc)
Stuff the head lightly with a small amount of fiberfill or yarn scraps to give it a soft rounded shape. Do not overstuff; the appliqué should stay fairly flat.
Rnd 8: Ch 1, sc2tog around. Join with a sl st. (6 sc)
Fasten off, leaving a 10-inch tail. Thread the tail onto the yarn needle and weave through the remaining 6 sts; pull tight to close. Weave in the end.
Ears (make 2 with Color B and the 3.5 mm hook)
Rnd 1: Make a magic ring. Ch 1, work 6 sc into the ring. Join with a sl st to the first sc. (6 sc)
Rnd 2: Ch 1, 2 sc in each st around. Join with a sl st. (12 sc)
Rnd 3: Ch 1, sc in each st around. Join with a sl st. (12 sc)
Fasten off, leaving a 6-inch tail on each ear. Flatten each ear slightly into a rounded half-circle shape.
Muzzle (worked with Color C and the 3.5 mm hook)
Rnd 1: Make a magic ring. Ch 1, work 6 sc into the ring. Join with a sl st to the first sc. (6 sc)
Rnd 2: Ch 1, 2 sc in each st around. Join with a sl st. (12 sc)
Rnd 3: Ch 1, sc in each st around. Join with a sl st. (12 sc)
Fasten off, leaving a 6-inch tail. The muzzle should be a small oval about 1 inch (2.5 cm) across.
Assembly and Finishing
1. Position the bear head on the front of the cozy tube, centered horizontally and about 0.75 inch (2 cm) below the top edge. Pin in place.
2. Using Color B and the yarn needle, stitch the bear head to the cozy with small, neat whipstitches around the outer edge. Do not stitch through to the inside of the tube.
3. Pin the two ears to the top of the bear head, about 0.5 inch (1.3 cm) apart, so they sit like rounded bumps above the head. Stitch each ear in place with Color B.
4. Center the cream muzzle on the lower half of the bear head. Stitch it down with Color C and the yarn needle using small whipstitches.
5. With Color D and the yarn needle, embroider a small triangular nose at the top center of the muzzle using 3–4 straight stitches, then add two small straight-stitch eyes above the muzzle, about 0.5 inch (1.3 cm) apart.
6. Weave in all remaining ends by threading each tail onto the yarn needle and running it back and forth through the back of the fabric for about an inch, then trimming close.
7. Slip the cozy onto a mug to check the fit. The ribbed fabric should stretch gently to hug the mug without bagging. If a looser fit is needed, add 1–2 rows to the cozy body before seaming. If a tighter fit is needed, remove 1–2 rows. Steam-block the bear appliqué lightly, if desired, to help it lie flat.
Pro Tips and Variations
- Change the colors: Swap the rust body for forest green, charcoal, or oatmeal for a different cabin look, and use any dark brown for the bear.
- Adjust the size: For a larger mug, add 3 chains to Row 1 (each 3 chains adds about 1 inch of width) and add rows to reach your desired height. For a smaller mug, remove 3 chains and a row or two.
- Substitute yarn: Any worsted-weight (category 4) yarn works. Just check your gauge again, since different fibers stretch differently.
- Make it a gift set: Crochet two or three huggers in coordinating colors and tie them around a mug with a ribbon for a handmade present.