Gossamer Grove Lace Blanket Free Pattern – Airy Botanical Knit
Gossamer Grove Lace Blanket Free Pattern – Airy Botanical Knit
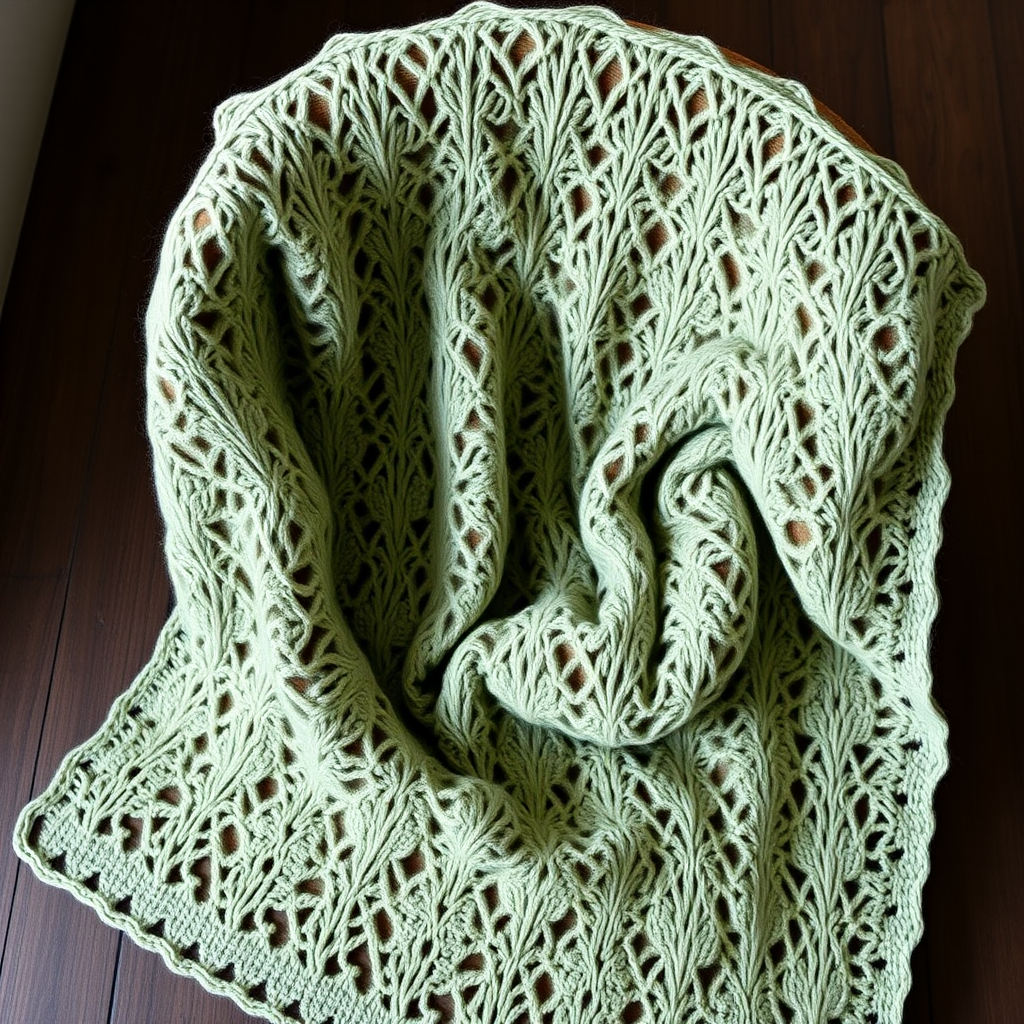
Wrap yourself in the delicate beauty of a hand-knitted lace blanket inspired by sun-dappled forest floors. This ethereal throw features cascading leaf motifs and openwork trellises that create a dreamy, textured drape. Whether you're an experienced lace knitter or a brave beginner ready for a rewarding challenge, the Gossamer Grove Lace Blanket is a stunning heirloom project that will become a cherished piece in your home for years to come.
Worked in soft sage green fingering weight yarn, this botanical knit pattern evokes the serene calm of a forest glade. The combination of yarn overs (yo), decreases, and garter stitch borders creates a fabric that is both airy and substantial—perfect for draping over a chair, layering on a bed, or wrapping around your shoulders on a cool evening. Let's dive into this free pattern and create something truly magical.
Materials Needed
Before you begin, gather the following supplies. Having everything ready will make your knitting experience smooth and enjoyable.
- Yarn: 1200 yards of fingering weight yarn in soft sage green (e.g., Malabrigo Sock or similar). The yardage ensures you have enough for the full 50" x 60" throw.
- Needle: US 6 (4.0 mm) circular knitting needle with a 32-inch cable. The long cable is essential for holding the 200+ stitches comfortably.
- Stitch markers: At least 2 markers to help track pattern repeats (optional but highly recommended).
- Tapestry needle: For weaving in ends and finishing.
- Blocking mats and pins: To open up the lace and achieve the final dimensions.
Gauge & Finished Size
- Gauge: 20 stitches and 28 rows = 4 inches in stockinette stitch (blocked). Gauge is crucial for lace—always knit a swatch and block it before starting.
- Finished Size: Approximately 50" wide x 60" long after blocking.
Abbreviations
Familiarize yourself with these standard knitting abbreviations before starting:
- k = knit
- p = purl
- yo = yarn over (creates an eyelet and adds a stitch)
- k2tog = knit two together (right-leaning decrease)
- ssk = slip, slip, knit (left-leaning decrease)
- k3tog = knit three together (double decrease)
- pm = place marker
- sm = slip marker
- rep = repeat
Step-by-Step Instructions
This pattern is worked flat from the bottom up. The lace pattern is a 24-row repeat that you'll work 12 times, framed by a simple garter stitch border on all sides. Follow these instructions carefully, and you'll be amazed at the beautiful botanical fabric that emerges.
Pattern Notes
- The blanket is worked flat (back and forth) on a circular needle to accommodate the large number of stitches.
- The first and last 3 stitches of every row are knit (garter stitch edge) to create a neat, non-curling selvedge border.
- All wrong-side (WS) rows are purled between the edge stitches, except for the border rows which are all knit.
- Blocking is essential: The lace will look scrunched and messy before blocking. Trust the process—aggressive blocking will open up the yarn overs and reveal the stunning leaf and trellis patterns.
Cast On
Loosely cast on 200 stitches. A long-tail cast-on or a knitted cast-on works well. Ensure your cast-on is not too tight, as this will make the first few rows difficult and affect the final drape.
Border (Rows 1–8)
This garter stitch border frames the blanket and prevents curling.
- Row 1 (RS): Knit all stitches.
- Row 2 (WS): Knit all stitches.
- Row 3: Knit all stitches.
- Row 4: Knit all stitches.
- Row 5: Knit all stitches.
- Row 6: Knit all stitches.
- Row 7: Knit all stitches.
- Row 8: Knit all stitches.
Tip: Place a marker after the first 3 stitches and before the last 3 stitches to help you remember the border.
Main Lace Pattern (Repeat 12 Times)
Now we begin the heart of the pattern. The 24-row repeat creates the cascading leaf and trellis motifs. Work the following rows, repeating the section between the asterisks (*) across the row, and always keeping the first and last 3 stitches as knit (k3 at start and end of each row).
Row 1 (RS): k3, *yo, ssk, k8, k2tog, yo, k1; rep from * to last 3 sts, k3.
Row 2 (WS): k3, purl to last 3 sts, k3.
Row 3: k3, *k1, yo, ssk, k6, k2tog, yo, k2; rep from * to last 3 sts, k3.
Row 4: k3, purl to last 3 sts, k3.
Row 5: k3, *k2, yo, ssk, k4, k2tog, yo, k3; rep from * to last 3 sts, k3.
Row 6: k3, purl to last 3 sts, k3.
Row 7: k3, *k3, yo, ssk, k2, k2tog, yo, k4; rep from * to last 3 sts, k3.
Row 8: k3, purl to last 3 sts, k3.
Row 9: k3, *k4, yo, ssk, k2tog, yo, k5; rep from * to last 3 sts, k3.
Row 10: k3, purl to last 3 sts, k3.
Row 11: k3, *k5, yo, k2tog, ssk, yo, k5; rep from * to last 3 sts, k3.
Row 12: k3, purl to last 3 sts, k3.
Row 13: k3, *k6, yo, k3tog, yo, k6; rep from * to last 3 sts, k3.
Row 14: k3, purl to last 3 sts, k3.
Row 15: k3, *k5, k2tog, yo, k1, yo, ssk, k5; rep from * to last 3 sts, k3.
Row 16: k3, purl to last 3 sts, k3.
Row 17: k3, *k4, k2tog, yo, k3, yo, ssk, k4; rep from * to last 3 sts, k3.
Row 18: k3, purl to last 3 sts, k3.
Row 19: k3, *k3, k2tog, yo, k5, yo, ssk, k3; rep from * to last 3 sts, k3.
Row 20: k3, purl to last 3 sts, k3.
Row 21: k3, *k2, k2tog, yo, k7, yo, ssk, k2; rep from * to last 3 sts, k3.
Row 22: k3, purl to last 3 sts, k3.
Row 23: k3, *k1, k2tog, yo, k9, yo, ssk, k1; rep from * to last 3 sts, k3.
Row 24: k3, purl to last 3 sts, k3.
Repeat these 24 rows a total of 12 times. To keep track, use a row counter or place a removable marker every time you complete a full repeat. After 12 repeats, your blanket should measure approximately 52 inches in length before blocking.
Border (Rows 1–8)
Finish the blanket with a matching garter stitch border to mirror the beginning.
- Row 1 (RS): Knit all stitches.
- Row 2 (WS): Knit all stitches.
- Row 3: Knit all stitches.
- Row 4: Knit all stitches.
- Row 5: Knit all stitches.
- Row 6: Knit all stitches.
- Row 7: Knit all stitches.
- Row 8: Knit all stitches.
Bind Off
Bind off very loosely to ensure the edge stretches to match the lace. Use a larger needle (e.g., US 8) or a yarn-over bind off method: Knit 1, *yarn over, knit 1, pass the first stitch over the second and the yarn over over the knit stitch; repeat from *. This creates a stretchy, decorative edge that won't pucker.
Finishing & Blocking
This is the most magical step! The lace will look crumpled and the stitches uneven—this is completely normal.
- Weave in ends using your tapestry needle, being careful not to pull too tight.
- Soak the blanket in lukewarm water with a mild wool wash (like Eucalan or Soak) for 20–30 minutes.
- Gently squeeze out excess water—do not wring or twist.
- Roll the blanket in a clean towel to remove additional moisture.
- Pin to measurements: Lay the blanket on blocking mats and pin it out to 50" x 60". Pay special attention to the points of the lace motifs—pin them out gently to open up the yarn overs and create the beautiful botanical shapes.
- Let dry completely (this can take 24–48 hours). Remove pins and enjoy your masterpiece!
Tips for Success
- Count your stitches: The pattern is designed to maintain a consistent stitch count. If you find you're off by a stitch or two, check your yarn overs and decreases—it's easy to miss one.
- Use lifelines: Thread a piece of scrap yarn through the stitches after every repeat (every 24 rows). If you make a mistake, you can easily rip back to the lifeline without losing all your work.
- Take breaks: Lace knitting requires focus. Step away if you feel frustrated, and return with fresh eyes.
- Trust the blocking: The final result depends heavily on blocking. Don't skip it—it transforms the fabric from a scrunched mess into a flowing, ethereal throw.
The Gossamer Grove Lace Blanket is more than just a knitting project—it's a meditation on nature, a celebration of craftsmanship, and a gift of warmth and beauty. Whether you keep it for yourself or give it as a heartfelt present, this botanical knit will be treasured for generations. Happy knitting!


