Evergreen Embrace Knitted Wreath Free Pattern
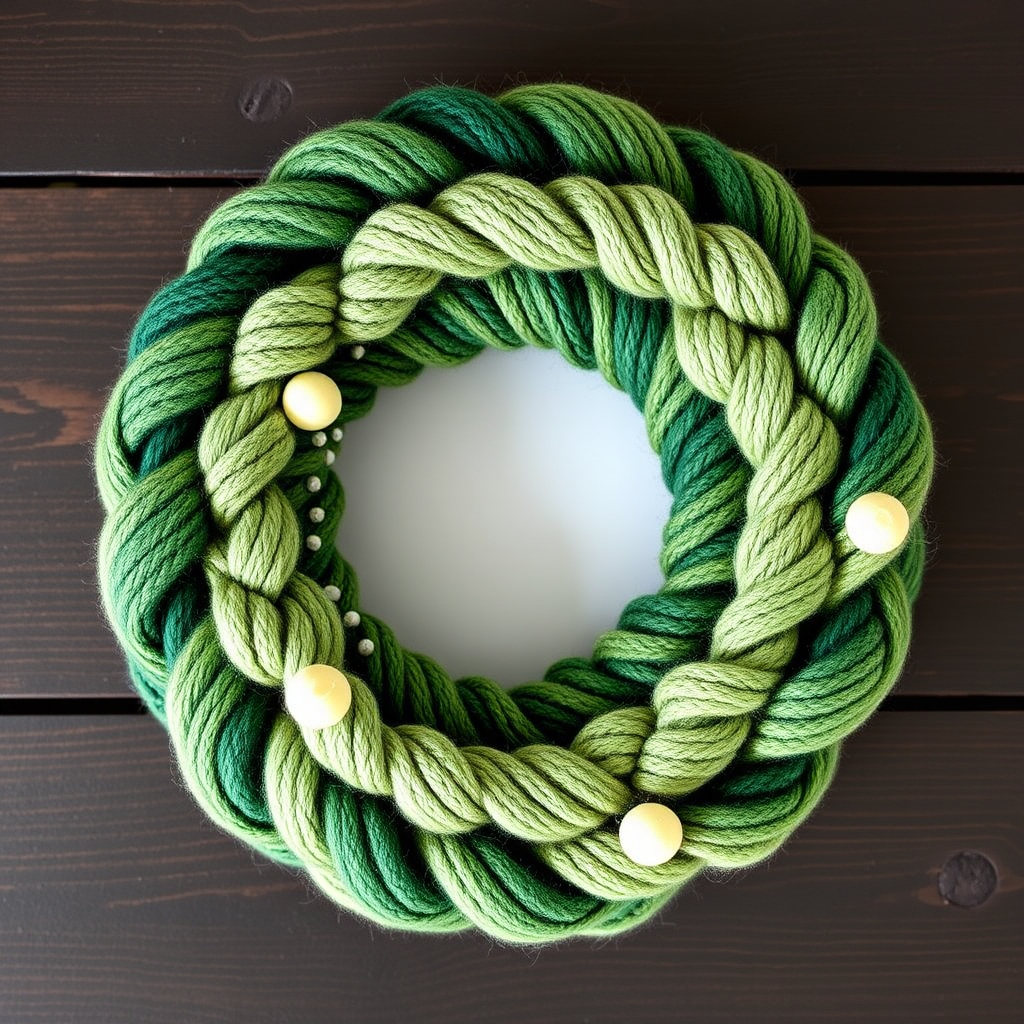
Cozy Up Your Doorway: The Evergreen Embrace Knitted Wreath
Are you looking to add a touch of handmade warmth to your holiday decor this year? Move over, traditional pine wreaths—there's a new cozy classic in town. The Evergreen Embrace Knitted Wreath is a plush, textured twist on festive decorating that brings rustic elegance to any door, wall, or mantel. This modern heirloom piece is surprisingly simple to construct, using a clever braided technique that creates a rich, dimensional look. Best of all, this is a free knitting pattern that makes for a thoughtful, handmade gift that friends and family will cherish for years to come.
This project is perfect for intermediate knitters looking for a fun, stash-busting challenge, but beginners who are comfortable with basic knit/purl stitches and simple cables can absolutely tackle this rewarding project. The beauty of this pattern lies in its forgiving nature—gauge isn't critical, so you can relax and enjoy the process of creating something truly special. Let's dive into how you can craft this stunning yarn wreath for your own cozy home.
Materials Needed for Your Hand-Knit Wreath
Before you begin your crafting session, gather these essential supplies. The quality of your yarn will significantly impact the final look, so choose soft, plush worsted-weight yarns for the best "squishy" effect.
- Yarn: Worsted weight yarn in three shades of green (e.g., Forest, Spruce, and Sage) and a contrasting cream or white for the berries. You will need approximately 150-200 yards of each green and 50 yards of the cream color.
- Knitting Needles: US 8 (5 mm) knitting needles. Straight or circular needles both work fine for this project.
- Cable Needle: A small cable needle (or double-pointed needle) for the cable pattern on Strand 3.
- Yarn Needle: A large-eye tapestry needle for seaming and weaving in ends.
- Scissors: A sharp pair for cutting yarn.
- Stitch Markers (optional): Helpful for keeping track of your rows, especially on the long strands.
Note on Gauge: The pattern specifies 18 stitches and 24 rows = 4 inches in stockinette stitch. While gauge isn't critical for the wreath's structure, maintaining a consistent tension throughout your knitting will ensure your three strands are equal in length and create a balanced braid.
Step-by-Step Instructions: Knitting Your Evergreen Wreath
The magic of this pattern comes from knitting three distinct textured strands and then braiding them together. Follow these detailed instructions carefully to create your masterpiece.
Strand 1: The Smooth Stockinette (Dark Green)
This strand provides a sleek, classic base that contrasts beautifully with the textured strands.
- Cast On: Cast on 12 stitches with your dark green yarn.
- Knit the Body: Work in stockinette stitch. This means you will Knit one row, then Purl one row. Repeat these two rows.
- Length: Continue knitting until the strand measures approximately 60 inches long. This length is crucial as it allows the strand to wrap around your wreath form twice. If you want a larger wreath, knit longer; for a smaller one, knit shorter.
- Bind Off: Bind off all stitches loosely. A loose bind-off is essential to prevent the edges from curling and to maintain the strand's flexibility for braiding. Cut your yarn, leaving a 6-inch tail, and pull it through the last loop.
Strand 2: The Bumpy Seed Stitch (Medium Green)
This strand adds wonderful, tactile texture that catches the light and gives the wreath its cozy, handmade feel.
- Cast On: Cast on 12 stitches with your medium green yarn.
- Knit the Body: Work in a seed stitch pattern. This is a simple two-row repeat:
- Row 1: *K1, P1*; repeat from * to end of row.
- Row 2: *P1, K1*; repeat from * to end of row.
- Important Note: Because you have an even number of stitches (12), Row 2 is the exact opposite of Row 1. This creates the classic, bumpy "seed" texture. Repeat these two rows until the strand measures 60 inches.
- Bind Off: Bind off loosely in pattern (knit the knits and purl the purls as they come). Cut yarn, leaving a tail.
Strand 3: The Textured Cable (Light Green)
This is the showstopper strand. The simple cable adds an elegant, intricate detail that elevates the entire wreath.
- Cast On: Cast on 12 stitches with your light green yarn.
- Knit the Body: Work the following 4-row cable pattern:
- Row 1 (Right Side): K6, P6.
- Row 2 (Wrong Side): K6, P6. (Note: You are knitting the purls and purling the knits from the previous row, which keeps the stockinette sections on the right side).
- Row 3 (Cable Row): Slip the next 3 stitches onto your cable needle and hold them at the front of your work. Knit the next 3 stitches from your left needle. Then, knit the 3 stitches from the cable needle. Finally, P6. This creates a left-leaning cable.
- Row 4: K6, P6.
- Repeat: Repeat Rows 1-4 until the strand measures 60 inches, ending on a Row 4 to ensure the pattern is complete.
- Bind Off: Bind off loosely in pattern. Cut yarn, leaving a tail.
Assembly: Braiding and Shaping Your Wreath
Now for the fun part—watching your creation come together!
- Lay Out Strands: Lay the three finished strands parallel to each other on a flat surface. Ensure the "right side" (the smooth, knit side) of each strand is facing up.
- Braid Together: Secure the top ends of the three strands together with a temporary knot or a large safety pin. Braid the strands together tightly and evenly, just like braiding hair. Keep the knit side facing out as you braid. Secure the bottom ends with another temporary knot.
- Coil the Wreath: Take the braided strand and begin coiling it into a spiral. Start from one end and work your way outwards in a circular motion, forming a wreath shape. Aim for a diameter of about 16 inches. Adjust the tightness of the coil to achieve your desired wreath size.
- Sew the Coils: Thread your yarn needle with a long piece of matching dark green yarn. Carefully sew the coils together on the back of the wreath. Use a whipstitch or overcast stitch to securely connect the braided rings, ensuring the front remains clean and beautiful. Sew in several places around the wreath to make it sturdy.
Creating the Festive Berries
These little pops of cream color are the perfect finishing touch.
- Cast On: With your cream yarn, cast on 5 stitches, leaving a long tail (about 8 inches).
- Knit One Row: Knit across all 5 stitches.
- Gather: Cut your yarn, leaving another long tail. Thread the tail onto your yarn needle. Slide the needle through all 5 stitches on your knitting needle, then gently pull the yarn tight. This will gather the stitches into a small, round ball.
- Secure: Use the yarn tails to sew the small opening closed and secure the ball shape. Weave in the ends or leave them long to use for sewing the berry onto the wreath.
- Attach: Repeat to make 5-7 berries. Sew them randomly across the surface of the wreath, nestling them into the braids for a natural look.
Adding the Hanging Loop
- Create Chain: Using your cream or dark green yarn and a crochet hook, make a simple chain of 20 stitches. If you don't have a crochet hook, you can knit an I-cord or simply braid three small strands of yarn together.
- Attach: Fold the chain in half to form a loop. Sew the two ends securely to the back of the wreath at the top.
Once your loop is attached, weave in any remaining loose ends on the back of the wreath. Give your wreath a gentle fluff and shape, and it's ready to hang! This beautiful, squishy creation is sure to be a conversation starter and a beloved part of your holiday traditions for years to come. Happy knitting!


