Deep Current Sleeping Raccoon Oval: Free No-Sew Velvet Crochet Pattern
Deep Current Sleeping Raccoon Oval: Free No-Sew Velvet Crochet Pattern
Introduction
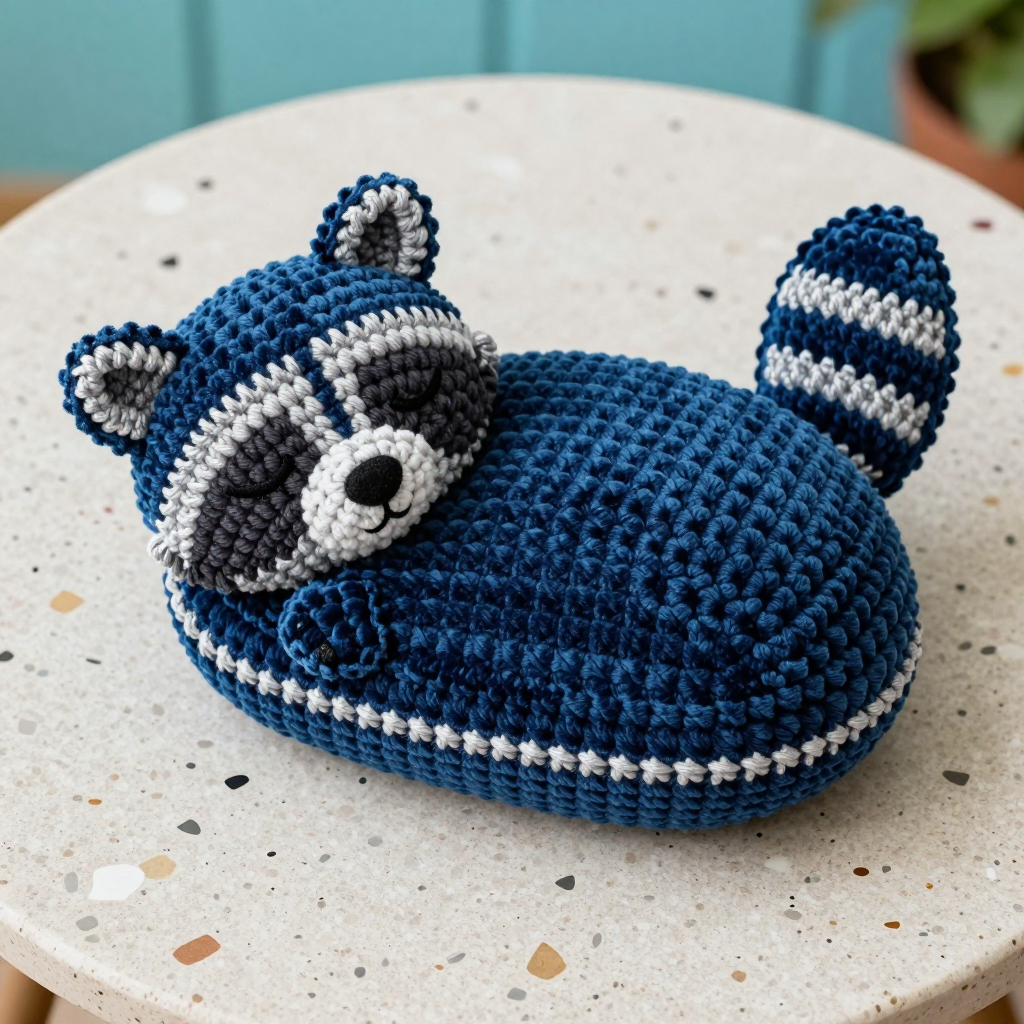
Meet the Deep Current Sleeping Raccoon, a curl-up-and-nap desk buddy worked in deep ocean-blue velvet yarn with soft silver stripes. This project is perfect for a confident beginner who has mastered the single crochet and wants to make something truly special, because almost every step is worked directly onto the body with no separate sewing thread required. The finished raccoon is a smooth, elongated oval about 5 inches long, 3 inches wide, and 2.5 inches tall, with two tiny rounded ears, gently closed embroidered eyes, a little black nose, and a striped tail that curves across its back. The velvet yarn gives it a plush, light-catching nap that feels like a tiny sleeping pet in your palm, and its quiet Victorian-romantic mood makes it a lovely companion for any workspace. If you can make a magic ring and a single crochet, you can make this raccoon.
Materials Needed
- Yarn (main color, MC): Bernat Velvet, 100% polyester, bulky weight (CYC 5), 300 g / 315 yd per skein, in Deep Sea — approx. 90 yd needed.
- Yarn (contrast color, CC): Bernat Velvet in Silver — approx. 25 yd needed (for the striped tail).
- Yarn (accent color, CC2): Bernat Velvet in Black — approx. 5 yd needed (for the eye lines and nose).
- Hook: 4.0 mm (US G-6) crochet hook.
- Stuffing: Polyester fiberfill.
- Stitch marker: One removable marker (or a scrap of contrasting yarn) to mark the start of each round.
- Tapestry needle: A blunt-tipped needle with an eye large enough for bulky yarn, for weaving in ends and attaching the tail.
- Scissors: Any small, sharp pair.
- Finished size: Approx. 5 in / 12.5 cm long x 3 in / 7.5 cm wide x 2.5 in / 6 cm tall.
Abbreviations and Beginner Glossary
- sc — single crochet: insert your hook into the stitch, yarn over (wrap the yarn around the hook), pull up a loop (you now have 2 loops on the hook), yarn over again, and pull through both loops. One single crochet made.
- inc — increase: work 2 single crochet stitches into the same stitch. This adds one stitch.
- dec — decrease (invisible single crochet decrease): insert your hook into the front loop only of the next stitch, then into the front loop only of the following stitch (2 loops on hook), yarn over and pull through both of those loops, yarn over again and pull through the remaining 2 loops. This turns 2 stitches into 1.
- sl st — slip stitch: insert hook, yarn over, pull the loop straight through the stitch and through the loop on your hook. Used here only if you need to join; this pattern mostly does not join.
- ch — chain: yarn over and pull through the loop on your hook. Each chain looks like a small V.
- st / sts — stitch / stitches.
- MR — magic ring: a loop of yarn you make with your fingers that you crochet into, then pull closed so there is no hole in the center.
- BLO — back loop only: work into just the back half of the V-shaped stitch top.
- FLO — front loop only: work into just the front half of the V-shaped stitch top.
- yarn over — wrap the working yarn around your hook from back to front.
- fasten off — cut the yarn leaving a tail, then pull the tail all the way through the last loop to lock it.
- continuous spiral rounds — you work round after round without joining or turning, so the rounds spiral upward like a coil.
- whipstitch — a simple over-and-over stitch: bring the needle up through both layers, over the edge, and back down, repeating along the seam.
- satin stitch — straight stitches laid side by side to fill a small shape.
Gauge
Gauge: 16 sc x 18 rounds = 4 in / 10 cm in continuous spiral single crochet with the 4.0 mm hook and velvet yarn.
Why gauge matters: Gauge is simply how big your stitches turn out. If your stitches are bigger than the gauge, your raccoon will be larger and the stuffing may show through; if smaller, it will be stiff and tiny. Because this is a small stuffed toy, matching gauge keeps the fabric dense enough to hide the fiberfill.
How to make a gauge swatch: With MC, make a magic ring, then work 6 rounds of increases as in the Body (Rnds 1–6 of the pattern), then work even single crochet rounds until your swatch is at least 4 in wide. Lay a ruler across the middle and count how many single crochet stitches fit in 4 in, and how many rounds fit in 4 in. If you have more stitches than 16, try a larger hook; if fewer, try a smaller hook. Work tightly and keep your tension even — velvet yarn sheds slightly, so a firm, consistent hand helps.
Beginner Tips Before You Start
- Use a stitch marker. Place it in the first stitch of each round and move it up every round. In a continuous spiral there is no seam to guide you, so the marker is your only landmark.
- Do not pull the yarn too tight. Velvet yarn is slippery and snaps if you yank it. Keep an even, gentle tension so the stitches stay dense but the yarn stays intact.
- Count every round out loud. Each round in the Body has a stitch count in parentheses — check it before moving on. A missed stitch now becomes a lopsided raccoon later.
- Stuff in small handfuls. Add fiberfill a little at a time and shape as you go, so the oval stays smooth and longer than it is tall.
- Work the eyes and nose last. Embroidering features onto a finished, stuffed body is much easier than onto a floppy half-made one.
- Keep your yarn tails long. Long tails make attaching the ears and tail far easier — never trim until you have woven the end in.
Step-by-Step Instructions
Body (worked in continuous spiral rounds — do not join, do not turn)
With MC, make a magic ring.
Rnd 1: 6 sc in MR. (6 sts)
Rnd 2: inc in each st around. (12 sts)
Rnd 3: [sc in next st, inc] 6 times. (18 sts)
Rnd 4: [sc in next 2 sts, inc] 6 times. (24 sts)
Rnd 5: [sc in next 3 sts, inc] 6 times. (30 sts)
Rnd 6: [sc in next 4 sts, inc] 6 times. (36 sts)
Rnd 7: [sc in next 5 sts, inc] 6 times. (42 sts)
Rnd 8: [sc in next 6 sts, inc] 6 times. (48 sts)
Rnds 9–20: sc in each st around. (48 sts) — 12 even rounds.
Rnd 21: [sc in next 6 sts, dec] 6 times. (42 sts)
Rnd 22: [sc in next 5 sts, dec] 6 times. (36 sts)
Rnd 23: [sc in next 4 sts, dec] 6 times. (30 sts)
Rnd 24: [sc in next 3 sts, dec] 6 times. (24 sts)
Stuff firmly with fiberfill now, shaping the body into an oval that is longer than it is tall.
Rnd 25: [sc in next 2 sts, dec] 6 times. (18 sts)
Rnd 26: [sc in next st, dec] 6 times. (12 sts)
Add a little more stuffing to firm the shape.
Rnd 27: dec 6 times. (6 sts)
Fasten off, leaving a 6-in tail. Thread the tail through the front loops of the remaining 6 sts and pull closed. Weave in the end. Gently squeeze and roll the oval between your palms to even out the stuffing and create a smooth, elongated sleeping-body shape.
Ears (make 2 — worked in continuous rounds, no sewing required)
With MC, make a magic ring.
Rnd 1: 4 sc in MR. (4 sts)
Rnd 2: [sc in next st, inc] 2 times. (6 sts)
Rnd 3: sc in each st around. (6 sts)
Rnd 4: [sc in next 2 sts, inc] 2 times. (8 sts)
Rnd 5: sc in each st around. (8 sts)
Fasten off, leaving a 10-in tail. Do not stuff. Flatten each ear into a small rounded triangle. Using the yarn tail, whipstitch the base of each ear closed, then attach the ears directly to the top of the body at Rnds 3–5, spaced about 1.5 in apart, using the same tail (no separate sewing thread needed). Angle the ears slightly outward.
Closed-Eye Lines (worked directly onto the body, no sewing)
With CC2 (Black), cut a 12-in length and thread your tapestry needle. Insert the needle at the side of the body near Rnd 12, bring it up through a stitch, and work a short 3-stitch straight stitch curving gently downward to suggest a closed sleeping eye. Repeat on the opposite side, mirroring the curve. Secure both ends inside the body and trim.
Nose (worked directly onto the body)
With CC2, make a 2-stitch satin stitch at the front tip of the oval, centered between the eye lines and about 1 in below them. Secure the ends inside the body.
Tail Appliqué (worked flat in rows, then attached)
With CC (Silver), ch 6.
Row 1: sc in 2nd ch from hook and in each ch across. (5 sts) Turn.
Rows 2–3: ch 1, sc in each st across. (5 sts) Turn. Change to MC.
Rows 4–5: ch 1, sc in each st across. (5 sts) Turn. Change to CC.
Rows 6–7: ch 1, sc in each st across. (5 sts) Turn. Change to MC.
Rows 8–9: ch 1, sc in each st across. (5 sts) Turn. Change to CC.
Rows 10–11: ch 1, sc in each st across. (5 sts) Turn. Change to MC.
Rows 12–13: ch 1, sc in each st across. (5 sts) Turn. Change to CC.
Rows 14–15: ch 1, sc in each st across. (5 sts) Turn. Change to MC.
Rows 16–17: ch 1, sc in each st across. (5 sts) Turn. Change to CC.
Rows 18–19: ch 1, sc in each st across. (5 sts) Turn. Change to MC.
Row 20: ch 1, sc in each st across. (5 sts) Turn.
Fasten off, leaving a 12-in tail. The tail should measure approx. 4.5 in long x 1.25 in wide with alternating 2-row stripes of Deep Sea and Silver.
Assembly and Finishing
Attaching the tail: Pin the tail appliqué across the back of the body, starting near the rear tip and curving gently upward over the top of the oval. Using the yarn tail and tapestry needle, whipstitch around the entire perimeter of the tail appliqué to secure it to the body, keeping stitches small and even. Weave in the ends.
Weaving in ends: Thread each remaining tail onto the tapestry needle, run it through the inside of the body for about 1 in, then back through a stitch or two and trim close. Running the end through the stuffing hides it completely.
Finishing touches: Use the tapestry needle to tuck any stray fiberfill back inside. Gently brush the velvet with your fingertips to fluff the nap. Shape the body into a soft oval and arrange the tail so it drapes naturally across the back. No further sewing is required — all features are worked directly onto the body.
Blocking: Do not wet-block or steam this piece; moisture can crush the velvet nap. Instead, "dry block" by gently patting and shaping the oval with your hands, then letting it rest for an hour so the stuffing settles evenly.
Care: Spot clean only; do not machine wash or tumble dry.
Pro Tips and Variations
- Change the color story. Swap Deep Sea for a dusty rose or forest green velvet and use a cream contrast for the tail — the same pattern reads completely differently and suits any desk.
- Make it bigger or smaller. Use a 5.0 mm (H-8) hook with the same yarn for a larger, softer raccoon, or a 3.5 mm (E-4) hook for a palm-sized one. Any hook change alters the finished size, so always check your gauge first.
- Try a different bulky yarn. Any CYC 5 plush or chenille yarn works; just avoid anything fuzzy enough to hide your stitches, since you need to see them to count rounds.
- Add a sleepy detail. Work the eye lines in a soft charcoal instead of black, or add a tiny silver stitch at the nose tip for a subtle highlight — small changes keep the Victorian-romantic mood while making each raccoon one of a kind.