Cranberry Glow Nordic Star Stocking Free Pattern – Knitted Christmas Heirloom
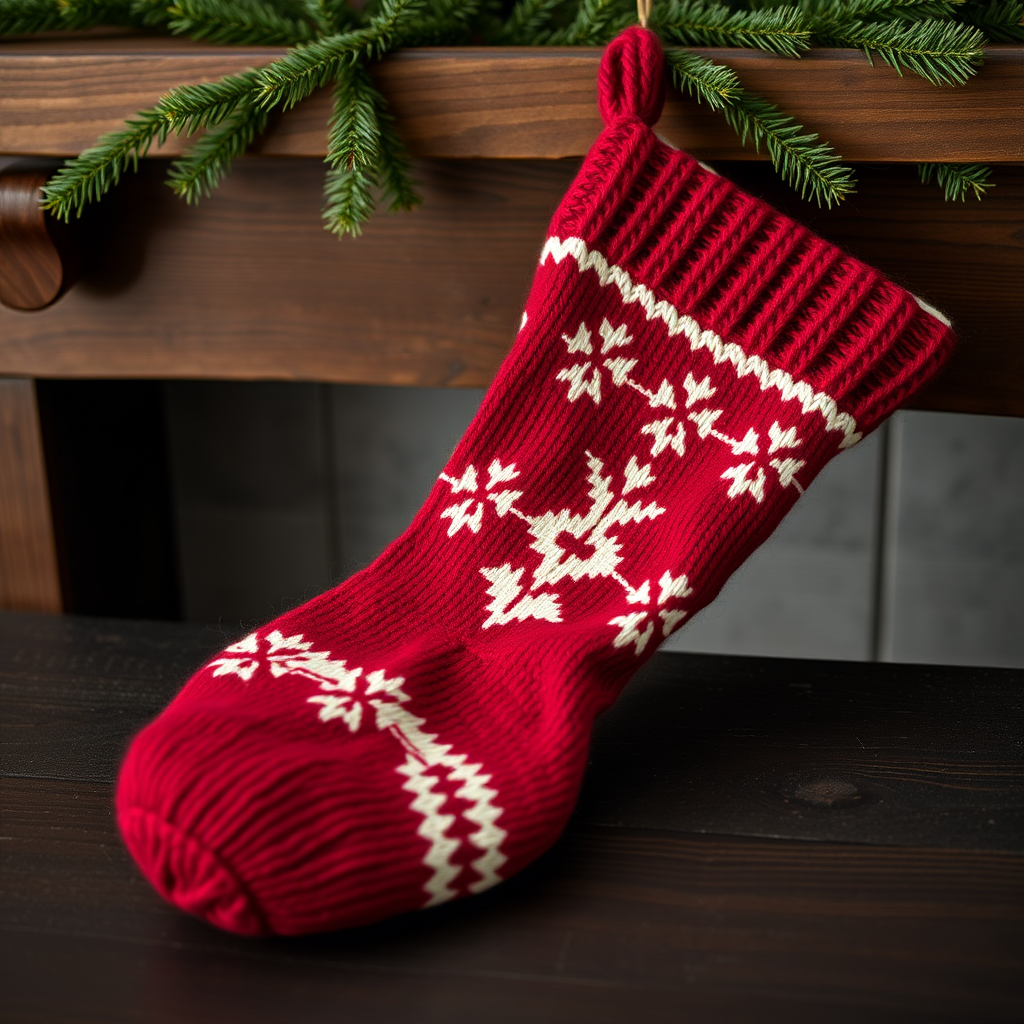
Knitting a Cranberry Glow Nordic Star Stocking: A Heirloom for Your Hearth
There is something deeply special about a hand-knit Christmas stocking. It’s more than just a vessel for treats; it’s a tangible piece of holiday magic, a future heirloom that carries the warmth of your hands and the spirit of the season. Today, I’m thrilled to share a pattern for a truly stunning piece: the Cranberry Glow Nordic Star Stocking. This isn't just any stocking; it's a modern interpretation of a classic Scandinavian design, knit in a rich, deep cranberry red and accented with a creamy white star motif. The dense, worsted-weight fabric creates a thick, cozy stocking that looks and feels like a cherished family treasure. Whether you're an experienced knitter or a brave beginner ready for a rewarding challenge, this pattern will guide you to create a beautiful centerpiece for your mantel. Let's cast on and begin crafting a piece of your family's holiday history.
Gathering Your Materials: The Foundation of a Heirloom
Before we begin, let's ensure you have everything you need. The quality of your materials will shine through in the finished piece, so choose yarns you love. This pattern calls for worsted weight yarn, which is perfect for creating a durable, substantial fabric.
Yarn & Notions
- Main Color (MC) - Cranberry Red: Approximately 250 grams of worsted weight yarn. Look for a rich, deep red to capture that "cranberry glow."
- Contrast Color (CC) - Cream: Approximately 150 grams of worsted weight yarn in a soft, warm cream or off-white.
- US 7 (4.5mm) Circular Needles: 16-inch length for knitting the body of the stocking in the round.
- US 7 (4.5mm) Double-Pointed Needles (DPNs): A set of 4 or 5 for working the heel and toe in the round.
- Stitch Markers (at least 2)
- Tapestry Needle for weaving in ends and finishing.
- Scissors
Pro-Tip: Before you begin, always knit a gauge swatch. This ensures your stocking will be the perfect size. The target gauge is 20 stitches and 26 rows = 4 inches in stockinette stitch.
Step-by-Step Instructions: Knitting Your Nordic Masterpiece
This pattern is knit from the top down, starting with the cuff and finishing at the toe. We'll work through it in clear, manageable sections. Don't be intimidated by the heel—we'll take it one row at a time.
Part 1: The Ribbed Cuff & Star Motif Leg
This section establishes the foundation and the beautiful star pattern that makes this stocking so special.
- Cast On: With your MC (cranberry) yarn and your 16-inch circular needle, cast on 60 stitches. Place a stitch marker to mark the beginning of the round and join in the round, being careful not to twist your stitches.
- Ribbing: Work in a 1x1 rib (K1, P1) for 2 inches. This creates a snug, stretchy cuff that will hold the stocking up.
- Begin Stockinette: Switch to knitting every round (stockinette stitch) in MC. Knit 2 rounds to create a clean base for your colorwork.
- Knit the Star Chart: Now, you will introduce your CC (cream) yarn. The star motif is a 5-stitch pattern that you will repeat 12 times across your 60 stitches. Here is the simple 5-stitch, 4-row pattern to follow:
- Round 1: *K3 in MC, K2 in CC*; repeat from * to * around.
- Round 2: *K1 in MC, K1 in CC, K1 in MC, K2 in CC*; repeat from * to * around.
- Round 3: *K1 in CC, K3 in MC, K1 in CC*; repeat from * to * around.
- Round 4: *K2 in CC, K1 in MC, K2 in CC*; repeat from * to * around.
- Repeat the Motif: Repeat these 4 rounds until the leg measures 6 inches from the top of the ribbing. Remember to carry the yarn not in use loosely across the back of the work to keep the fabric from puckering.
- Finish Leg: Cut the CC yarn. Knit 2 more rounds in MC to complete the leg section.
Part 2: The Heel Flap & Turn
This is the structural heart of the stocking. We will work on only half of the stitches (30) back and forth to create the heel. Place the other 30 stitches on a holder or leave them on the circular needle.
- Set Up: With MC, knit across the first 30 stitches. Turn your work so the wrong side is facing you. You will now work back and forth on these 30 stitches only.
- Heel Flap:
- Row 1 (WS): Slip 1 stitch purlwise, purl across the remaining 29 stitches. Turn.
- Row 2 (RS): *Slip 1 stitch purlwise, knit 1*; repeat from * to * across the row. Turn.
- Turn the Heel: This short-row shaping creates the cup of the heel. Work as follows:
- Row 1 (RS): K18, ssk (slip, slip, knit), k1, turn. (You will have 9 stitches left unworked on the left needle).
- Row 2 (WS): P7, p2tog (purl two together), p1, turn. (You will have 9 stitches left unworked on the left needle).
- Row 3 (RS): Knit until 1 stitch remains before the gap from the previous row, ssk, k1, turn.
- Row 4 (WS): Purl until 1 stitch remains before the gap, p2tog, p1, turn.
Part 3: The Gusset & Foot
Now we will rejoin the work in the round and shape the foot to fit comfortably.
- Pick Up Stitches: With the right side facing you and your circular needle, knit across the 12 heel stitches. Then, pick up and knit 15 stitches along the first side of the heel flap. Place a marker. Knit across the 30 instep stitches (the ones you left on hold). Place a marker. Pick up and knit 15 stitches along the second side of the heel flap. You should now have 72 stitches on your needle.
- Knit One Round: Knit one full round in MC, knitting through the back loop of the picked-up stitches to avoid holes.
- Decrease Round: This is where we shape the gusset.
- Round 1: Knit to 3 stitches before the first marker, k2tog, k1. Slip marker. Knit across instep stitches. Slip marker. K1, ssk, knit to end of round.
- Round 2: Knit all stitches.
- Knit the Foot: Remove the gusset markers. Continue knitting in the round in stockinette stitch (all knit stitches) in MC until the foot measures 6 inches from the back of the heel, or about 2 inches less than your desired total foot length.
Part 4: The Toe & Finishing Touches
We're almost there! The toe decreases will create a neat, rounded finish.
- Set Up: Place a marker at the beginning of the round and another one after 30 stitches to divide the top of the foot from the bottom.
- Decrease Rounds:
- Round 1 (Decrease): *K1, ssk, knit to 3 stitches before marker, k2tog, k1*; repeat from * to * for the second half of the round. (You will decrease 4 stitches total).
- Round 2: Knit all stitches.
- Finish: Cut your yarn, leaving a 12-inch tail. Thread the tail onto your tapestry needle and slip it through the remaining 8 stitches. Pull tight to close the hole and secure the yarn.
- Weave in Ends: Use your tapestry needle to carefully weave in all loose ends on the inside of the stocking. Take your time—this is what makes it look professional.
- Blocking: To give your stocking its final, polished shape, gently wet-block it. Soak the stocking in lukewarm water with a little wool wash, gently squeeze out excess water (don't wring!), and lay it flat on a towel. Shape it to the correct dimensions and let it dry completely. This will even out your stitches and make the star pattern pop.
Congratulations! You've just knitted a stunning, heirloom-quality Christmas stocking. Hang it with pride, fill it with goodies, and know that this beautiful piece of handcrafted art will be a part of your family's holiday traditions for generations to come. Happy knitting, and have a wonderfully cozy holiday season!


