Cranberry Glow Luminaria Free Knitting Pattern – Festive Illuminated Centerpiece
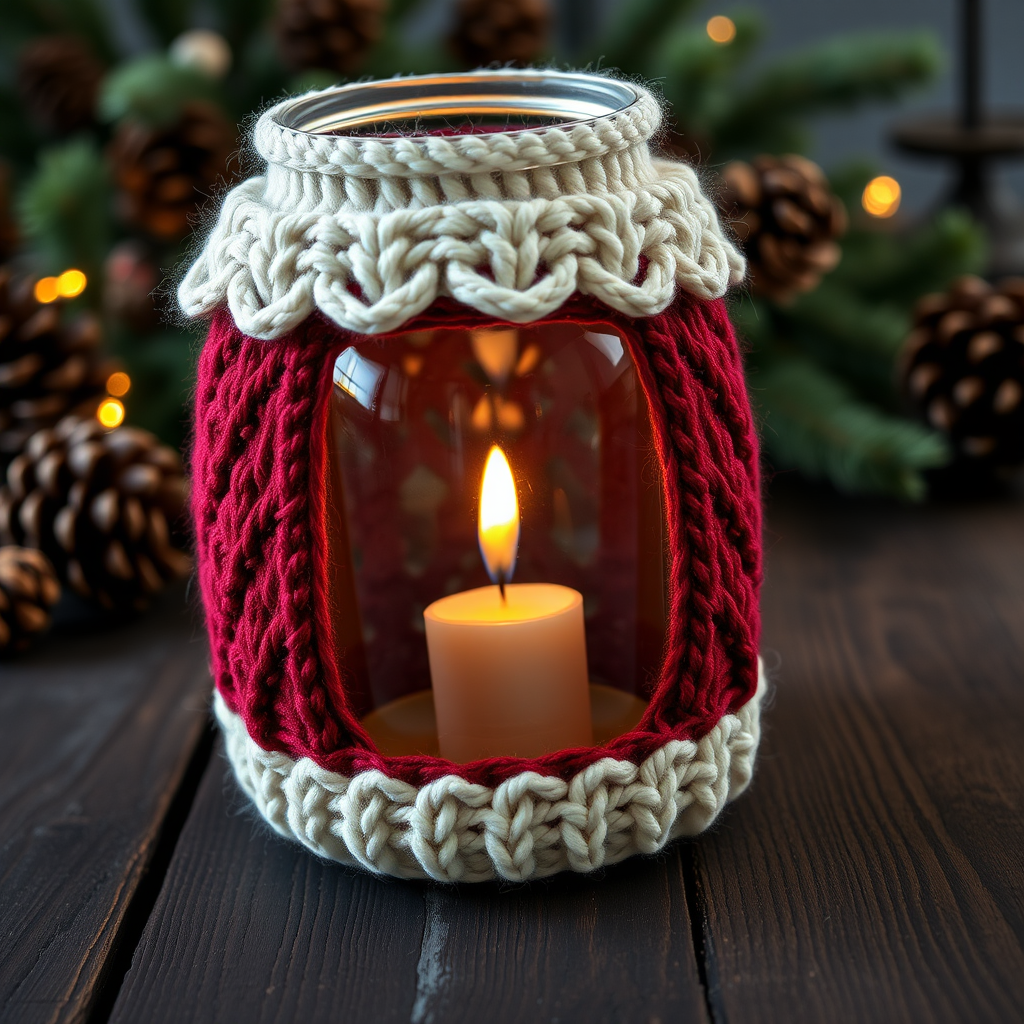
Cranberry Glow Luminaria: A Free Knitting Pattern for a Festive, Illuminated Centerpiece
Wrap your home in the warm, festive glow of handcrafted light with the Cranberry Glow Luminaria—a textured knitted cover that transforms any glass jar into a cozy winter lantern. This quick, satisfying project uses chunky yarn and simple stitches to create a stunning, giftable centerpiece. Whether you're a seasoned knitter or just starting out, this pattern is designed to be beginner-friendly while delivering a polished, professional result.
The deep cranberry red body, accented with a cream top band and scalloped edge, evokes the rich colors of the holiday season. The subtle diamond texture adds visual interest without complicating the process, and the finished piece fits snugly around a standard mason jar. Place a battery-operated tea light inside, and you'll have a warm, inviting glow that casts beautiful patterns through the knitted fabric.
This project is perfect for holiday crafting, gift-giving, or simply adding a handmade touch to your winter decor. Let's dive into the materials and step-by-step instructions to create your own luminous masterpiece.
Materials Needed
Before you begin, gather the following supplies. All items are readily available at craft stores or online.
Yarn
- Lion Brand Wool-Ease Thick & Quick (super bulky, weight 6) in 'Cranberry' (MC – Main Color) – 1 skein
- Lion Brand Wool-Ease Thick & Quick (super bulky, weight 6) in 'Fisherman' (CC – Contrast Color) – 1 skein
Tools
- US 13 (9 mm) knitting needles
- Tapestry needle (for seaming and weaving in ends)
- Scissors
Additional Supplies
- Glass mason jar (approximately 3.5 inches wide and 5 inches tall)
- Battery-operated tea light or LED candle (for safe illumination)
Gauge
8 stitches and 12 rows = 4 inches in stockinette stitch. Exact gauge is not critical for this project, but aim for a snug fit around your jar. If your knitting is very loose, consider using smaller needles; if it's very tight, go up a size.
Step-by-Step Instructions
This pattern creates a rectangular knitted panel that wraps around your jar. The panel is seamed at the back, leaving the top open for the jar. The design features a ribbed bottom edge, a central textured diamond pattern, and a scalloped top edge.
Abbreviations
- CO: cast on
- K: knit
- P: purl
- K2tog: knit two together (decrease)
- SSK: slip, slip, knit (decrease)
- YO: yarn over
- St(s): stitch(es)
- MC: main color (Cranberry)
- CC: contrast color (Fisherman)
Panel (Worked Flat)
With MC, CO 28 sts.
Ribbed Bottom Edge
Row 1 (RS): K2, P2, K2, P2, K2, P2, K2, P2, K2, P2, K2, P2, K2, P2. (This creates a 2x2 ribbing pattern across all 28 stitches.)
Row 2 (WS): P2, K2, P2, K2, P2, K2, P2, K2, P2, K2, P2, K2, P2, K2.
Rows 3-4: Repeat Rows 1-2. You should now have 4 rows of ribbing.
Textured Diamond Pattern (Worked with MC)
Now we'll create the beautiful diamond texture that gives this luminaria its character. The pattern uses a combination of knit and purl stitches to form the diamond shapes against a stockinette background.
Row 5 (RS): K4, P2, K4, P2, K4, P2, K4, P2, K4.
Row 6 (WS): P4, K2, P4, K2, P4, K2, P4, K2, P4.
Row 7 (RS): K3, P2, K2, P2, K2, P2, K2, P2, K2, P2, K3.
Row 8 (WS): P3, K2, P2, K2, P2, K2, P2, K2, P2, K2, P3.
Row 9 (RS): K2, P2, K2, P2, K2, P2, K2, P2, K2, P2, K2, P2, K2.
Row 10 (WS): P2, K2, P2, K2, P2, K2, P2, K2, P2, K2, P2, K2, P2.
Row 11 (RS): K3, P2, K2, P2, K2, P2, K2, P2, K2, P2, K3.
Row 12 (WS): P3, K2, P2, K2, P2, K2, P2, K2, P2, K2, P3.
Row 13 (RS): K4, P2, K4, P2, K4, P2, K4, P2, K4.
Row 14 (WS): P4, K2, P4, K2, P4, K2, P4, K2, P4.
Tip: The diamond pattern is symmetrical. As you work, you'll see the purl stitches forming diamond shapes against the knit background. If you lose your place, count your stitches and look for the pattern to guide you.
Switch to CC for Top Section
Row 15 (RS): With CC, K all sts.
Row 16 (WS): With CC, P all sts.
Scalloped Edge (Worked with CC)
This edge creates a lovely decorative finish with a series of eyelets that add a delicate, lacy touch to the top of your luminaria.
Row 17 (RS): (K2tog, YO) repeat 14 times across the row. You'll end with 28 sts, but with eyelets created by the yarn overs.
Row 18 (WS): P all sts.
Row 19 (RS): Bind off all sts knitwise.
Finishing
Now that your panel is complete, it's time to assemble your luminaria.
Step 1: Weave in all ends. Use your tapestry needle to carefully weave in any loose yarn tails from your cast-on, bind-off, and color changes. Make sure to weave them in securely so they don't unravel.
Step 2: Fold the panel in half. With the right side (RS) facing out, fold the panel so the side edges meet. The ribbed edge should be at the bottom, and the scalloped edge at the top.
Step 3: Sew the side seam. Using your tapestry needle and a length of MC yarn, sew the side seam from the bottom up to about 1 inch from the top edge. Leave the top open so you can slide the jar in and out. Use a whip stitch or mattress stitch for a neat, secure seam.
Step 4: Turn the panel right side out. If you sewed with the right side facing in, turn the panel right side out so the seam is on the inside. If you sewed with the right side facing out, the seam will be visible—this is fine too, as it adds a handmade charm.
Step 5: Slide the knitted cover over your jar. Make sure the jar is clean and dry. Gently stretch the knitted panel over the jar, positioning the ribbed edge at the bottom and the scalloped edge at the top.
Step 6: Add your light source. Place a battery-operated tea light or small LED candle inside the jar. Do not use a real flame—the yarn is highly flammable, and safety should always come first.
Optional Decorative Touches
For an extra special finish, consider adding a simple i-cord tie or a small button at the top back for a decorative closure. You can also embellish the luminaria with a few beads or a ribbon bow for a more personalized look.
Tips for Success
- Check your gauge: While exact gauge isn't critical, a snug fit is important. If your panel is too loose, the jar may slip out; if it's too tight, it will be difficult to slide over the jar.
- Count your stitches: The diamond pattern is easy to follow, but it's helpful to count your stitches at the end of each row to catch any mistakes early.
- Use stitch markers: If you find it helpful, place stitch markers at the beginning and end of each pattern repeat to keep track of your place.
- Block your work: If your panel is slightly uneven, you can block it by gently steaming it (without touching the yarn directly) to even out the stitches.
Creative Variations
Once you've mastered the Cranberry Glow Luminaria, feel free to experiment with different color combinations to match your decor or the season. Try a deep forest green with a white top for a classic Christmas look, or a soft blue with silver for a winter wonderland theme. You can also adjust the size of the panel to fit different jars—just add or subtract stitches in multiples of 4 to maintain the ribbing and diamond patterns.
This pattern is also a wonderful gift idea. Knit a few luminarias in different colors and pair them with a jar and a battery-operated candle for a thoughtful, handmade present that anyone would love.
Final Thoughts
The Cranberry Glow Luminaria is more than just a knitting project—it's a way to bring warmth and light into your home during the darkest months of the year. The combination of chunky yarn, simple stitches, and a beautiful texture makes this a satisfying project for knitters of all skill levels. Whether you're making one for yourself or as a gift, the result is a stunning, functional piece of decor that will be cherished for years to come.
So grab your needles, choose your colors, and let the cozy glow of handmade craftsmanship illuminate your holiday season. Happy knitting!


