Cozy Forest Cub Earflap Hat Free Pattern
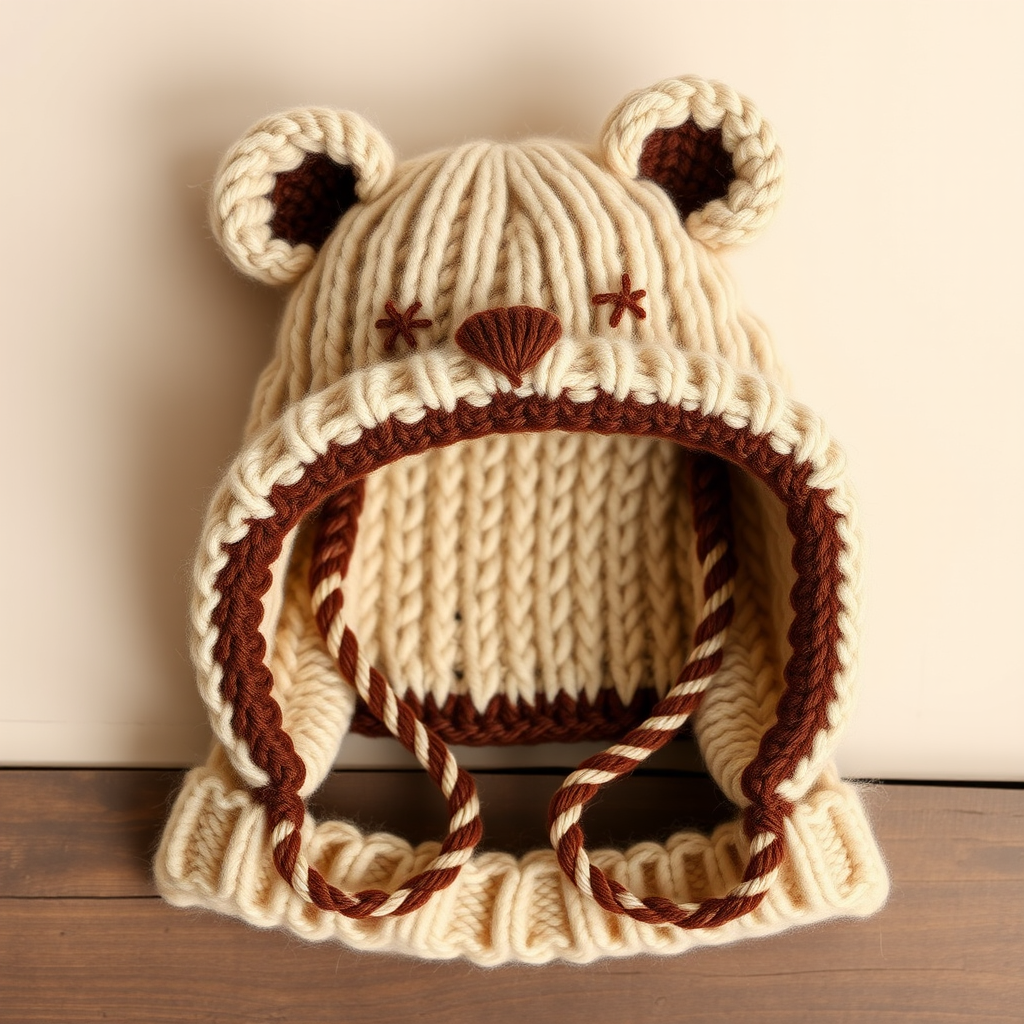
Cozy Forest Cub Earflap Hat: A Free Beginner-Friendly Knitting Pattern
There's something truly special about wrapping a little one in a handmade gift. This Cozy Forest Cub Earflap Hat is the perfect project for knitters looking to create a thoughtful, adorable, and functional accessory. With its textured stockinette stitch, charming bear-inspired details, and snug earflaps, this hat is designed to keep your baby warm during chilly adventures while turning heads with its undeniable cuteness.
This free pattern is worked in the round from the bottom up, making it a fantastic next step for beginners ready to move beyond simple scarves. The simple stitches and clear construction mean you can focus on the joy of knitting while creating a plush, cozy masterpiece. Whether you're knitting for your own little cub or searching for a memorable baby shower gift, this pattern is sure to become a favorite in your collection.
Materials Needed
Before you begin, gather the following supplies to ensure a smooth and enjoyable knitting experience. This pattern calls for worsted weight yarn, which is widely available and perfect for creating a soft yet durable fabric.
Yarn
- Main Color (MC): Worsted weight yarn in warm oatmeal (approximately 100-150 yards depending on size)
- Contrast Color (CC): Worsted weight yarn in rich chocolate brown (small amount for face details and ties)
Needles & Notions
- US Size 7 (4.5 mm) 16-inch circular needle
- US Size 7 (4.5 mm) double-pointed needles (for crown decreases)
- Stitch marker
- Yarn needle for weaving in ends
- Scissors
Gauge
20 stitches and 28 rows = 4 inches in stockinette stitch. Always take time to check your gauge before starting to ensure your hat fits perfectly. If your gauge is off, adjust your needle size accordingly.
Sizes & Finished Measurements
This pattern includes four sizes to accommodate growing babies:
- Newborn: Finished circumference 13 inches
- 0-3 months: Finished circumference 14 inches
- 3-6 months: Finished circumference 15 inches
- 6-12 months: Finished circumference 16 inches
Step-by-Step Instructions
Follow these detailed instructions carefully, and you'll have a beautiful earflap hat in no time. The pattern is worked in the round from the bottom up, with earflaps added afterward.
Hat Body
Step 1: Cast On & Join
With your Main Color (MC) yarn and circular needle, cast on 72 (80, 88, 96) stitches for your chosen size. Place a stitch marker and join in the round, being extremely careful not to twist your stitches. The join is the most critical step—take your time to ensure your cast-on edge lies flat and untwisted.
Step 2: Ribbed Brim
Work in K2, P2 ribbing for 1 inch. This creates a snug, stretchy brim that will keep the hat securely on your baby's head. Continue around, repeating the K2, P2 pattern until the brim measures 1 inch from the cast-on edge.
Step 3: Stockinette Body
Switch to stockinette stitch by knitting every round. Continue knitting in the round until your piece measures 4.5 (5, 5.5, 6) inches from the cast-on edge. This measurement creates the main body of the hat that covers the head.
Decrease for Crown
Now you'll shape the top of the hat by decreasing stitches. Switch to double-pointed needles when your circular needle becomes too long for the remaining stitches.
Round 1: *K6, K2tog* repeat to end of round. (63, 70, 77, 84 stitches remain)
Round 2 and all even rounds: Knit all stitches.
Round 3: *K5, K2tog* repeat to end. (54, 60, 66, 72 stitches)
Round 5: *K4, K2tog* repeat to end. (45, 50, 55, 60 stitches)
Round 7: *K3, K2tog* repeat to end. (36, 40, 44, 48 stitches)
Round 9: *K2, K2tog* repeat to end. (27, 30, 33, 36 stitches)
Round 11: *K1, K2tog* repeat to end. (18, 20, 22, 24 stitches)
Round 13: *K2tog* repeat to end. (9, 10, 11, 12 stitches)
Finishing the Crown: Cut your yarn, leaving a 6-inch tail. Thread the tail through a yarn needle, then pass it through the remaining stitches on your needles. Remove the needles and pull the yarn tight to close the hole at the top of the hat. Secure with a knot and weave in the end.
Earflaps
The earflaps are worked flat, back and forth, after the hat body is complete. They provide extra warmth and are essential for the adorable bear look.
Step 1: Pick Up Stitches
With the right side of the hat facing you, position the hat so the seam (where you joined in the round) is at the back. Using your MC yarn, pick up and knit 20 (22, 24, 26) stitches along the bottom edge of the hat, centered over one ear area. This should be approximately 2 inches from the center front of the hat on each side.
Step 2: Work Earflap Body
Work back and forth in stockinette stitch (knit on right side, purl on wrong side) for 2 inches. This creates the length of the earflap that will cover your baby's ear.
Step 3: Shape the Earflap
Now you'll decrease to create a rounded tip:
Row 1 (Right Side): K1, K2tog, knit to last 3 stitches, K2tog, K1.
Row 2 (Wrong Side): Purl all stitches.
Repeat these 2 rows until 6 stitches remain on your needle. Then work K2tog across the next row (3 stitches remain). Cut your yarn, leaving a long tail (about 12 inches). Thread the tail through the remaining 3 stitches and pull tight to form a rounded tip. Weave in the end securely.
Step 4: Repeat for Second Earflap
Turn your hat so the opposite ear area is facing you. Repeat the entire earflap process to create the second earflap, ensuring it's positioned symmetrically with the first.
Braided Ties
These charming braided ties keep the hat securely in place under your baby's chin.
Step 1: Prepare Strands
Cut 3 strands of MC and 3 strands of CC yarn, each about 20 inches long. You'll have 6 strands total for each tie.
Step 2: Attach to Earflap
Fold all 6 strands in half together. Use a crochet hook or your fingers to pull the folded loop through the tip of one earflap. Pass the loose ends through the loop and pull tight to secure.
Step 3: Braid
Divide the 6 strands into 3 groups of 2 strands each (one MC and one CC per group for a marled look). Braid the strands together for about 6 inches. Tie a secure knot at the end and trim the ends evenly.
Step 4: Repeat
Repeat the entire process for the other earflap.
Bear Ears (Make 2)
These adorable ears are what transform a simple hat into a forest cub masterpiece.
Step 1: Cast On & Knit
With MC yarn, cast on 10 stitches. Work in stockinette stitch (knit on right side, purl on wrong side) for 1 inch, ending with a wrong-side row.
Step 2: Shape the Ear
Next Row (Right Side): K2tog across all stitches (5 stitches remain).
Next Row (Wrong Side): Purl all stitches.
Step 3: Gather
Cut your yarn, leaving a 10-inch tail. Thread the tail through the remaining 5 stitches and pull tight to gather the top of the ear into a circle. This creates a rounded, cup-like shape.
Step 4: Attach Ears
Using the tail, sew the ears onto the top of the hat. Position them about 1 inch apart from each other and about 1 inch down from the crown point. Sew securely, weaving the yarn through the hat fabric. Repeat for the second ear.
Embroidered Face
This final step brings your forest cub to life with a gentle, sweet expression.
Step 1: Embroider the Nose
Using your CC yarn and a yarn needle, embroider a small triangle nose at the center front of the hat, just above the ribbed brim. To create a triangle, make three small straight stitches that form a triangle shape, filling it in for a solid look.
Step 2: Add the Mouth
With CC yarn, add two small horizontal stitches extending downward from the bottom point of the nose to form a small "V" or gentle smile shape.
Step 3: Embroider the Eyes
Using CC yarn, embroider two small circles for eyes. Position them about 1 inch apart and approximately 1 inch above the nose. To create a circle, make several small straight stitches radiating from a center point, or use a simple satin stitch in a circular motion.
Step 4: Weave in All Ends
Carefully weave in all remaining yarn ends using your yarn needle. Make sure all ends are securely hidden within the fabric of the hat so they won't come loose during wear or washing.
Final Thoughts & Care Instructions
Congratulations! You've completed your very own Cozy Forest Cub Earflap Hat. This handmade treasure is not only practical but also a beautiful expression of love for the little one in your life.
Care Instructions: To keep your hat looking its best, hand wash in cool water with a gentle wool wash. Lay flat to dry, reshaping as needed. Avoid wringing or machine drying to maintain the hat's shape and softness.
This pattern is perfect for gifting—pair it with a matching baby blanket or booties for a complete set. The simple construction and charming details make it a rewarding project that you'll want to knit again and again. Happy knitting!



