Azure Bloom Bobble Throw Free Knitting Pattern – Textured Floral Blanket
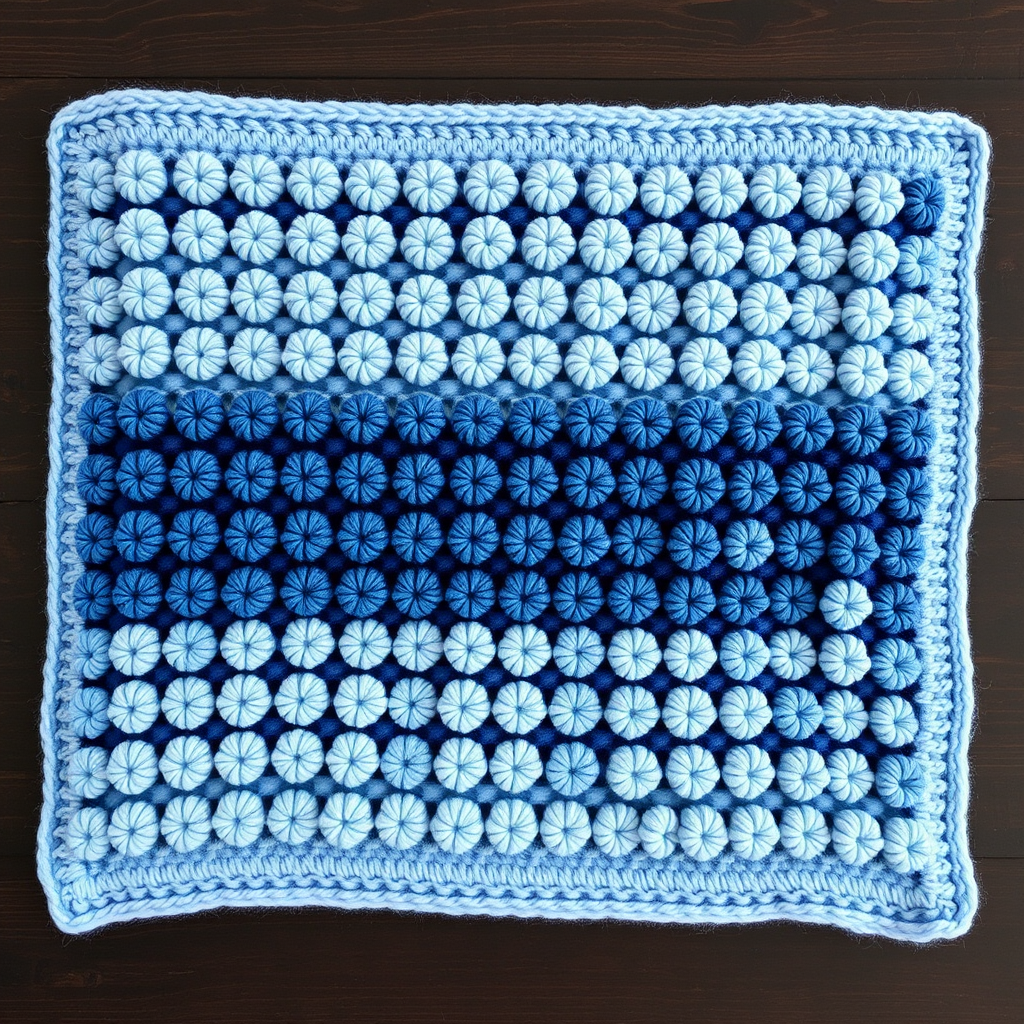
Introducing the Azure Bloom Bobble Throw: A Textured Knitting Adventure
Wrap yourself in the serene beauty of a hand-knitted bobble blanket, where each textured bloom adds depth and warmth to your space. The Azure Bloom Bobble Throw is a stunning, beginner-friendly knitting project that combines classic bobble stitches with a calming blue palette to create a truly unique and cozy creation. This pattern is perfect for those looking to expand their knitting skills beyond basic scarves, offering a rhythmic and rewarding repeat that results in a luxurious, textured throw. With its soothing oceanic hues and plush, dimensional surface, this blanket will become a cherished heirloom in your home.
This free knitting pattern is designed to be accessible, with clear instructions and a simple stitch repeat. You'll master the bobble stitch, a fun technique that adds incredible texture, while creating a beautiful, large rectangular throw perfect for draping over a sofa or snuggling under on a cool evening. Let's dive into the materials and steps to bring this beautiful blanket to life.
Materials Needed for Your Bobble Blanket
Before you begin, gather the following materials. The quality of your yarn will greatly impact the final look and feel of your throw, so choose a soft, durable worsted weight yarn in shades that inspire you.
Yarn & Notions
- Yarn: Worsted weight yarn in 3 shades of blue – approximately 1800 yards total. The pattern uses:
- Color A (Light Blue): For the base, borders, and main sections. (Approx. 800 yards)
- Color B (Medium Blue): For the first bobble stripe sections. (Approx. 500 yards)
- Color C (Navy): For the contrasting bobble stripe sections. (Approx. 500 yards)
- Knitting Needles: US Size 8 (5.0 mm) knitting needles. A circular needle (e.g., 32 inches long) is recommended to hold the large number of stitches comfortably, but straight needles will also work.
- Tapestry Needle: For weaving in the loose ends and finishing.
- Scissors: For cutting yarn.
- Stitch Markers (Optional): Helpful for keeping track of pattern repeats, though not strictly necessary.
Gauge & Size
- Gauge: 18 stitches and 24 rows = 4 inches in stockinette stitch. It's crucial to check your gauge to ensure your blanket turns out the correct size.
- Finished Dimensions: Approximately 50 inches wide and 60 inches long.
Step-by-Step Instructions for the Azure Bloom Bobble Throw
This pattern is worked in one piece from the bottom up. The bobble stitch (MB) is the star of the show, and you'll get plenty of practice with it! Follow these detailed instructions carefully, and you'll be amazed at what you can create.
Pattern Notes & Special Stitches
- Worked Flat: The blanket is knitted back and forth in rows.
- Right Side (RS) vs. Wrong Side (WS): The right side is the front of the blanket where the bobbles will prominently stand out. All bobbles are worked on RS rows.
- Bobble Stitch (MB): This is the key to the texture. Here’s how to make one:
- Knit into the front of the next stitch, but do not slip it off the left needle.
- Knit into the back of the same stitch.
- Knit into the front of the same stitch again. You have now increased 1 stitch into 3 stitches.
- Turn your work so the wrong side is facing you.
- Purl these 3 stitches.
- Turn your work again so the right side is facing you.
- Knit these 3 stitches together (k3tog). You have now decreased back to 1 stitch. This creates a tight, raised bobble.
Getting Started: Cast On & Border
We'll begin with a clean, sturdy garter stitch border to frame your beautiful work.
Cast On: With Color A (light blue), cast on 120 stitches using your preferred method (e.g., long-tail cast on).
Border (Rows 1-8):
- Row 1 (RS): Knit all stitches.
- Row 2 (WS): Purl all stitches.
- Repeat Rows 1 and 2 for a total of 8 rows. You will have 4 garter stitch ridges (each ridge is two rows of knitting).
Creating the Main Body Pattern
Now for the fun part! The main body is a 14-row repeat that creates the beautiful striped and bobbled pattern. Pay close attention to the color changes and bobble placement.
- Row 9 (RS): With Color A, knit all stitches.
- Row 10 (WS): With Color A, purl all stitches.
- Row 11 (RS): Switch to Color B (medium blue). *K5, MB, K5; repeat from * to the end of the row. (This means you'll knit 5, make a bobble, knit 5, and repeat this sequence across all 120 stitches).
- Row 12 (WS): With Color B, purl all stitches.
- Row 13 (RS): With Color B, knit all stitches.
- Row 14 (WS): With Color B, purl all stitches.
- Row 15 (RS): Switch to Color C (navy). *K1, MB, K9; repeat from * to the end of the row, ending with K1 after the last bobble. (This staggers the bobbles for a lovely offset pattern).
- Row 16 (WS): With Color C, purl all stitches.
- Row 17 (RS): With Color C, knit all stitches.
- Row 18 (WS): With Color C, purl all stitches.
- Row 19 (RS): Switch back to Color A. *K5, MB, K5; repeat from * to the end of the row.
- Row 20 (WS): With Color A, purl all stitches.
- Row 21 (RS): With Color A, knit all stitches.
- Row 22 (WS): With Color A, purl all stitches.
Repeat Rows 9-22 until your blanket measures approximately 60 inches from the cast-on edge. It's best to end with a Row 22 (WS) repeat to ensure your final border is symmetrical.
Finishing Touches: Border & Bind Off
Once your blanket reaches the desired length, it's time to add the matching border and cast off.
Border (Last 8 Rows): With Color A, knit 8 rows (4 garter ridges) exactly as you did at the beginning.
Bind Off: Bind off all stitches knitwise on the right side. This creates a flexible, neat edge that matches the garter stitch border.
Weaving in Ends & Blocking
Your blanket is almost complete! The final steps are crucial for a professional finish.
- Weave in Ends: Thread your tapestry needle with a loose yarn end. Weave it in and out of the purl bumps on the wrong side of the work for about 2-3 inches. Trim the excess yarn. Repeat for all loose ends.
- Blocking: This step is highly recommended. Gently wet-block your blanket by soaking it in cool water with a mild wool wash, then gently squeeze out excess water (do not wring). Lay it flat on a clean towel, shape it to the correct dimensions (50" x 60"), and pin the edges if needed. Allow it to dry completely. Blocking will even out your stitches and make the bobbles pop beautifully.
Congratulations! You've created a stunning, textured heirloom piece. The Azure Bloom Bobble Throw is a testament to your skill and patience, and it's sure to be a favorite for years to come.


