Aurora Drape Cardigan Free Pattern
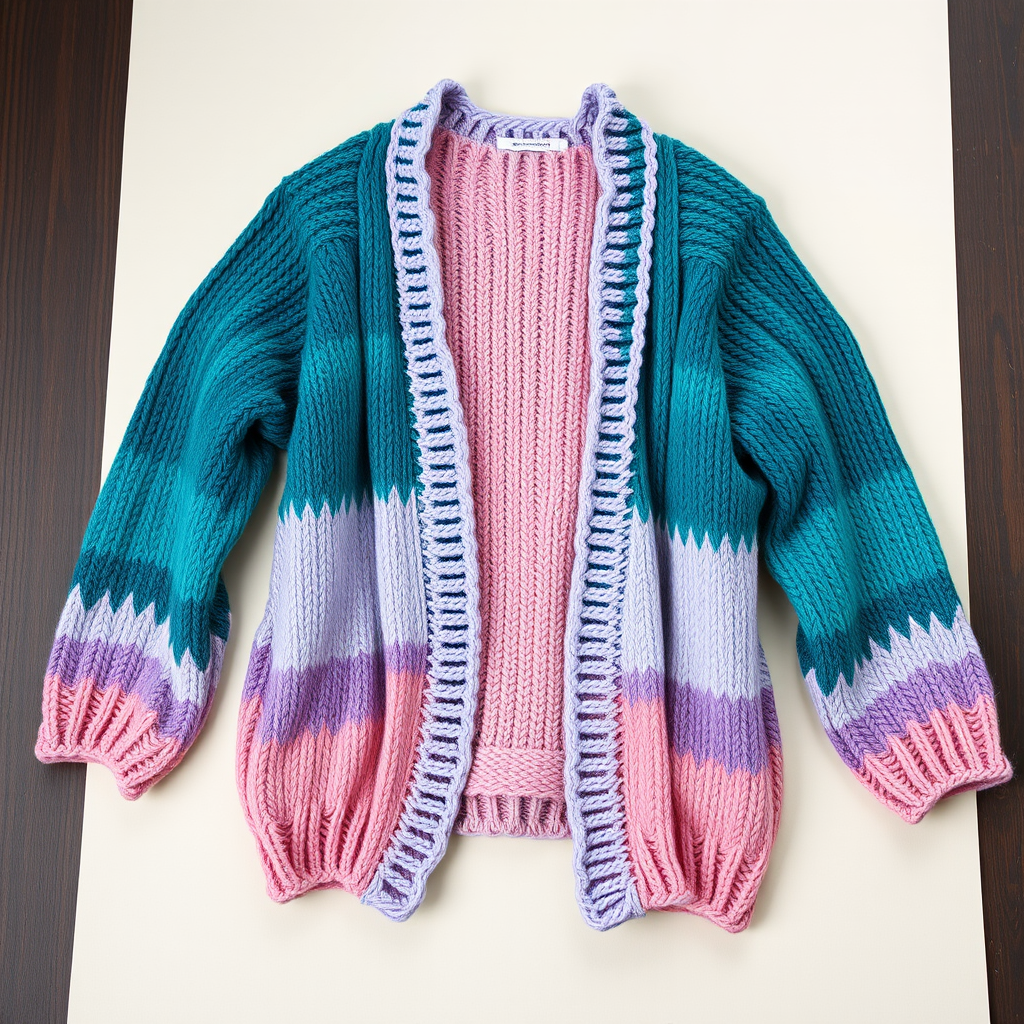
Aurora Drape Cardigan: A Beginner-Friendly Knitting Pattern
Wrap yourself in the ethereal beauty of the northern lights with the Aurora Drape Cardigan. This cozy, open-front design features a simple yet striking stripe pattern that drapes elegantly over any outfit. Knitted in bulky yarn with a relaxed gauge, this cardigan works up quickly and is perfect for beginners looking to tackle their first garment. The seamless top-down construction means minimal finishing, and the three-color gradient—deep teal, soft lavender, and dusty rose—creates a stunning visual effect that mimics the flowing colors of the aurora borealis.
Whether you're curling up with a book or heading out for a crisp autumn walk, this cardigan will become your go-to layering piece. The open-front design means no buttonholes to fuss with, and the drop-shoulder silhouette flatters every body type. Let's dive into this free pattern and create something truly magical.
Materials Needed
Before you begin, gather the following supplies:
Yarn
- Bulky weight yarn (Category 5) in three complementary colors:
- Color A: Deep teal (approximately 300-500 yards depending on size)
- Color B: Soft lavender (approximately 300-500 yards depending on size)
- Color C: Dusty rose (approximately 300-500 yards depending on size)
- Total yardage needed: 800 (900, 1000, 1100, 1200, 1300, 1400) yards for sizes XS (S, M, L, XL, 2XL, 3XL)
Needles
- US 10.5 (6.5 mm) circular knitting needles, 32-inch length (for the body)
- US 10.5 (6.5 mm) double-pointed needles for sleeves (or a long circular needle for the magic loop method)
Other Supplies
- Stitch markers (at least 4)
- Stitch holders or waste yarn (for sleeve stitches)
- Tapestry needle for weaving in ends
- Scissors
- Measuring tape
Gauge
14 stitches and 20 rows = 4 inches in stockinette stitch (blocked). Always knit a gauge swatch before starting to ensure your finished cardigan matches the intended measurements.
Sizes and Measurements
This pattern is written for sizes XS through 3XL. Here are the finished bust measurements:
| Size | Finished Bust |
|---|---|
| XS | 36 inches |
| S | 40 inches |
| M | 44 inches |
| L | 48 inches |
| XL | 52 inches |
| 2XL | 56 inches |
| 3XL | 60 inches |
The cardigan is designed with a relaxed, oversized fit. If you prefer a closer fit, choose a size with 2-4 inches of positive ease. For a more oversized look, go up one size from your usual.
Abbreviations
- CO: cast on
- BO: bind off
- K: knit
- P: purl
- St(s): stitch(es)
- RS: right side
- WS: wrong side
- K2tog: knit two together (right-leaning decrease)
- SSK: slip, slip, knit (left-leaning decrease)
- M1L: make one left (increase)
- M1R: make one right (increase)
- PM: place marker
- SM: slip marker
Pattern Notes
- The cardigan is worked in one piece from the top down, starting with the back yoke, then dividing for sleeves and body.
- Color changes are made in stripes: 2 rows of Color A, 2 rows of Color B, 2 rows of Color C, repeating throughout the entire garment.
- The drape effect comes from the relaxed gauge and the open front (no buttonholes).
- When changing colors, do not cut the yarn—simply carry it up the side of the work. This creates a clean edge and reduces ends to weave in.
- Always end with a complete stripe sequence (2 rows of each color) before moving to the next section.
Step-by-Step Instructions
Back Yoke
Step 1: With Color A, CO 70 (78, 86, 94, 102, 110, 118) sts.
Step 2: Work in stockinette stitch (K on RS, P on WS) for 2 rows.
Step 3: Switch to Color B, work 2 rows in stockinette.
Step 4: Switch to Color C, work 2 rows in stockinette.
Step 5: Continue in the stripe pattern (2 rows each color, repeating A-B-C). On the next RS row, begin increases:
Row 1 (RS): K3, *K1, M1L, K to 3 sts before marker, M1R, K1, PM, K3* – place markers after every 3rd st to divide sections. (Increase 4 sts per row)
Step 6: Repeat this increase row every 4th row (i.e., every other stripe repeat) until you have 110 (122, 134, 146, 158, 170, 182) sts total.
Step 7: Work even in stripe pattern until piece measures 8 (8.5, 9, 9.5, 10, 10.5, 11) inches from CO edge, ending with a WS row.
Pro Tip: Place a locking stitch marker on the RS of your work so you can easily identify which side is which, especially when working in the round later.
Divide for Sleeves
Step 1: On the next RS row, work across the first 25 (28, 31, 34, 37, 40, 43) sts for the left front.
Step 2: Place the next 30 (33, 36, 39, 42, 45, 48) sts on a stitch holder or waste yarn for the left sleeve.
Step 3: CO 6 (6, 8, 8, 10, 10, 12) sts underarm using the backward loop method or cable cast-on.
Step 4: Work across the next 30 (33, 36, 39, 42, 45, 48) sts for the back.
Step 5: Place the next 30 (33, 36, 39, 42, 45, 48) sts on a stitch holder or waste yarn for the right sleeve.
Step 6: CO 6 (6, 8, 8, 10, 10, 12) sts underarm.
Step 7: Work across the last 25 (28, 31, 34, 37, 40, 43) sts for the right front.
Total body sts: 92 (102, 114, 124, 136, 146, 158) sts.
Body
Step 1: Continue in the stripe pattern (2 rows each color) in stockinette stitch until the body measures 12 (12.5, 13, 13.5, 14, 14.5, 15) inches from the underarm, ending with a WS row.
Step 2: On the next RS row, BO all sts loosely. Use a larger needle or a stretchy bind-off method (such as the Jenny's Surprisingly Stretchy Bind-Off) to ensure the edge doesn't pull.
Pro Tip: To achieve a beautifully drapey edge, bind off with a needle one size larger than your working needle.
Sleeves
Step 1: Transfer the sleeve sts from the holder to double-pointed needles (or a long circular needle for magic loop).
Step 2: Starting at the center of the underarm, pick up and knit 6 (6, 8, 8, 10, 10, 12) sts from the underarm CO, plus 2 sts at each corner to avoid holes. Your total should be 40 (44, 48, 52, 56, 60, 64) sts.
Step 3: PM at the center underarm to mark the beginning of the round.
Step 4: Work in stockinette in the round, continuing the stripe pattern (2 rounds each color).
Step 5: Decrease 2 sts every 6th round as follows: K2tog, K to 2 sts before marker, SSK. This creates a gentle taper toward the wrist.
Step 6: Continue decreasing until you have 30 (32, 34, 36, 38, 40, 42) sts.
Step 7: Work even until the sleeve measures 16 (16.5, 17, 17.5, 18, 18.5, 19) inches from the underarm, or your desired length.
Step 8: BO all sts loosely.
Pro Tip: Try on the cardigan before binding off the sleeves to ensure the length is perfect for your arms. Remember that blocking will slightly lengthen the fabric.
Finishing
Step 1: Weave in all ends using a tapestry needle. Be sure to weave in ends on the wrong side of the work, following the path of the yarn to keep them invisible.
Step 2: Block the cardigan to the specified measurements. For bulky yarn, wet blocking works beautifully—soak the garment in lukewarm water with a gentle wool wash, gently squeeze out excess water (never wring), and lay flat to dry, shaping to the correct dimensions.
Step 3 (Optional): Add a crochet edging for a clean finish. With Color A, single crochet around the entire front opening and bottom edge. This gives the cardigan a more polished look and helps the edges lay flat.
Customization Ideas
While the Aurora Drape Cardigan is stunning as written, feel free to make it your own:
- Color Variations: Swap the color palette to match your wardrobe. Try jewel tones for a richer look, or pastels for a softer aesthetic.
- Length Adjustments: Make the body longer for a tunic-style cardigan, or shorter for a cropped look.
- Sleeve Options: Skip the decreases for a straight, relaxed sleeve, or add more decreases for a fitted wrist.
- Add Pockets: Knit simple patch pockets and sew them on after blocking for extra functionality.
Care Instructions
To keep your Aurora Drape Cardigan looking beautiful for years to come:
- Hand wash in cold water with a gentle wool-specific detergent.
- Never wring or twist the fabric—gently press water out.
- Lay flat to dry on a towel, reshaping as needed.
- Store folded, not hung, to prevent stretching.
Final Thoughts
The Aurora Drape Cardigan is more than just a knitting project—it's a wearable piece of art that brings the magic of the northern lights into your everyday life. The simple stockinette stitch and rhythmic stripe pattern make it a meditative knit, perfect for cozy evenings with your favorite show or podcast playing in the background.
As you work through the color changes, you'll watch your cardigan transform from a simple rectangle of stitches into a flowing, drapey garment that's both stylish and functional. The top-down construction means you can try it on as you go, ensuring a perfect fit every time.
Whether you're knitting this for yourself or as a gift for someone special, the Aurora Drape Cardigan is sure to become a treasured piece. The combination of chunky yarn, soothing repetition, and stunning color transitions makes this pattern a joy to knit and an even greater joy to wear.
Happy knitting, and may your stitches always be even and your coffee always be warm!



