Aurora Bloom Wall Hanging Free Pattern – Knitted Textured Tapestry with Cascading Petals
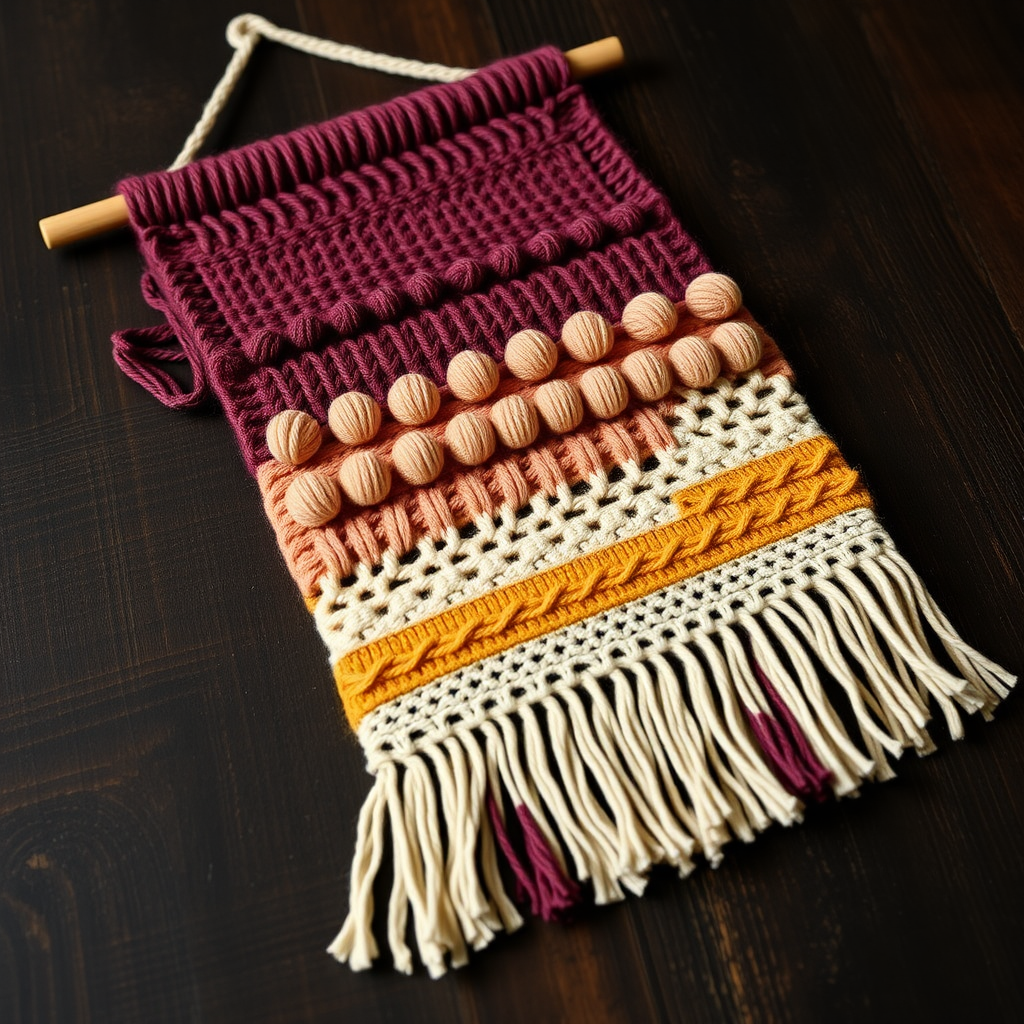
Aurora Bloom Wall Hanging: A Beginner-Friendly Knitted Tapestry
Bring the ethereal beauty of a twilight garden indoors with this stunning knitted wall hanging. Featuring dimensional petals, delicate eyelets, and a gradient of dusk-inspired hues, the Aurora Bloom adds cozy, handcrafted charm to any room. This pattern is designed for beginners and intermediate knitters alike, using simple stitches and clear instructions to create a statement piece of fiber art. The textured surface—a mix of bobbles, lace, and seed stitch—creates an organic, dimensional feel that mimics blooming petals against a twilight sky.
Best of all, this project is knitted flat in one piece, from the top down, so there’s no seaming or complicated shaping. Just follow the color changes and texture patterns, and you’ll have a beautiful boho tapestry to hang on your wall.
Materials Needed
Before you begin, gather the following supplies. All yarn is worsted weight, and the total yardage is approximately 200g.
- Yarn: Worsted weight yarn in 5 colors:
- Color A: Deep Plum (approx. 50g)
- Color B: Dusty Rose (approx. 40g)
- Color C: Soft Peach (approx. 40g)
- Color D: Warm Gold (approx. 40g)
- Color E: Cream (approx. 30g)
- Needles: US 8 (5mm) knitting needles
- Notions: Tapestry needle for weaving in ends, scissors
- Hardware: Wooden dowel or branch (12–16 inches long), plus a small piece of yarn or twine for the hanging loop
Gauge: 18 stitches and 24 rows = 4 inches in stockinette stitch. (Gauge is not critical for this project, but matching it will help you achieve the same finished size.)
Step-by-Step Instructions
This pattern is worked flat in one piece, from the top down. The piece is 40 stitches wide, with a 5-stitch garter stitch border on each side. The center 30 stitches form the textured panel.
Cast On & Top Border
Cast On: With Color A (deep plum), cast on 40 stitches.
Rows 1–6 (Garter Stitch Border): Knit all stitches. This creates a solid, sturdy top edge that will fold over the dowel.
Section 1: Dusty Rose with Bobbles (Rows 7–16)
Row 7: Switch to Color B (dusty rose). Knit 5 stitches (border), purl 30 stitches, knit 5 stitches (border).
Row 8: Knit all 40 stitches. (This creates a stockinette panel between the garter borders.)
Rows 9–16: Repeat Rows 7 and 8, but on the odd-numbered rows (9, 11, 13, 15), work bobbles in the stockinette section as follows:
Row 9 (and 11, 13, 15): Knit 5 border, *purl 3, make bobble (k1, p1, k1, p1, k1 into the same stitch—5 stitches total—then pass the 4 extra stitches over the first stitch), purl 3*, repeat from * to * across until 5 stitches remain, knit 5 border.
Even rows (10, 12, 14, 16): Knit all stitches.
Tip: The bobble creates a dimensional petal effect. Don’t pull the yarn too tight when making the bobble, or it will pucker.
Section 2: Soft Peach with Eyelet Lace (Rows 17–26)
Row 17: Switch to Color C (soft peach). Knit 5 border, purl 30, knit 5 border.
Row 18: Knit all stitches.
Rows 19–26: Repeat Rows 17 and 18, but on the odd-numbered rows (19, 21, 23, 25), work a delicate eyelet pattern:
Row 19 (and 21, 23, 25): Knit 5 border, *purl 2, k2tog, yarn over, purl 2*, repeat from * to * until 5 stitches remain, knit 5 border.
Even rows (20, 22, 24, 26): Knit all stitches.
Note: The yarn over creates a small hole, and the k2tog (knit two together) decreases the stitch count back to normal, keeping the width consistent.
Section 3: Warm Gold with Diagonal Lines (Rows 27–36)
Row 27: Switch to Color D (warm gold). Knit 5 border, purl 30, knit 5 border.
Row 28: Knit all stitches.
Rows 29–36: Repeat Rows 27 and 28, but on the odd-numbered rows (29, 31, 33, 35), work diagonal lines:
Row 29: Knit 5 border, *purl 4, k2tog, yarn over, purl 4*, repeat from * to * until 5 stitches remain, knit 5 border.
Row 31: Knit 5 border, *purl 3, k2tog, yarn over, purl 5*, repeat from * to * until 5 stitches remain, knit 5 border. (Shift the eyelet by one stitch to the left.)
Row 33: Knit 5 border, *purl 2, k2tog, yarn over, purl 6*, repeat from * to * until 5 stitches remain, knit 5 border. (Shift again.)
Row 35: Knit 5 border, *purl 1, k2tog, yarn over, purl 7*, repeat from * to * until 5 stitches remain, knit 5 border. (Shift again.)
Even rows (30, 32, 34, 36): Knit all stitches.
Tip: This shifting creates a diagonal cascade effect, mimicking falling petals. Keep your yarn overs loose to maintain an even tension.
Section 4: Cream Seed Stitch (Rows 37–46)
Row 37: Switch to Color E (cream). Knit 5 border, purl 30, knit 5 border.
Row 38: Knit all stitches.
Rows 39–46: Repeat Rows 37 and 38, but on the odd-numbered rows (39, 41, 43, 45), work a seed stitch panel:
Row 39 (and 41, 43, 45): Knit 5 border, *k1, p1* repeat across the next 30 stitches, knit 5 border.
Even rows (40, 42, 44, 46): Knit all stitches.
Note: Seed stitch creates a bumpy, organic texture that contrasts beautifully with the smoother sections above.
Bottom Border & Bind Off
Row 47: Switch back to Color A (deep plum). Knit all 40 stitches.
Rows 48–52: Knit all stitches (garter stitch border).
Bind Off: Bind off all stitches loosely. (If you bind off too tightly, the bottom edge will curl. Use a larger needle or a loose tension.)
Finishing & Assembly
Weave in Ends: Use a tapestry needle to weave in all loose ends on the wrong side of the piece.
Block the Piece: Gently wet-block the tapestry. Lay it flat on a towel, pin it to the desired dimensions, and let it dry completely. This evens out the texture and helps the piece hang straight.
Mount on Dowel: Fold the top garter stitch edge over the wooden dowel. Using a tapestry needle and matching yarn, sew the folded edge down securely, creating a casing for the dowel.
Add Hanging Loop: Cut a 12-inch piece of yarn or twine. Tie each end to the dowel, about 1 inch from each end, to create a hanging loop. Adjust the length as needed.
Add Fringe: Cut strands of yarn in colors B, C, D, and E, each about 8 inches long. Fold each strand in half, pull the loop through the bottom edge of the tapestry, and pull the ends through the loop to secure. Alternate colors every few strands (e.g., B, B, C, C, D, D, E, E) to create a gradient fringe. Trim the fringe evenly.
Final Thoughts
Your Aurora Bloom Wall Hanging is now ready to display! The combination of bobbles, eyelets, diagonal lines, and seed stitch creates a rich, tactile surface that changes with the light. Hang it in your living room, bedroom, or entryway to add a cozy, handcrafted touch.
This pattern is perfect for using up scrap yarn in coordinating colors, and you can easily customize the length by repeating any of the texture sections. Enjoy your handmade fiber art!


