Aurora Bloom Blanket Free Knitting Pattern – Textured Garden Mosaic Throw
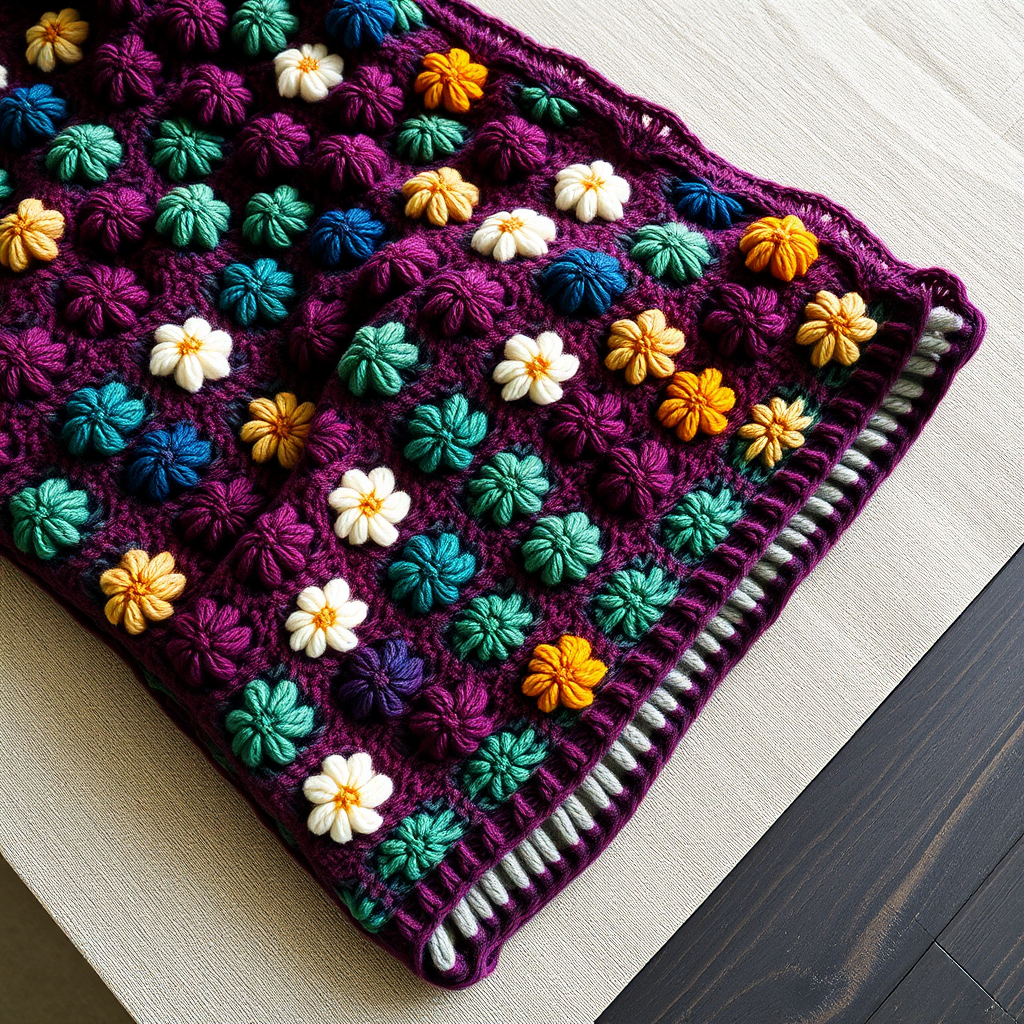
Aurora Bloom Blanket Free Knitting Pattern – Textured Garden Mosaic Throw
Wrap yourself in a garden of textured blooms with this stunning mosaic-inspired throw, featuring a rich palette of jewel tones and cozy bobble petals. This pattern creates a luxurious, heirloom-quality blanket that brings warmth and artistry to any space. The Aurora Bloom Blanket is a true statement piece—a handcrafted treasure that combines the geometric elegance of slipped-stitch mosaics with the playful, dimensional charm of bobble flowers. Whether draped over a sofa, folded at the foot of a bed, or gifted to someone special, this throw promises to be a beloved keepsake for years to come.
This pattern is designed with the adventurous beginner in mind. While it introduces a few special techniques—slipped stitches and bobbles—the repetitive nature of the pattern makes it meditative and manageable. The result is a generously sized 50 x 60 inch throw that feels both modern and timeless, reminiscent of a stained glass garden captured in yarn.
Materials Needed
Before you begin your knitting journey, gather the following materials. Having everything ready will make the process smooth and enjoyable.
Yarn
- Worsted weight yarn in 5 colors (approximately 1800 yards total):
- Color A (Deep Plum): Approximately 600 yards (for borders, base rows, and main sections)
- Color B (Emerald): Approximately 300 yards
- Color C (Sapphire): Approximately 300 yards
- Color D (Amber): Approximately 300 yards
- Color E (Cream): Approximately 300 yards
Tip: Choose a soft, durable worsted weight yarn such as a merino wool blend or a high-quality acrylic for easy care. The jewel tones will pop beautifully against the deep plum base.
Needles & Notions
- US 8 (5.0 mm) circular knitting needle, 32 inches or longer (to accommodate the large number of stitches)
- Stitch markers (optional, but helpful for keeping track of pattern repeats)
- Yarn needle for weaving in ends
- Scissors
- Measuring tape
- Blocking mats and pins (for finishing)
Gauge
18 stitches and 24 rows = 4 inches in stockinette stitch (knit one row, purl one row). Always knit a gauge swatch before starting to ensure your blanket matches the finished size. If your gauge is off, adjust your needle size accordingly.
Step-by-Step Instructions
This pattern is worked in one piece from the bottom up. The design is a multiple of 12 + 2 stitches, which creates the repeating mosaic diamond pattern. Follow the instructions carefully, and you'll be amazed at the beautiful texture that emerges.
Finished Size
Approximately 50 x 60 inches. You can adjust the size by adding or removing pattern repeats (each repeat is 12 stitches wide and 32 rows tall).
Special Stitches
Before you begin, familiarize yourself with these two special techniques. They are easier than they look and add incredible dimension to your work.
- Bobble (MB - Make Bobble): This creates a raised, flower-like bump.
- Knit into the front and back of the next stitch 3 times (you will have 6 stitches on your right needle).
- Turn your work and purl these 6 stitches.
- Turn again and knit these 6 stitches.
- Now, using your left needle, pass stitches 2 through 6 over the first stitch, one at a time. You will be left with 1 stitch on your right needle. This is your completed bobble.
- Slip Stitch (sl): This creates the geometric mosaic pattern.
- Slip the stitch purlwise (as if to purl) with the yarn held in the back of the work. This is often abbreviated as "sl1 wyib" (with yarn in back).
Pattern Notes
- The blanket is worked in one piece from the bottom up.
- Each row is worked with two colors. When you change colors, carry the unused color loosely along the side of the work. This will be hidden in the border.
- The pattern repeat is a multiple of 12 + 2 stitches.
- Always read the pattern carefully, especially the slipped stitch rows, to ensure you are carrying the yarn correctly.
Cast On & Border
With Color A (Deep Plum), cast on 152 stitches.
Border (worked in garter stitch):
- Rows 1-6: Knit all stitches with Color A. This creates a neat, sturdy edge.
Main Pattern
Now we begin the beautiful mosaic pattern. Follow each row carefully, changing colors as indicated.
Rows 1-2 (Base Rows):
- Row 1 (RS): With Color A, knit all stitches.
- Row 2 (WS): With Color A, purl all stitches.
Rows 3-4 (Emerald Mosaic):
- Row 3 (RS): With Color B (Emerald), k1, *k1, sl1, k1, sl1, k1, sl1, k1, sl1, k1, sl1, k1, sl1; repeat from * to last stitch, k1.
- Row 4 (WS): With Color B, k1, *p1, sl1, p1, sl1, p1, sl1, p1, sl1, p1, sl1, p1, sl1; repeat from * to last stitch, k1.
Rows 5-6 (Base Rows):
- Row 5 (RS): With Color A, knit all stitches.
- Row 6 (WS): With Color A, purl all stitches.
Rows 7-8 (Sapphire Mosaic):
- Row 7 (RS): With Color C (Sapphire), k1, *k2, sl1, k2, sl1, k2, sl1, k2, sl1, k2, sl1; repeat from * to last stitch, k1.
- Row 8 (WS): With Color C, k1, *p2, sl1, p2, sl1, p2, sl1, p2, sl1, p2, sl1; repeat from * to last stitch, k1.
Rows 9-10 (Base Rows):
- Row 9 (RS): With Color A, knit all stitches.
- Row 10 (WS): With Color A, purl all stitches.
Rows 11-12 (Amber Mosaic):
- Row 11 (RS): With Color D (Amber), k1, *k3, sl1, k3, sl1, k3, sl1, k3, sl1; repeat from * to last stitch, k1.
- Row 12 (WS): With Color D, k1, *p3, sl1, p3, sl1, p3, sl1, p3, sl1; repeat from * to last stitch, k1.
Rows 13-14 (Base Rows):
- Row 13 (RS): With Color A, knit all stitches.
- Row 14 (WS): With Color A, purl all stitches.
Rows 15-16 (Cream Mosaic):
- Row 15 (RS): With Color E (Cream), k1, *k4, sl1, k4, sl1, k4, sl1; repeat from * to last stitch, k1.
- Row 16 (WS): With Color E, k1, *p4, sl1, p4, sl1, p4, sl1; repeat from * to last stitch, k1.
Rows 17-18 (Base Rows):
- Row 17 (RS): With Color A, knit all stitches.
- Row 18 (WS): With Color A, purl all stitches.
Bobble Section
Now we add the delightful bobble "petals" that give this blanket its garden-like charm. Take your time with the bobbles—they are worth the effort!
Rows 19-20 (Emerald Bobbles):
- Row 19 (RS): With Color B (Emerald), k1, *k5, MB, k6; repeat from * to last stitch, k1.
- Row 20 (WS): With Color B, purl all stitches.
Rows 21-22 (Base Rows):
- Row 21 (RS): With Color A, knit all stitches.
- Row 22 (WS): With Color A, purl all stitches.
Rows 23-24 (Sapphire Bobbles):
- Row 23 (RS): With Color C (Sapphire), k1, *k2, MB, k9; repeat from * to last stitch, k1.
- Row 24 (WS): With Color C, purl all stitches.
Rows 25-26 (Base Rows):
- Row 25 (RS): With Color A, knit all stitches.
- Row 26 (WS): With Color A, purl all stitches.
Rows 27-28 (Amber Bobbles):
- Row 27 (RS): With Color D (Amber), k1, *k8, MB, k3; repeat from * to last stitch, k1.
- Row 28 (WS): With Color D, purl all stitches.
Rows 29-30 (Base Rows):
- Row 29 (RS): With Color A, knit all stitches.
- Row 30 (WS): With Color A, purl all stitches.
Rows 31-32 (Cream Bobbles):
- Row 31 (RS): With Color E (Cream), k1, *k11, MB; repeat from * to last stitch, k1.
- Row 32 (WS): With Color E, purl all stitches.
Rows 33-34 (Base Rows):
- Row 33 (RS): With Color A, knit all stitches.
- Row 34 (WS): With Color A, purl all stitches.
Repeating the Pattern
Repeat Rows 3-34 until the piece measures approximately 58 inches from the cast-on edge, ending with Row 34 (a wrong-side row). This will give you a finished length of about 60 inches after blocking. The pattern is forgiving, so don't worry if you're slightly off—just aim for a length you love.
Final Border & Bind Off
- Border: With Color A (Deep Plum), knit 6 rows of garter stitch. This mirrors the bottom border and frames your beautiful work.
- Bind Off: Bind off loosely knitwise. A loose bind-off is crucial to prevent the edge from pulling in. You can use a larger needle for the bind-off if needed.
Finishing Touches
Your Aurora Bloom Blanket is almost complete! The finishing steps are what transform your knitting into a polished, heirloom piece.
- Weave in all ends: Using your yarn needle, carefully weave in all loose ends on the wrong side of the blanket. Make sure to weave them in securely so they don't come loose with use.
- Blocking: This step is essential for a professional finish. Soak the blanket in cool water with a gentle wool wash for about 30 minutes. Gently squeeze out excess water (do not wring). Lay the blanket flat on blocking mats and pin it to the finished measurements of 50 x 60 inches. Pay special attention to the edges and corners. Allow it to dry completely, which may take 24-48 hours.
- Final Fluff: Once dry, unpin the blanket. Gently fluff the bobbles with your fingers to give them extra dimension.
Congratulations! You've created a stunning, textured garden mosaic throw that will be cherished for generations. The combination of jewel tones, geometric slipped stitches, and plush bobbles makes this a truly special piece. Whether you keep it for yourself or gift it to a loved one, the Aurora Bloom Blanket is a testament to the beauty of handmade craftsmanship.
Happy knitting! We'd love to see your finished Aurora Bloom Blanket. Share your photos and tag us in your creations—your work is an inspiration to the knitting community.


